For all PowerPoint presentation enthusiasts, timelines are considered to be a blessing as they are one of the most popular design tools. These are used to present processes in a visually interesting manner. If your company has multiple processes, product cycles, or historical data to present, a PowerPoint timeline template is an excellent way to showcase them.
But how to make a timeline in PowerPoint? What different methods can you apply to customize the process? Keep reading to find out.
Why Do You Need to Add a Timeline in Your PowerPoint?
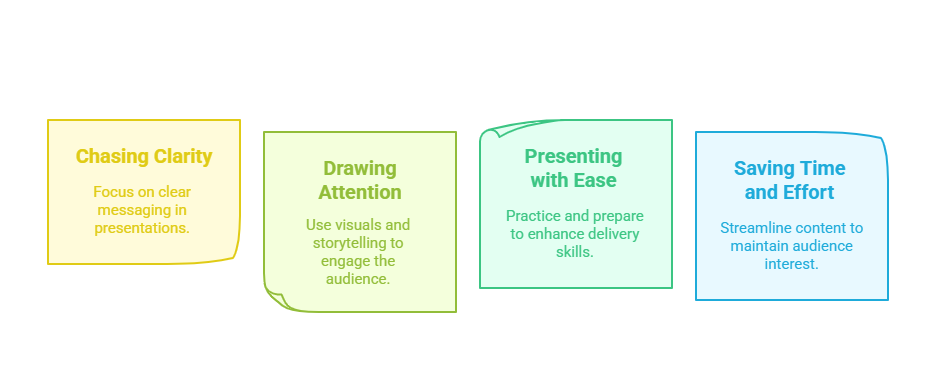
Before you learn how to make a timeline in PowerPoint, it is necessary to understand the importance of adding a timeline to your presentation. Here are the reasons why you need to do so:
1. Chasing Clarity
A timeline in your presentations provides your audience with a clear roadmap of progressing events. With this set of clear data, you can present complex narratives and information effortlessly.
2. Drawing Attention
Presentation slides that are overloaded with images and texts seem less flattering than slides with a timeline. This is because a timeline in PowerPoint makes information easy to digest and draws attention to where the audience should look first.
3. Presenting with Ease
A well-structured timeline in PowerPoint enhances your presentation by providing a clear and organized framework. It allows you to seamlessly navigate through your content while maintaining a coherent narrative flow.
4. Saving Time and Effort
Timelines in PowerPoint can prove to be efficient as they save you time and effort when showcasing key events or handling a project. Moreover, it is easy to edit, add, and update them and keep them relevant to current trends.
Types of Timeline Layouts for Presentations
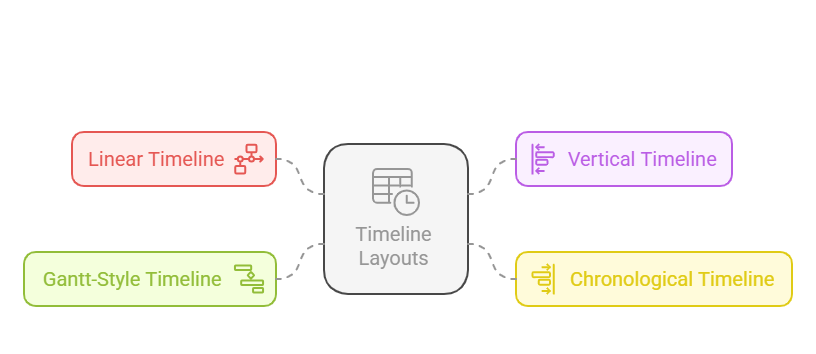
Every timeline template in PowerPoint contains its own design and purpose. Below are the most common types of timeline layouts for presentation:
1. Linear Timeline
Linear timelines are types of timeline layouts that are used in presentations to give an overview of the overall information in the presentation. These timeline templates in PowerPoint display only the start or end dates of events with no other information.
2. Vertical Timeline
A vertical timeline is a structured representation of events arranged in a top-to-bottom format rather than the traditional left-to-right orientation. This format is particularly effective for displaying extensive information within a compact space. Additionally, vertical timelines are ideal for illustrating complex sequences with multiple branching events, ensuring clarity and ease of understanding.
3. Chronological Timeline
As the name suggests, the chronological timeline in PowerPoint presents data, events, or milestones in chronological order of occurrence. This type of timeline template is often used to represent product development timelines, historical events, or personal milestones.
4. Gantt-Style Timeline
A Gantt chart is a specialized timeline designed to monitor project progress by visually mapping out tasks, their start and end dates, and their dependencies. Commonly used in business presentations, it serves as an effective tool for communicating project schedules, deadlines, and task relationships, ensuring clarity and efficient project management.
5. Roadmap Timeline
A roadmap timeline in PowerPoint is a strategic visual tool that outlines the planned development of a product, service, or business over a specific period. It highlights key milestones, objectives, and initiatives, providing a clear trajectory for progress and helping stakeholders align with long-term goals.
How to Make a Timeline in PowerPoint
There are three methods by which you can make a timeline in PowerPoint. Here’s a detailed explanation:
Method 1: Using SlidesAI Template
- Step 1: Download the Template – Visit SlidesAI and explore their collection of templates. Select the Timeline Presentation Template and download it to your computer.
- Step 2: Open Your Existing PowerPoint Presentation – Launch PowerPoint and open the presentation where you want to apply the SlidesAI template.
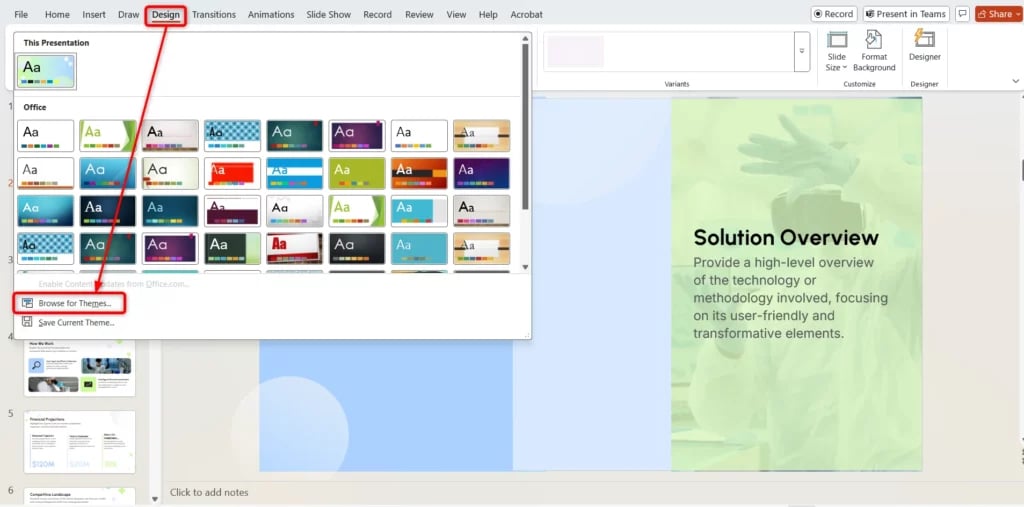
- Step 3: Apply the Template –
- Head over to the Design tab in the PowerPoint ribbon.
- Click on the More button (downward arrow in the Themes section).
- Select Browse for Themes from the dropdown menu.
- Locate the downloaded SlidesAI template file (typically in .pptx or .potx format).
- Click Apply to integrate the template into your presentation.
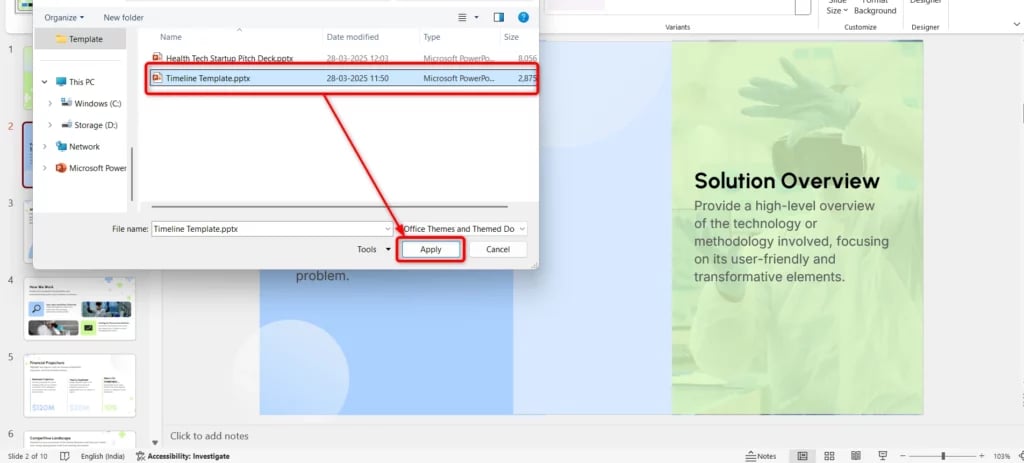
- Step 4: Customize Your Slides – Once the template is applied, review each slide to ensure proper formatting. Adjust text, images, and graphics as needed to align with the template’s design and maintain a professional look.
Create presentation slides with AI in Seconds in Google Slides
15M+Installs
Works with Google Slides

Method 2: Using PowerPoint Timeline Templates
- Step 1: Open PowerPoint – Launch Microsoft PowerPoint on your computer.
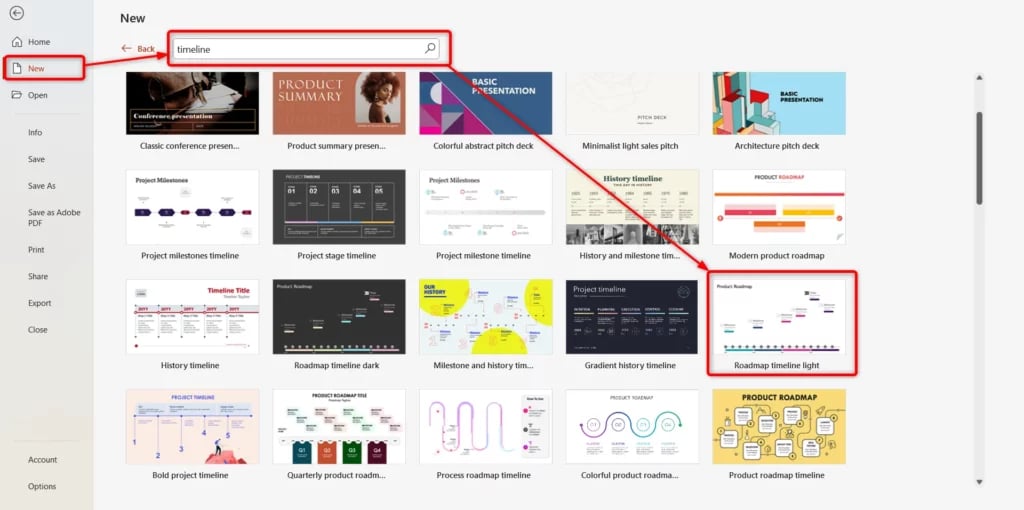
- Step 2: Choose a Template –
- Click on File > New.
- Go to the search bar and look for “Timeline” templates.
- Then, choose the template that fits your needs and click Create to open it.
- Step 3: Customize the Timeline –
- Click on each text box to edit milestones, dates, and descriptions.
- Adjust colors, fonts, and styles using the Design and Format tabs.
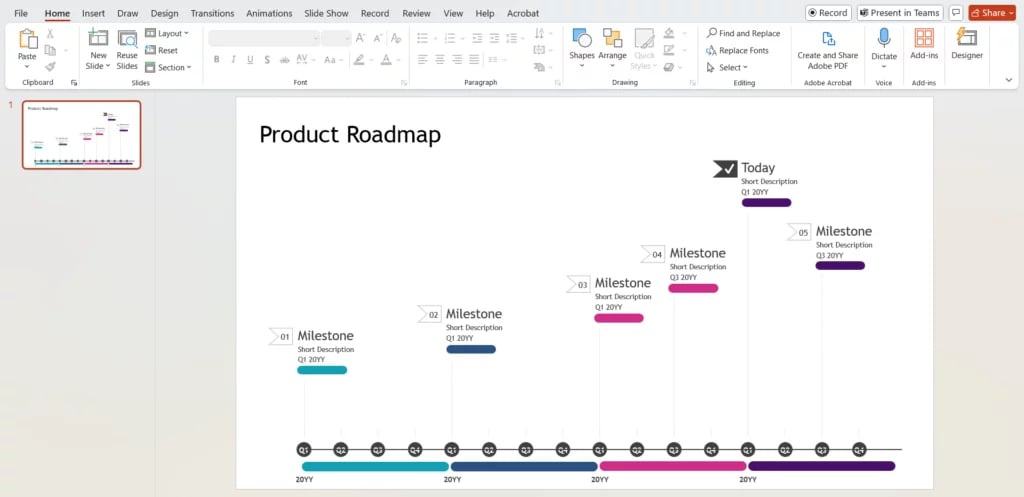
- Step 4: Add or Remove Events –
- To add a new event, copy an existing milestone shape and paste it in the correct position.
- To remove an event, click on the shape and press Delete.
- Step 5: Enhance with Icons and Images –
- Go to Insert > Icons or Insert > Pictures to include relevant visuals.
- Resize and position images/icons to fit your design.
- Step 6: Animate the Timeline (Optional) –
- Select a timeline element and navigate to the Animations tab.
- Apply effects like Appear or Fade for a dynamic presentation.
- Use Slide Show Mode to preview the animations.
- Step 7: Save and Present –
- Click File > Save As to store your presentation.
- Press F5 to enter Slide Show Mode and present your timeline seamlessly.
Method 3: Manually
- Step 1: Set Up Your Presentation –
- Open Microsoft PowerPoint and create a new presentation or open an existing one.
- Add a new slide where you want to insert the timeline.
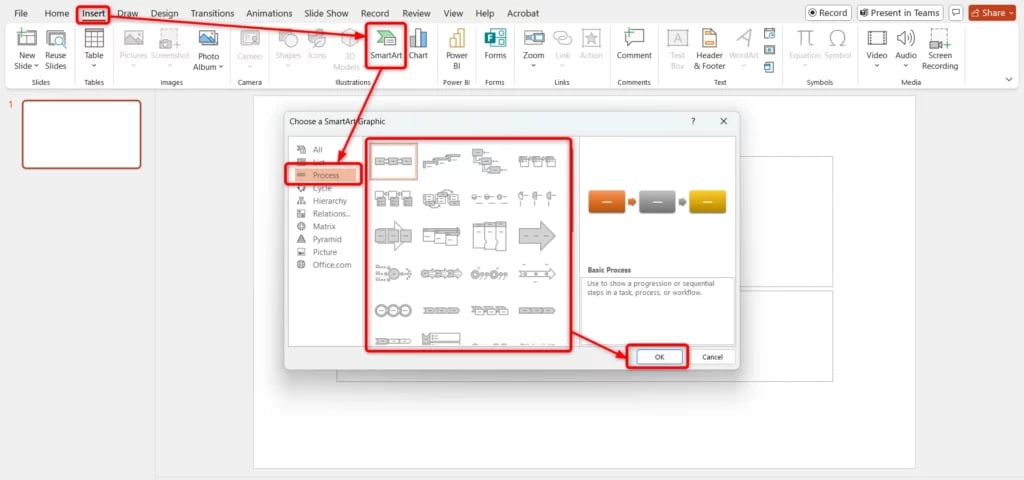
- Step 2: Insert a SmartArt Timeline –
- Go to the Insert tab in the menu bar.
- Click on SmartArt to open the SmartArt Graphics selection.
- Navigate to the Process category and select Simple Timeline.
- Explore different styles and templates to find the best fit for your presentation.
- Step 3: Add Your Data –
- Click inside the milestone’s [Text] box or use the text pane for easy data entry.
- Press Shift + Enter to insert a line break within a milestone.
- To add more milestones, press Enter in the text pane, and PowerPoint will automatically generate a new milestone.
- The font size will adjust dynamically based on the number of events and the text length.
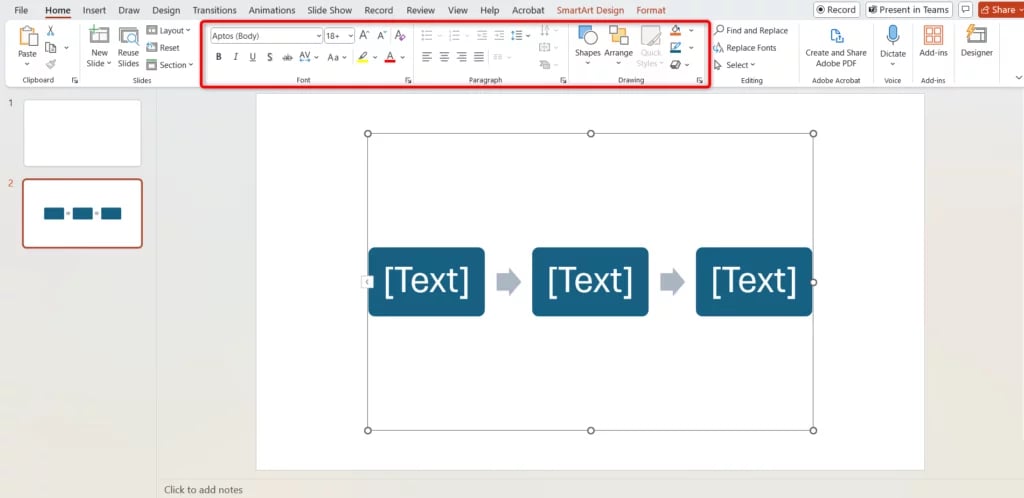
- Step 4: Customize Your Timeline –
- Modify font properties to enhance readability.
- Change milestone colors to differentiate key events.
- Adjust the timeline axis by altering its color and width.
- Reposition milestones for better visual balance.
How Can SlidesAI Help Create a Timeline Presentation in PowerPoint?
SlidesAI, an advanced AI-powered presentation tool, simplifies the process of designing a timeline presentation in PowerPoint. Here’s how it enhances efficiency and professionalism:
- Automated Timeline Generation – Instead of manually crafting slides, enter key events and dates, and SlidesAI will generate a well-structured timeline for you.
- Time-Saving AI-Driven Design – SlidesAI optimally formats and styles each slide, ensuring a polished and visually appealing layout without requiring extensive design efforts.
- Seamless Customization – Easily adjust colors, fonts, and layouts to align with your brand identity or presentation theme.
- AI-powered Content Assistance – If you require concise and professional descriptions for timeline events, SlidesAI can generate well-structured content suggestions.
- Direct PowerPoint Export – Once the timeline is finalized, it can be exported directly to PowerPoint, allowing for additional customization or immediate presentation.
By leveraging SlidesAI, professionals can efficiently create timeline presentations without doing manual labor, allowing them to focus on delivering impactful content rather than navigating complex design elements.
Create presentation slides with AI in Seconds in Google Slides
- No design skills required
- 3 presentations/month free
- Don’t need to learn a new software
Works with Google Slides

Frequently Asked Questions
How to create a timeline in slides?
To create a timeline in Google Slides, navigate to Insert > Diagram, select the Timeline option, and pick a preferred style. Customize it by modifying the text, dates, and colors to suit your needs. For a more visually appealing presentation, consider adding relevant images or icons.
Read more: How to Make a Timeline on Google Slides? 4 Easy Steps
How do I create a timeline in PowerPoint with no templates?
You can manually design a timeline by inserting shapes (such as rectangles, circles, or lines) and adding text boxes to highlight key milestones. Alternatively, using SmartArt provides a faster way to create a structured timeline without relying on pre-made templates.
Can I customize the timeline design in PowerPoint?
Yes, you can modify colors, fonts, shapes, and layouts through the Design and Format tabs. Additionally, you can enhance visual appeal by incorporating animations for a more dynamic presentation.
How do I add more milestones or events to my timeline?
You can copy and paste existing shapes or SmartArt elements and reposition them along the timeline as needed. If you are using SmartArt, simply go to the SmartArt Tools tab and select Add Shape to include additional milestones.
Can I animate my timeline in PowerPoint?
Yes! Navigate to the Animations tab to apply effects such as Appear, Fade, or Motion Paths to individual milestones, creating a more dynamic and visually engaging timeline.


