PowerPoint presentations are a go-to for clear and informative content delivery. But what if you want your presentation to run on repeat, like at a kiosk or digital sign? The good news is, that PowerPoint has a built-in feature to loop your slideshow, ensuring your message stays on display without interruption.
This blog post will guide you through the simple steps to set your presentation on a loop, keeping your audience engaged and informed around the clock.
What is PowerPoint Looping?
Normally, in a PowerPoint presentation, you have to manually move from one slide to the next by pressing keys on the keyboard or clicking buttons on a mouse or presentation remote.
However, when you enable looping in PowerPoint, the presentation progresses automatically from one slide to the next without requiring manual input. This eliminates the need for the presenter to interact with the computer or mouse during the presentation.
With PowerPoint looping, you can also set each slide to display automatically for a specified duration, determined by you. Once the preset time elapses, the next slide seamlessly appears. Additionally, upon reaching the final slide, the slideshow automatically starts over from the beginning.
Why Do You Need to Loop Your Slideshow in PowerPoint?
There are several reasons why you might want to loop your slideshow in PowerPoint:
- Unattended Presentations:Looping is ideal for situations where the presentation runs without a presenter. This could be at a kiosk, trade show booth, or in a waiting room. Looping ensures the information is continuously displayed for viewers to come and go as they please.
- Automated Playback:Looping allows for a hands-off presentation experience. Once started, the presentation progresses automatically, freeing you up to greet attendees or answer questions.
- Self-Paced Learning:Looping can be useful for self-paced learning environments. Viewers can revisit slides or take breaks without needing someone to control the flow.
- Continuous Engagement:Looping keeps the audience engaged with a constant stream of information. This can be beneficial for displaying menus, directions, or other ongoing updates.
Create presentation slides with AI in Seconds in Google Slides
15M+Installs
Works with Google Slides
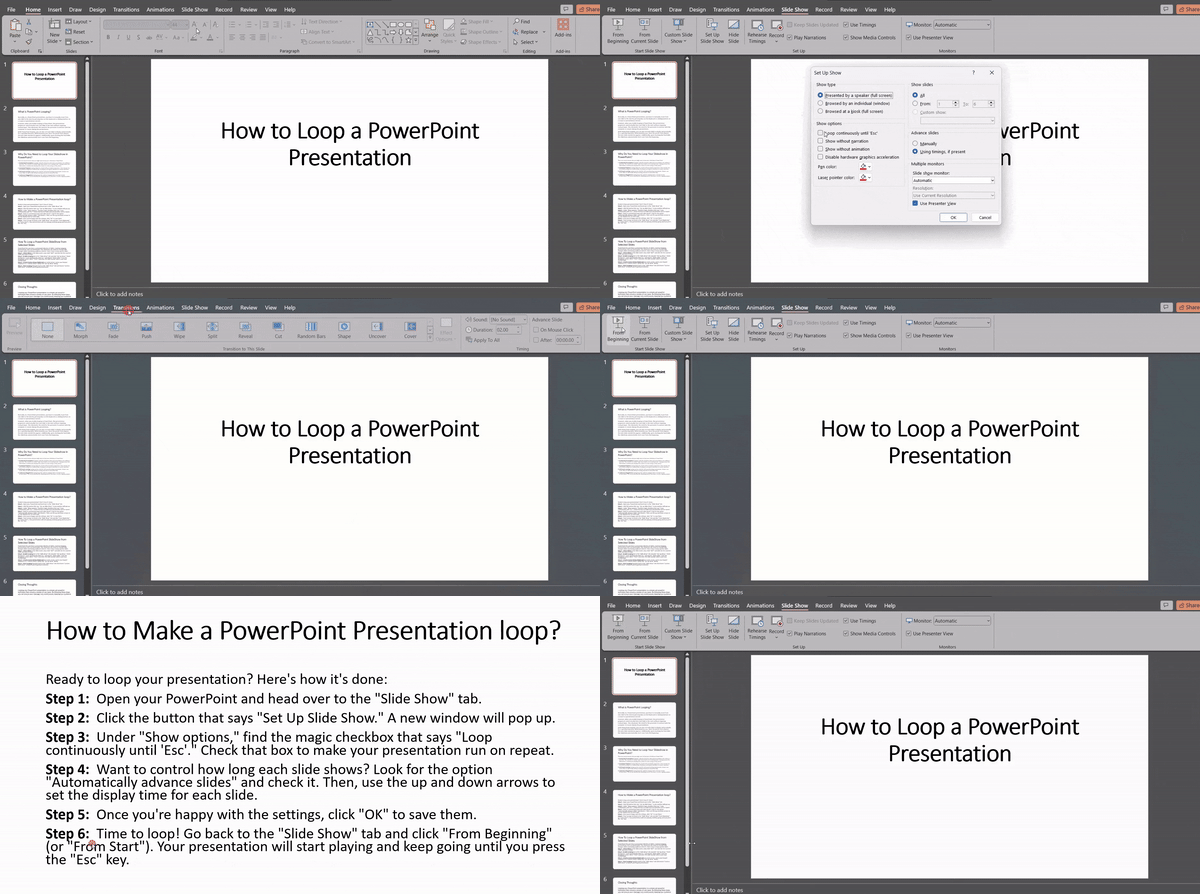
How to Make a PowerPoint Presentation loop?
Ready to loop your presentation? Here’s how it’s done:
Step 1: Open your PowerPoint and head over to the “Slide Show” tab.
Step 2: Click the button that says “Set Up Slide Show.” A new window will pop up.
Step 3: Under “Show options,” find the magic checkbox that says “Loop continuously until ‘Esc’.” Check that box to make your presentation run on repeat.
Step 4: Want to control how long each slide shows? Look for the option “Automatically advance slides” and check it. Then, use the up and down arrows to set the display time for each slide.
Step 5: Once you’re happy with the settings, click “OK” to save them.
Step 6: Time to loop! Go back to the “Slide Show” tab and click “From Beginning” (or “From Start”). Your presentation will start playing and keep going until you press the “Esc” key.
How To Loop a PowerPoint SlideShow from Selected Slides?
PowerPoint lets you loop a customized selection of slides, creating engaging presentations that run unattended. This eliminates the need for manual slide changes while maintaining audience interest. Here’s how to loop specific slides:
Step 1: Select Slides: In the Slide Sorter view, hold “Shift” and click the first and last slides you want to loop.
Step 2: Enable Looping: Go to the “Slide Show” tab and click “Set Up Show.” Check the box for “Loop continuously until ‘Esc'” and choose “Show slides” from the dropdown menu. Select “From” and enter the slide number where your loop should begin.
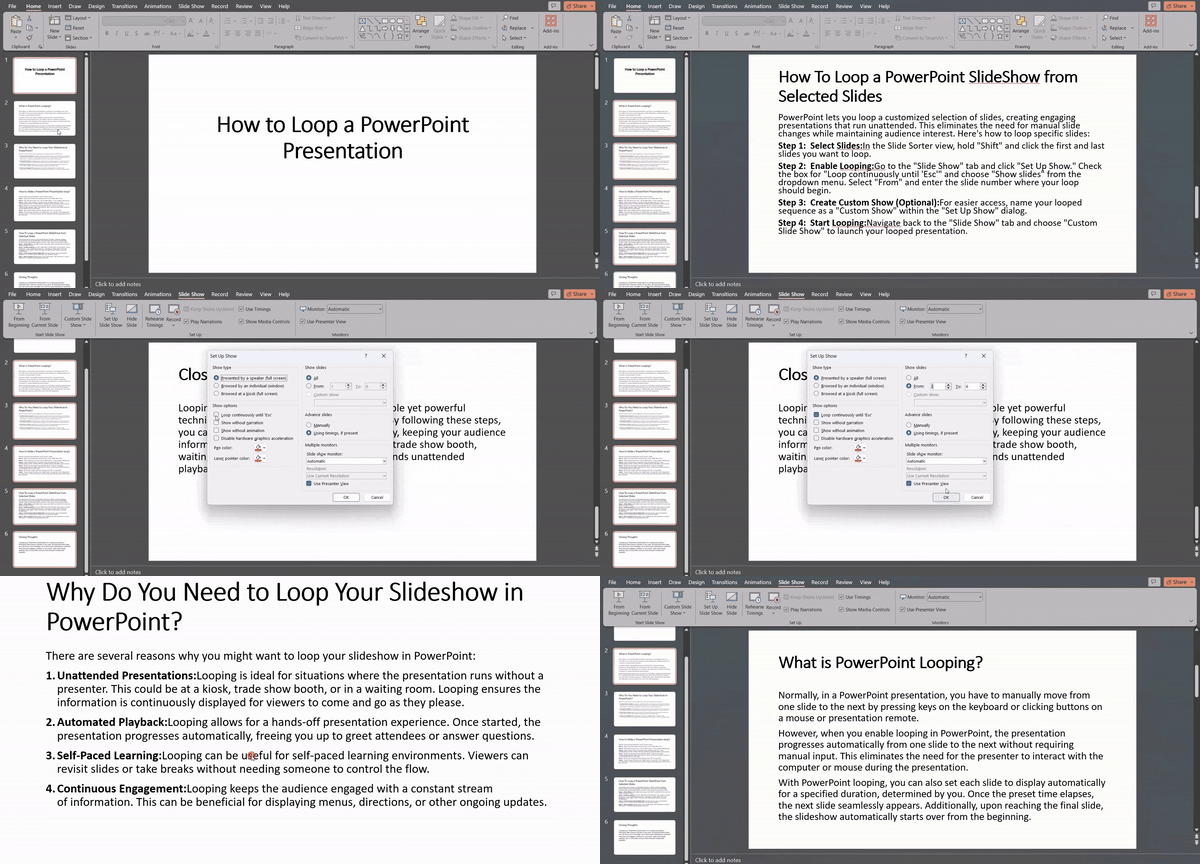
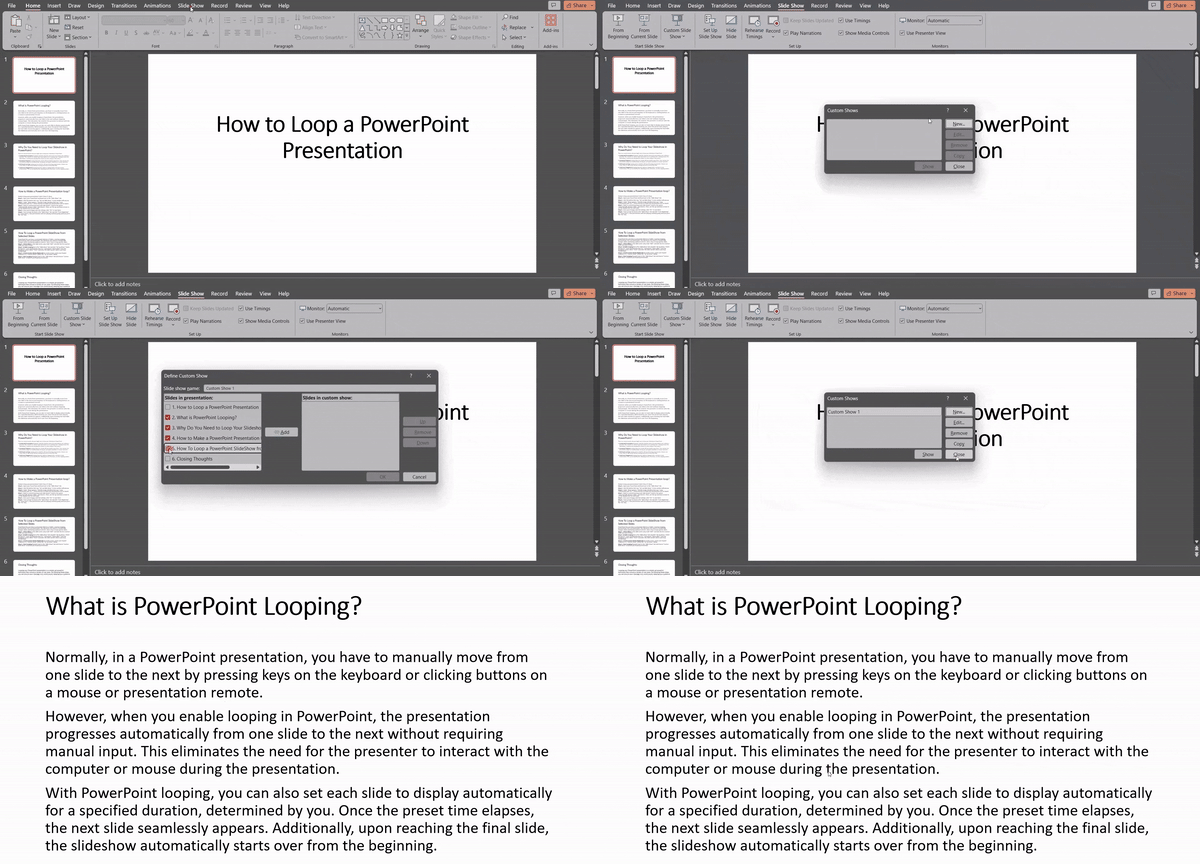
Step 3: Create Custom Show (Optional): For easier access, name your looped sequence as a “Custom Show” within the “Set Up Show” dialog.
Step 4: Start Looping: Navigate back to the “Slide Show” tab and choose “Custom Slide Show” to launch your looped presentation.
Closing Thoughts
Looping your PowerPoint presentation is a simple yet powerful technique that unlocks a variety of use cases. By following these steps, you can ensure your message runs continuously, keeping your audience informed and engaged, whether it’s at a kiosk, trade show booth, waiting room, or any other scenario that demands unattended playback.
Create presentation slides with AI in Seconds in Google Slides
- No design skills required
- 3 presentations/month free
- Don't need to learn a new software
Works with Google Slides

Frequently Asked Questions
My presentation has animations and transitions. Will they loop as well?
Absolutely! When you loop your presentation, animations and transitions will also repeat continuously, regardless of the looping method you choose.
Does looping affect animation timing?
There’s a possibility. Looping might affect how your animations play out, especially if they have specific timings set. To avoid any hiccups, be sure to thoroughly test your looped presentation. This will ensure your animations sync smoothly with the slide transitions.
Can I loop specific slides in my PowerPoint presentation?
Yes! PowerPoint gives you the flexibility to loop a selected group of slides, creating engaging presentations that run unattended.
How do I stop or pause a looped slideshow in PowerPoint?
Need a break? Simply press the “Esc” key on your keyboard to interrupt the looped slideshow at any time.
Can I customize the duration of each slide in a looped PowerPoint presentation?
Yes, you can! PowerPoint allows you to adjust the slide transition settings for each slide. This lets you control how long each slide displays, creating a tailored and dynamic looping experience.
 Install SlidesAI