Google Slides has become a popular tool for teachers and students, offering a simple yet powerful way to create and share presentations. Whether you’re explaining a new concept, showing visuals, or collaborating on a project, Google Slides allows for seamless interaction and creativity.
One of its standout features is the ability to share slides in real-time, making it easier for students to follow along and engage with the material. In an online or hybrid learning setup, sharing your screen can keep students involved and help them stay on track.
In this blog, we’re going to show you how to actively display Google Slides on your students’ screens, ensuring they stay engaged and can follow your presentation. Without waiting further, let’s get started.
How to Show Google Slides on Students Screens?
Sharing your Google Slides with students is a simple way to display content during lessons. Below are some easy methods to ensure every student has access to the presentation on their own screen.
Method 1: Share Google Slides Directly with Students

Steps:
- First, create your Google Slides presentation.
- Look for the “Share” button at the top right of the screen and click on it.
- In the sharing settings, adjust the permissions to control who can view or edit the slides.
- Once done, click on the “Copy Link” button to grab the link to the presentation.
- Finally, send this link to your students so they can access the slides directly on their screens.
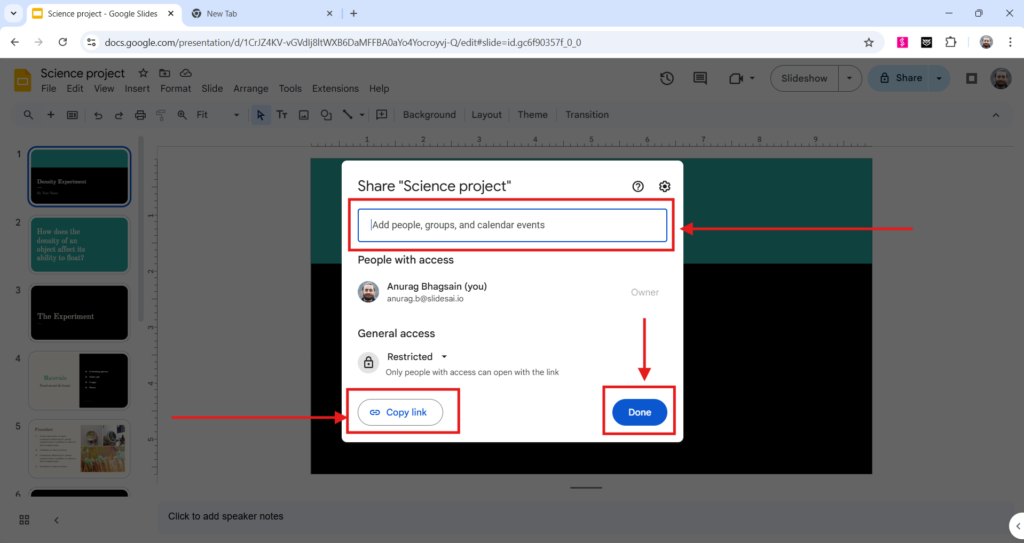
This method is quick and easy, letting students see the slides on their own devices without needing any extra setup. Make sure the link permissions are set the way you want, whether it’s for viewing or editing, depending on the activity.
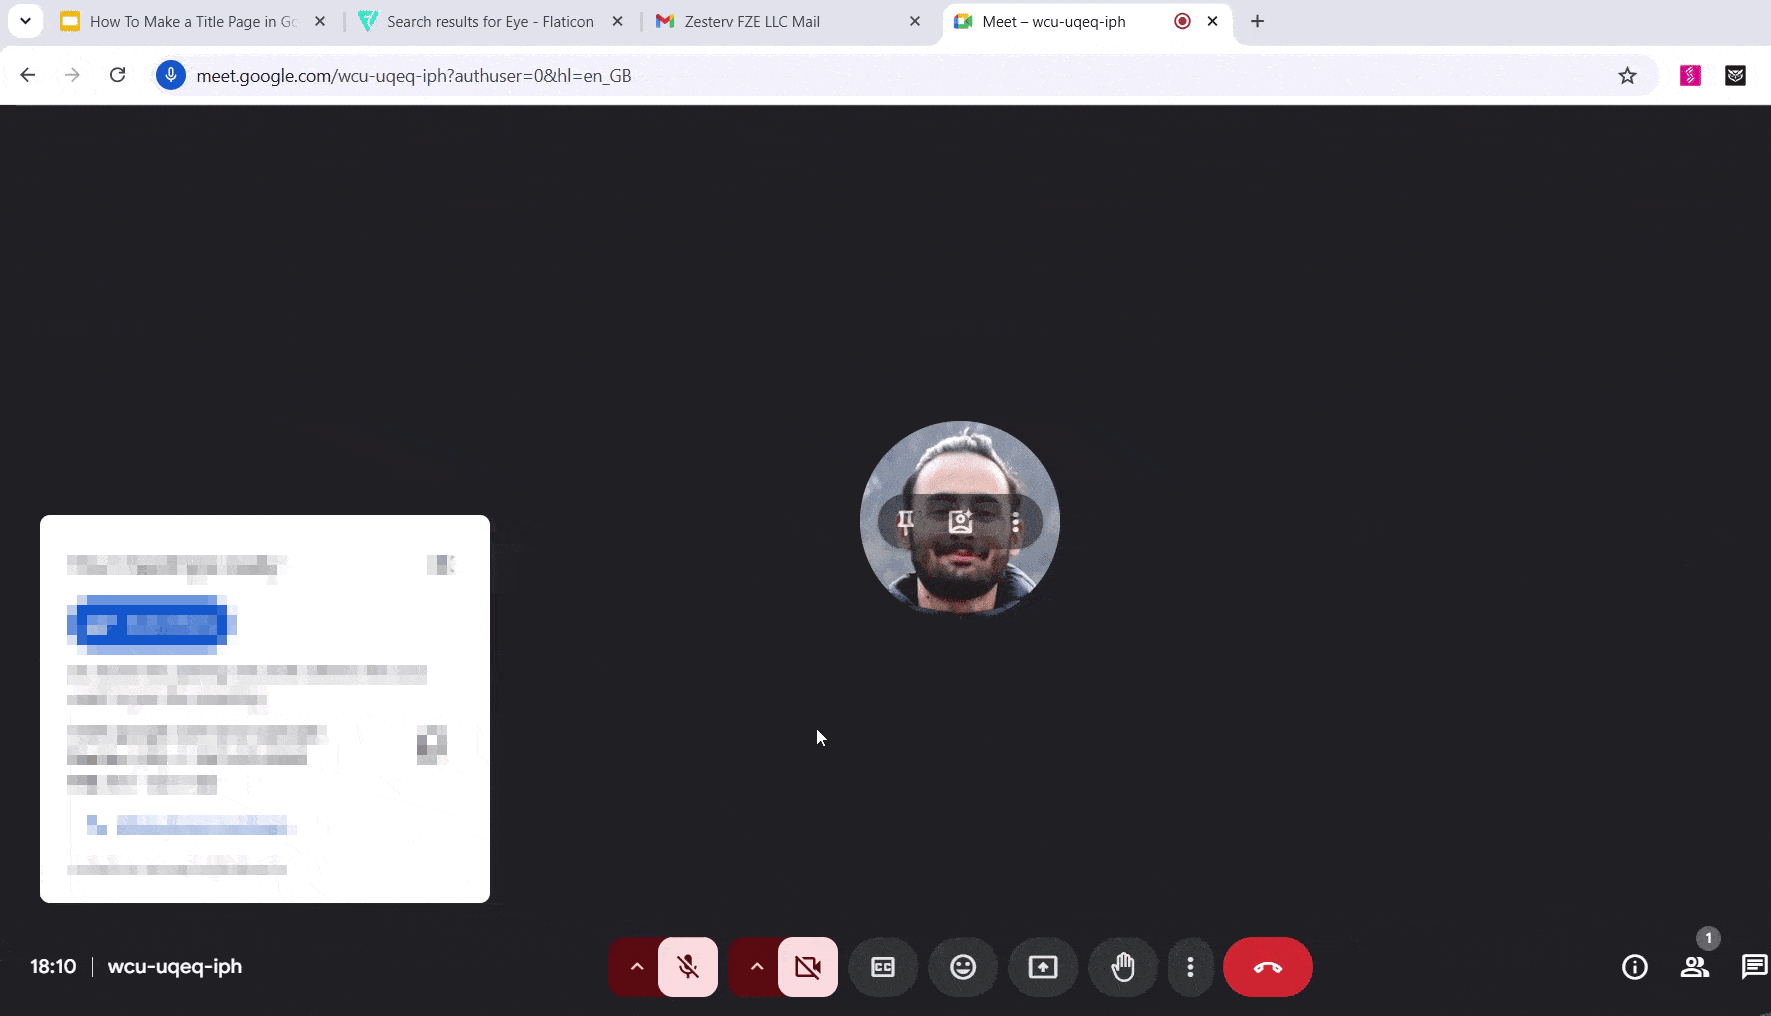
Method 2: Using Video Conferencing Tools to Share Google Slides
Steps:
- Begin by opening your preferred video conferencing tool, like Zoom, Microsoft Teams, or Google Meet.
- Once you’re in the meeting, look for the option to “Share Screen.”
- Choose the window where your Google Slides presentation is open.
- Start presenting! You can control the slides as you talk and move through them.
- If you want, you can also record the presentation so that students can review it later.
This method allows you to present Google Slides in real-time, interact with students, and even record the session for future reference. It’s a great option for live classes or virtual meetings.
Create presentation slides with AI in Seconds in Google Slides
14M+Installs
Works with Google Slides
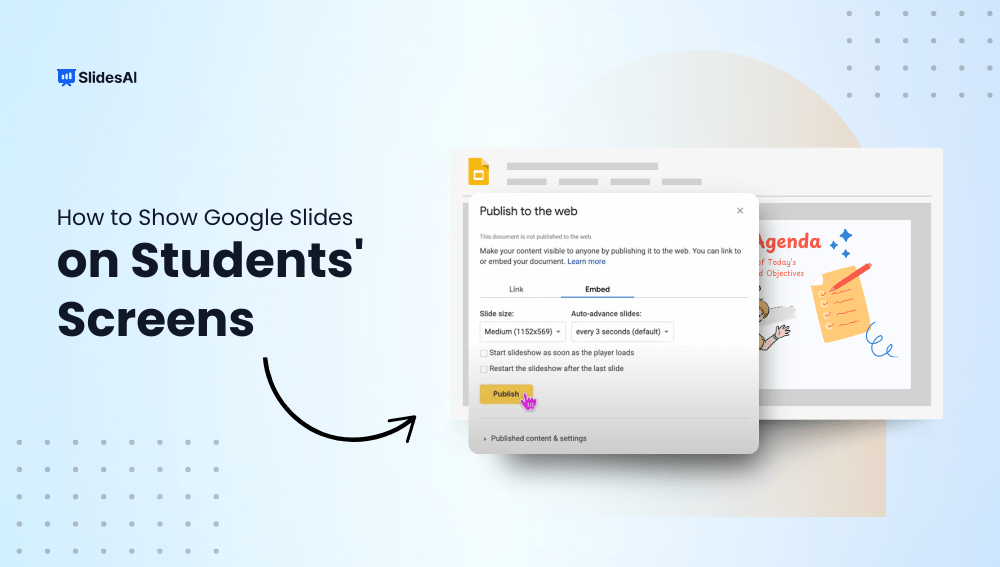
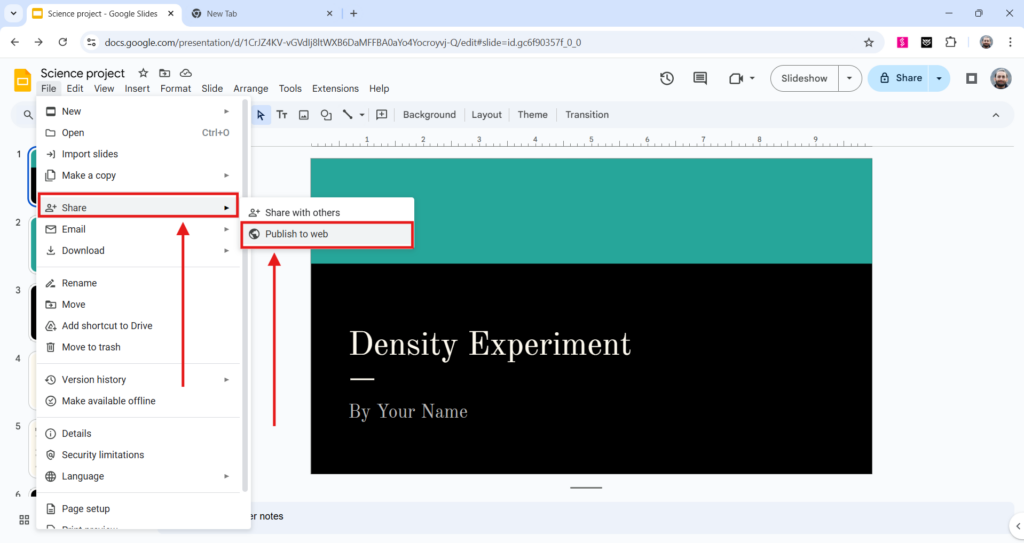
Method 3: Publishing Google Slides to the Web
Steps:
- Start by creating your Google Slides presentation.
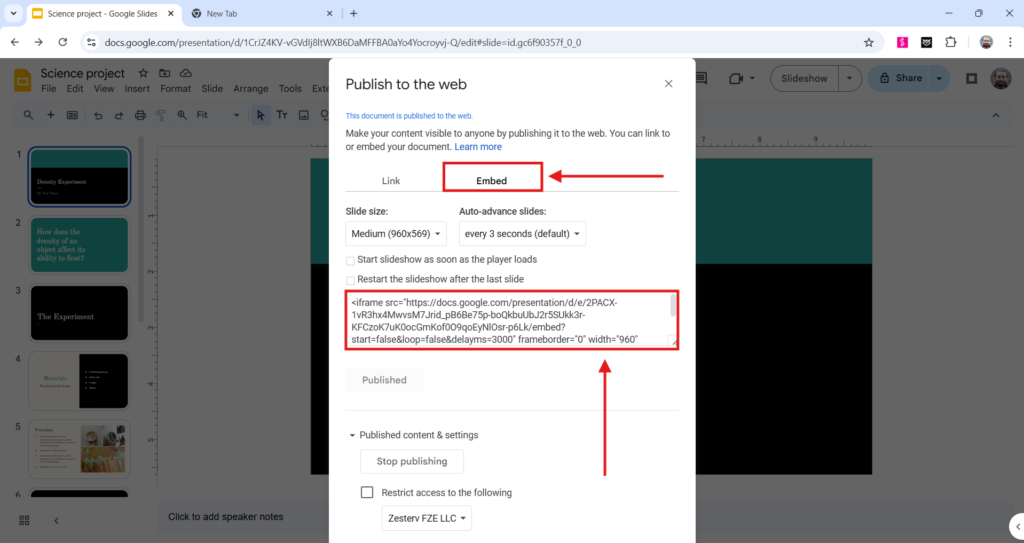
- Next, go to the top menu and click on File, then select Publish to the web.
- A new window will pop up. Choose the Embed option and copy the embed code provided.
- Now, go to Google Classroom or any other classroom management software and paste the embedded code into a post or announcement.
- Once you publish the post, students will be able to view the presentation directly within the post without needing to open another link.
This method makes it easy to share your slides with the class in a simple, interactive way. The presentation appears right in the classroom feed, so students can quickly access it and follow along.
Method 4: Share via Email
Steps:
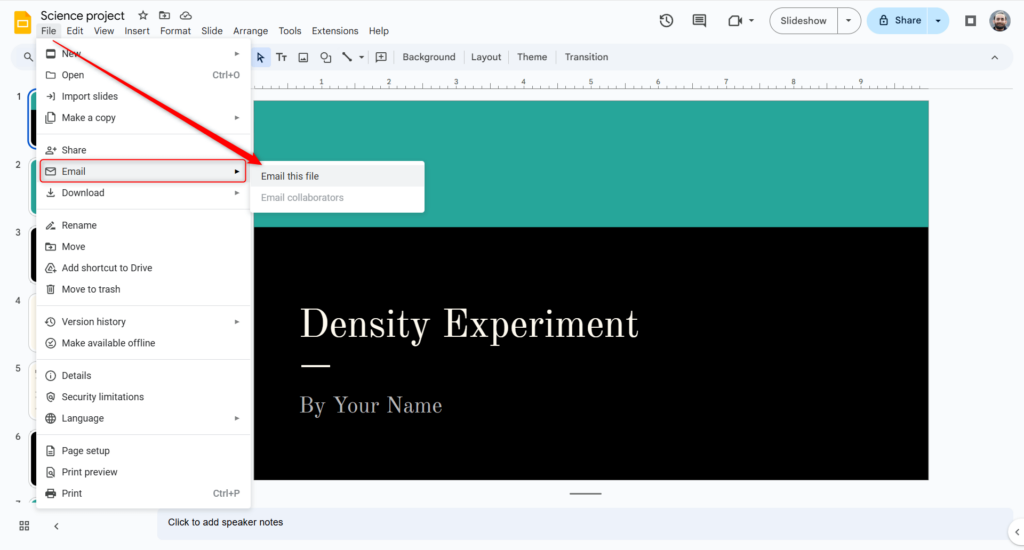
- Open the Presentation: Open your Google Slides presentation.
- Go to the File Menu: Click “File” in the top-left corner.
- Choose “Email”: Hover over “Email” in the dropdown menu and select one of these options:
- “Email this file”: Sends a copy of the presentation as an attachment (PDF, PPTX, etc.).
- “Share with others”: Opens the sharing settings to send via Google Slides.
- Follow the Prompts:
- If emailing as a file, enter the recipient’s email address, customize the subject and message, and select the file format.
- If sharing via Google Slides, set permissions (Viewer, Commenter, Editor), and send the invite.
- Send the Email: Click “Send” to complete the process.

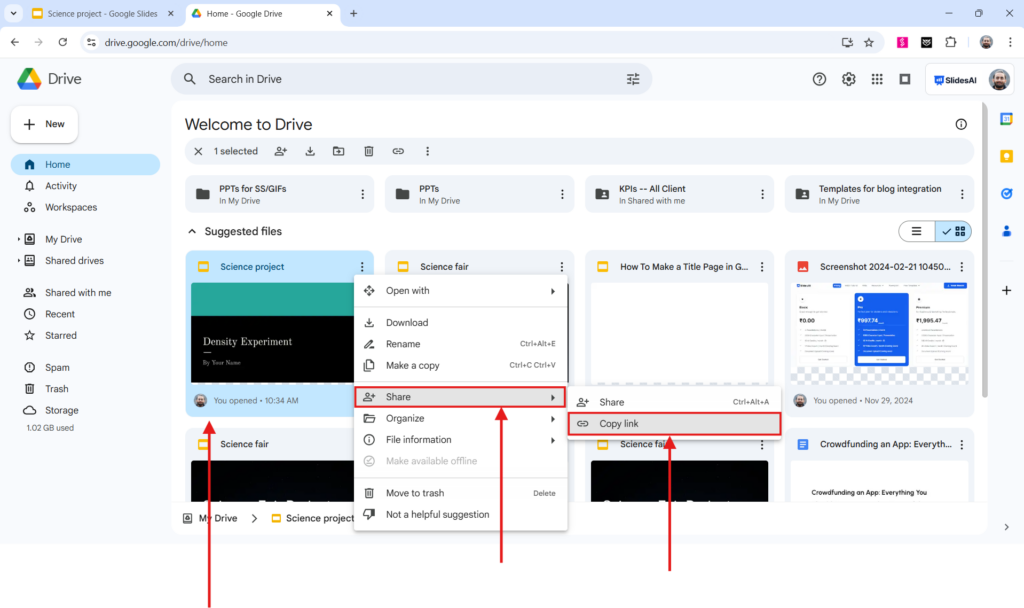
Method 5: Using Google Drive to Share a Presentation
Steps:
- Start by creating your Google Slides presentation.
- Once your presentation is ready, upload it to your Google Drive.
- After uploading, right-click the file in Drive and select “Get Link” to copy the shareable link.
- Set the appropriate sharing permissions to decide who can view or edit the presentation.
- Share the link with your students and ask them to open the presentation while you’re presenting.
This method works well if you prefer managing your files in Google Drive and need a simple way for students to follow along with your presentation in real time. Just make sure the sharing settings are correct so everyone can access the slides when needed.
Create presentation slides with AI in Seconds in Google Slides
- No design skills required
- 3 presentations/month free
- Don’t need to learn a new software
Works with Google Slides
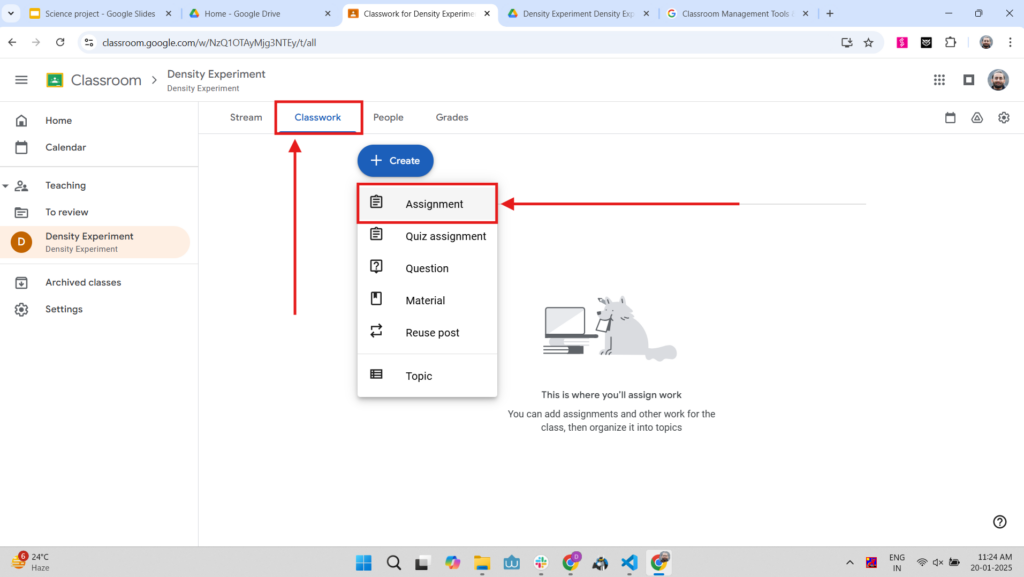
Method 6: Using Google Classroom to Share Google Slides
Steps:
- Log into Google Classroom: Start by logging into your Google Classroom account and select the class where you’d like to share the presentation.
- Create an Assignment: Head to the Classwork tab, click on “Create,” and select “Assignment.”
- Attach Google Slides: Click on “Add,” then select “Google Drive.” From there, find and select the Google Slides presentation you want to share.
- Set Permissions: Decide how you want students to access the slides. You can let them view, edit, or make a copy of the slides. Add any extra details, such as a due date or points for the assignment.
- Assign to Students: Once everything is set up, click “Assign” to send the Google Slides to your students. Let them know to open it while you’re presenting.
Method 7: Using Classroom Management Software
1. Choose a Classroom Tool
- Google Classroom: A versatile platform with built-in features for sharing resources, assigning work, and tracking student progress. Seamless integration with Google Slides.
- Nearpod: Interactive lessons with features like gamification, formative assessments, and real-time student engagement tracking.
- Edpuzzle: Allows you to add interactive elements like questions and voiceovers to your videos and presentations.
- Kahoot!: Game-based learning platform with interactive quizzes and polls to engage students.
2. Prepare Your Google Slides
Design: Create a visually appealing and informative presentation with clear and concise text, relevant images, and engaging animations. Accessibility: Ensure your slides are accessible to all students by using sufficient font sizes, high-contrast colors, and alternative text for images.
3. Obtain the Embed Code
- Open your Google Slides presentation.
- Go to “File” > “Publish to the web.”
- Select the “Embed” tab.
- Click “Publish.”
- Copy the provided iframe code.
4. Add to Your Classroom Tool
- Log in to your chosen classroom software.
- Navigate to the appropriate section for adding resources (e.g., “Assignments,” “Lessons,” “Activities”).
- Look for an option to “Embed” or “Add External Content.”
- Paste the iframe code into the designated space.
5. Share with Students
Share the link or assign the activity to your students. Provide clear instructions on how to access and interact with the embedded slides. Monitor student progress and provide feedback as needed.
Closing Thoughts
It’s important to keep in mind that students have different learning styles, and not all tech setups are the same. Whether you’re sharing slides directly, using screen-sharing, or embedding them in classroom tools, each method can work well in its own way.
Don’t be afraid to try out different options to see what works best for you and your students. Finding the right fit can help create a more engaging and positive classroom experience.
Create presentation slides with AI in Seconds in Google Slides
- No design skills required
- 3 presentations/month free
- Don’t need to learn a new software
Works with Google Slides
Frequently Asked Questions
1. How can I easily share Google Slides with my students?
The simplest way to share Google Slides is by sending a link to the presentation. Just right-click on the file, choose “Get link,” and then make sure to set the sharing settings to “Anyone with the link can view.” This way, students can easily access the slides without any extra steps.
2. Can I share Google Slides using classroom tools?
Yes, you can share your Google Slides using various classroom management platforms like Google Classroom, Microsoft Teams, Zoom, or SeeSaw. These tools let you share links, your screen, or even directly embed the slides into assignments for students to access.
3. Will students be able to edit the Google Slides I share with them?
It depends on the permissions you set. By default, students can either view or edit the slides. You can choose what level of access they have—whether it’s just viewing, making changes, or creating their own copy.
4. How do I make sure students can only view the slides and not edit them?
To prevent students from making changes, simply set the sharing permission to “Viewer” when you share the link. This will let them see the slides but not make any edits or alterations to the content.
5. Can students view Google Slides if they don’t have a Google account?
Yes, students can still access the slides if the presentation link is shared with the “Anyone with the link” permission. However, if you want them to edit or leave comments on the slides, they will need to sign in with a Google account.