Creating visual presentations can be a bit tricky, especially when you want to make your data look interesting and easy to understand at the same time.
That’s where a word cloud comes in—it’s a simple yet great tool for displaying text data in a fun and clear way. If you’ve been wondering how to make one in Google Slides, you’re in the right spot.
In this guide, we’ll show you step-by-step instructions on how to create a word cloud using Google Slides. We’ll talk about why word clouds are useful, walk you through a few ways to create them, and teach you how to add one to your presentation. Ready to spice up your slides? Let’s dive in!
What Is a Word Cloud?
A word cloud is a graphic representation of words where the size of each word shows how often it appears in a given piece of text. The larger the word, the more frequently it shows up. It’s like a quick snapshot that highlights the main themes or ideas in a block of text.
Word clouds are useful for breaking down complicated information into something easier to understand. They’re great for looking at things like survey answers, meeting notes, or any text-heavy material.
With just a glance, you can spot common trends or patterns. Plus, they’re visually interesting, which can help keep your audience engaged while you present your findings.
Create presentation slides with AI in Seconds in Google Slides
15M+Installs
Works with Google Slides
How to Create a Word Cloud in Google Slides?
Part 1: Installing the Word Cloud Generator Add-on
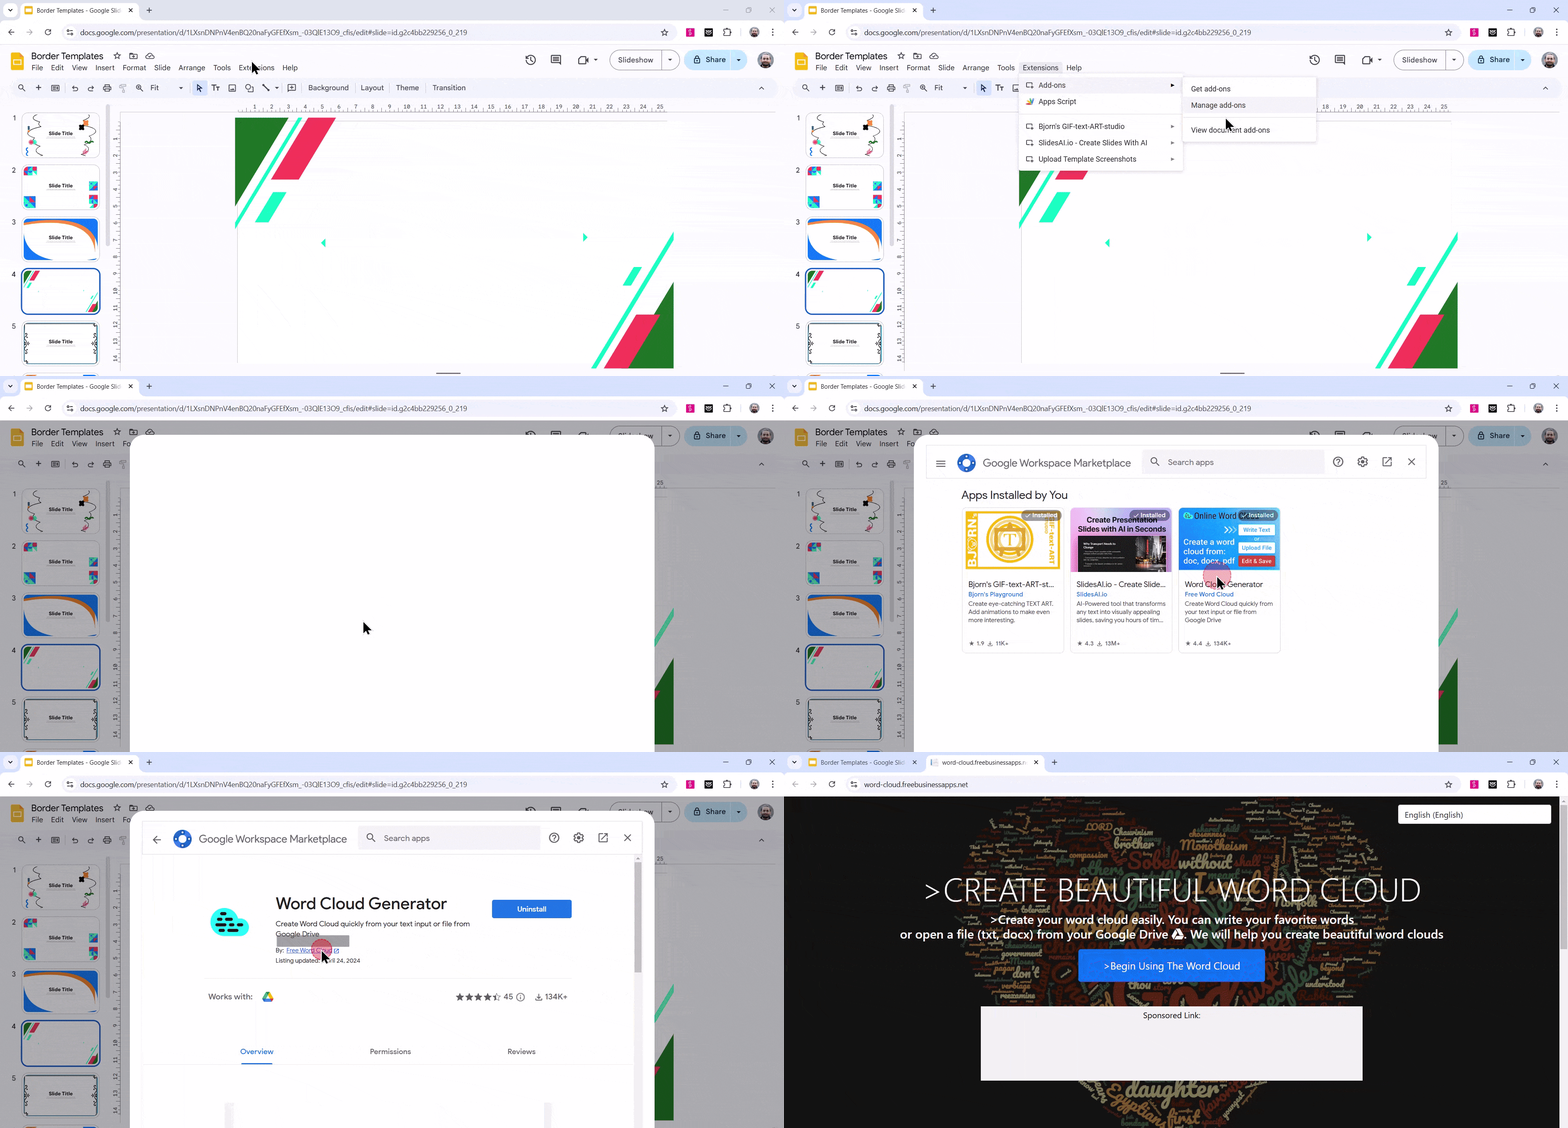
- Open Google Slides: Start by opening Google Chrome and navigating to Google Slides.
- Access Google Workspace Marketplace:
- Click the Google Apps button (the square grid icon) in the top-right corner of your Chrome browser.
- From the dropdown menu, select “Slides.”
- Once you’re in Google Slides, open the presentation where you want to add a word cloud.
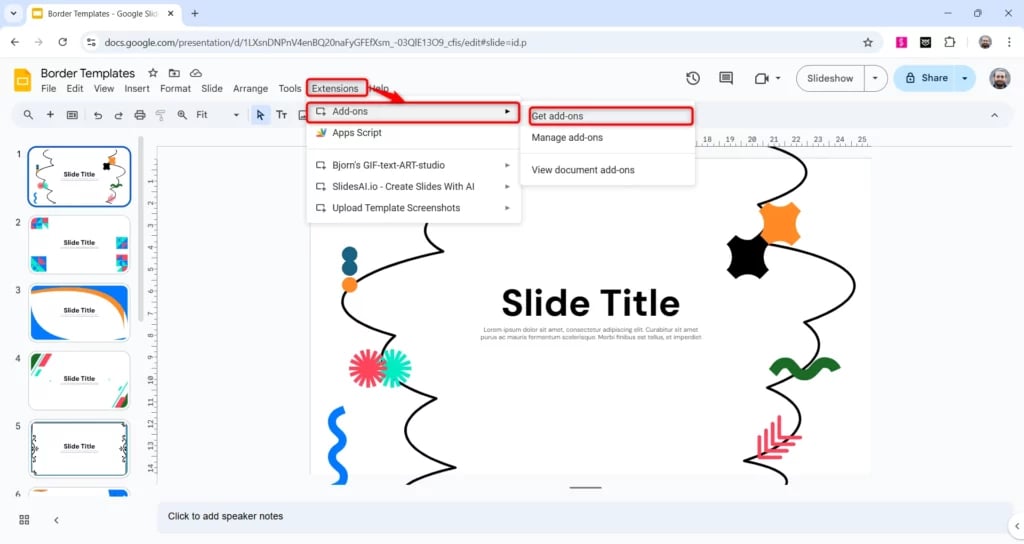
- Go to the “Extensions” menu and select “Add-ons.”
- Click “Get add-on” to open the Google Workspace Marketplace.
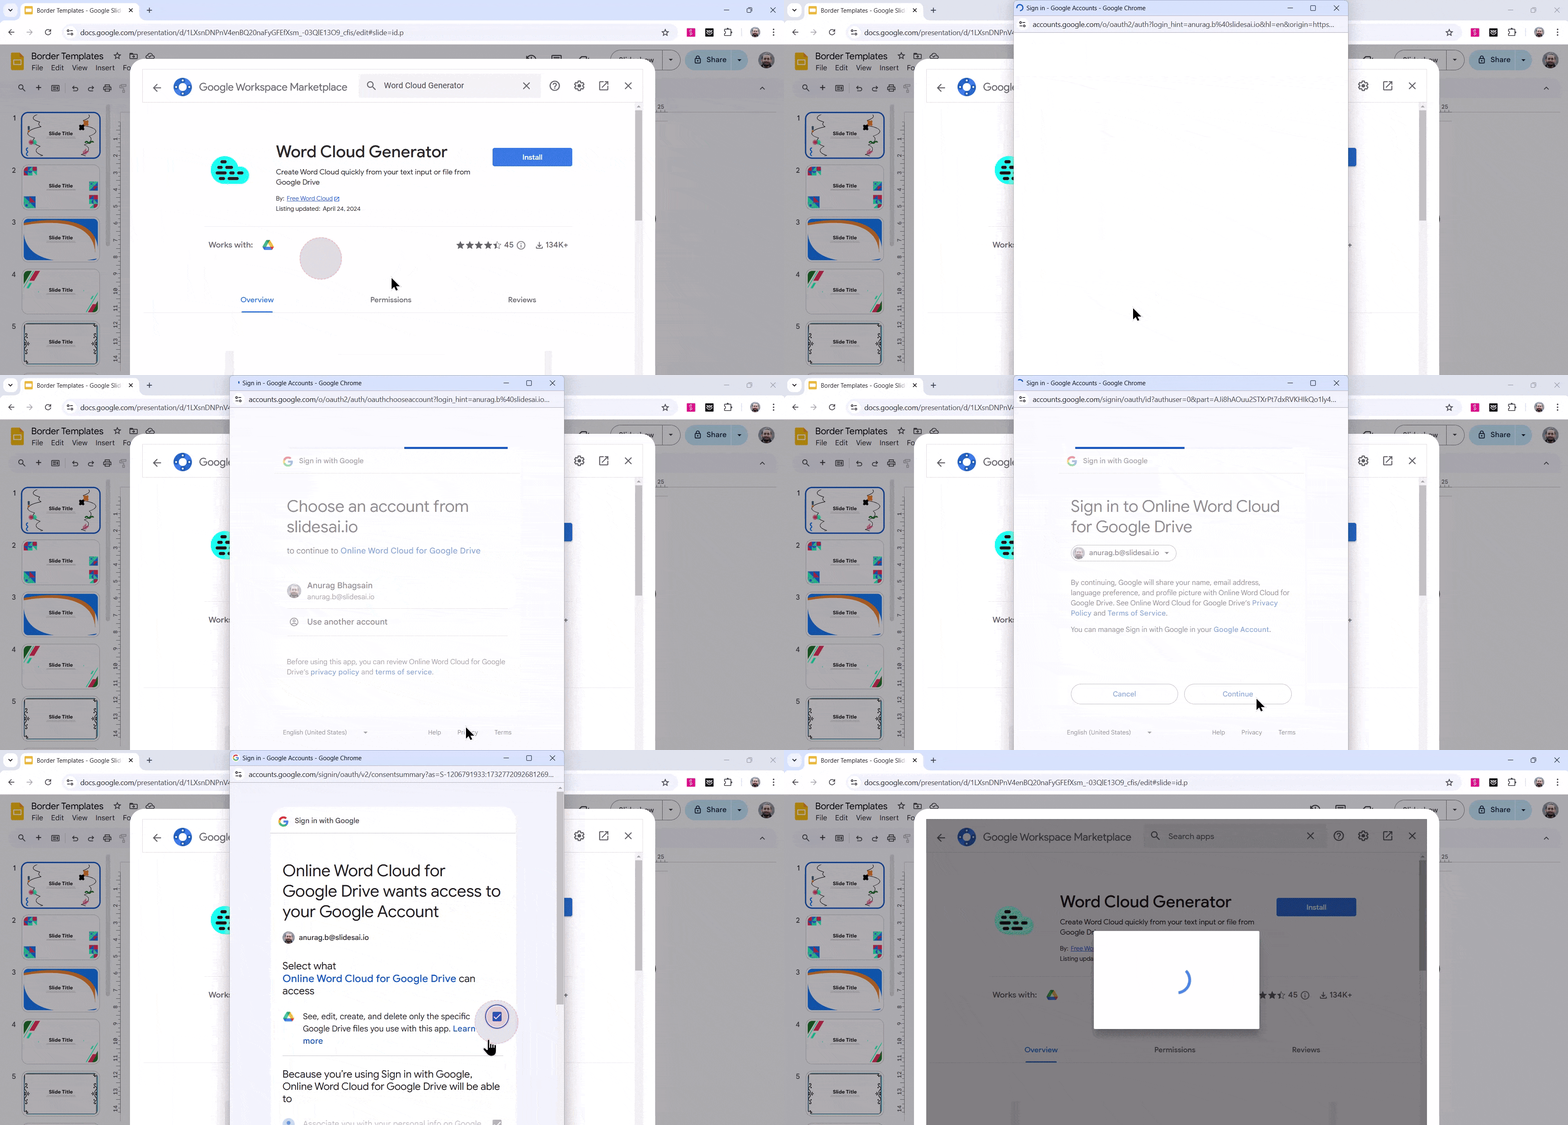
- Search for the Word Cloud Generator: In the search bar of the Marketplace, type “Word Cloud Generator” and press Enter.
- Install the Add-on:
- Locate the “Word Cloud Generator” add-on in the search results.
- Click the “Install” button.
- A pop-up window will appear. Click “Continue” to confirm the installation.
Part 2: Creating a Word Cloud
- Prepare Your Text: Identify the text you want to visualize in your word cloud. This could be a transcript, a speech, or any other text-based content.
- Use the Word Cloud Generator:
- Open your Google Slides presentation.
- Go to the “Extensions” menu and select “Word Cloud Generator.”
- A new window will appear.
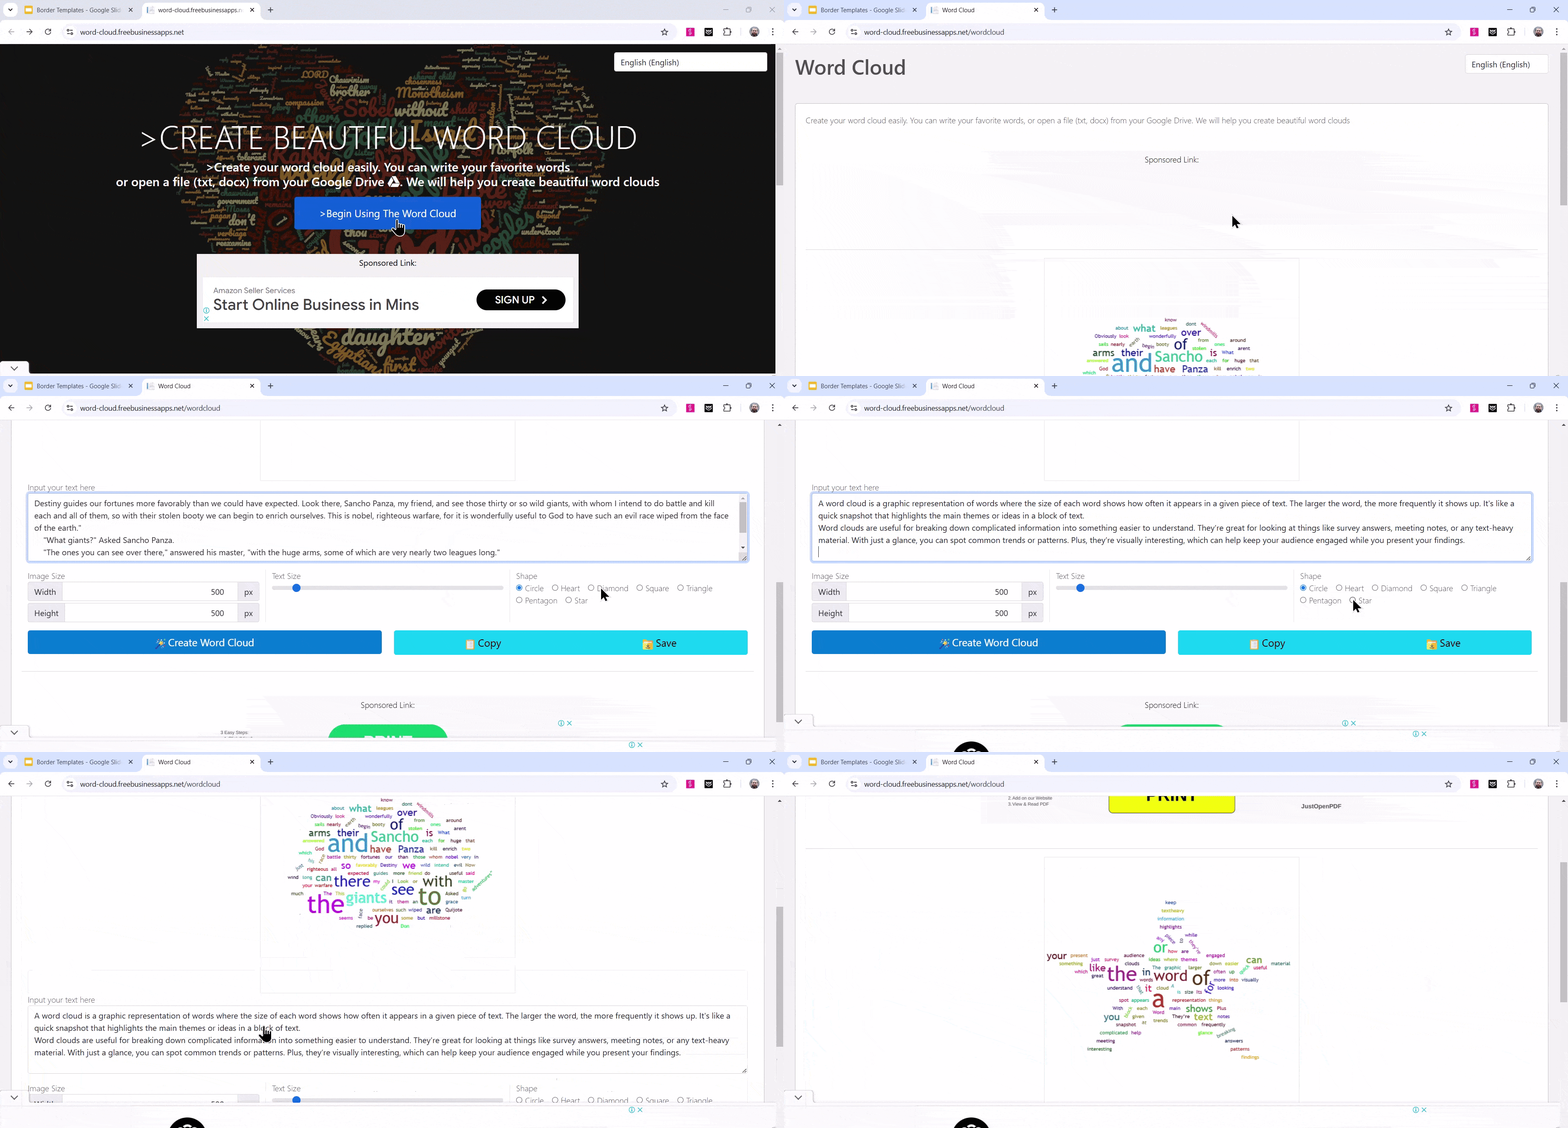
- Input Your Text: Paste your text into the designated text box labeled “Input your text here.”
- Customize Your Word Cloud:
- Shape: Choose the desired shape for your word cloud. Options may include circles, squares, hearts, or custom shapes.
- Font: Select a font style that complements your presentation.
- Color Palette: Customize the color scheme to match your branding or preferences.
- Word Size: Determine the relative size of words based on their frequency or importance.
- Generate the Word Cloud: Click the “Create a Word Cloud” button.
- Save the Word Cloud: Once the word cloud is generated, click the “Save” button to download it as an image file (usually PNG or JPEG format).
Part 3: Inserting the Word Cloud into Your Presentation
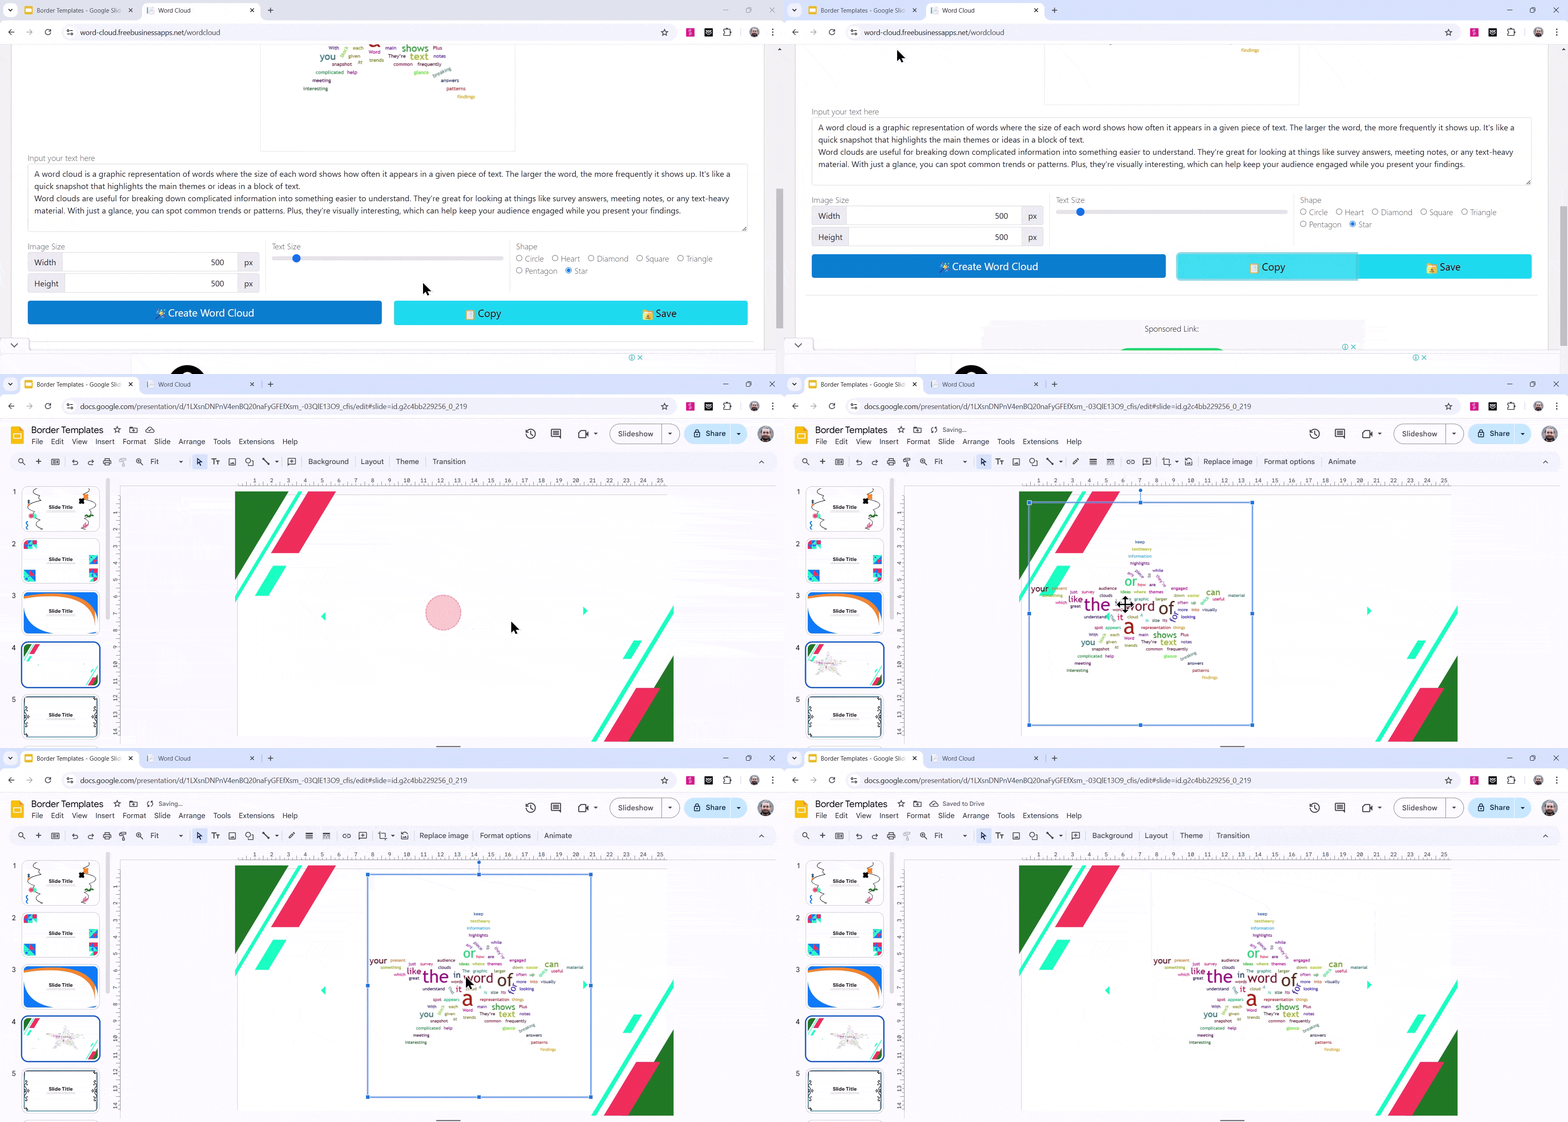
- Open Your Presentation: Go back to your Google Slides presentation and open the slide where you want to insert the word cloud.
- Insert the Image:
- Go to the “Insert” menu and select “Image.”
- Choose “Upload from computer.”
- Select the Word Cloud:
- In the file explorer window, navigate to the location where you saved the word cloud image.
- Select the image and click “Open.”
- Position the Word Cloud: Once the word cloud is inserted, you can resize, rotate, and reposition it to fit your desired layout.
Tips for Creating Word Clouds
When creating word clouds, it’s important to choose the right words. Pick terms that clearly represent your topic or message. Avoid overloading the cloud with too many words; instead, focus on the ones that really matter. Keeping it simple is a good approach—don’t make the cloud too busy or hard to read.
Next, try using contrasting colors. This helps make certain words stand out more, creating a visual interest that draws people’s attention. Make sure the colors match the vibe of what you’re sharing, so the word cloud feels connected to the overall theme or idea you’re working with.
Lastly, highlight the words that really matter to your message. These should stand out in the cloud, whether it’s through size, color, or placement. This way, the most important ideas in your word cloud are easy to spot and understand at a glance.
Create presentation slides with AI in Seconds in Google Slides
- No design skills required
- 3 presentations/month free
- Don’t need to learn a new software
Works with Google Slides

Closing Thoughts
Creating a word cloud in Google Slides is an easy way to make your text data more engaging and accessible. With just a few simple steps, you can transform any chunk of text into a visually appealing graphic. Whether you’re presenting ideas or summarizing information, a word cloud can help highlight what matters most. Give it a try!
Frequently Asked Questions
What file format should I use to insert a word cloud into Google Slides?
The best file formats to use for inserting a word cloud into Google Slides are PNG or JPEG. Both of these formats keep the image looking clear and sharp when added to your slides.
Can I use a word cloud as a background for my Google Slides presentation?
Yes, you can use a word cloud as a background. However, make sure it doesn’t make the text hard to read. A good trick is to adjust the transparency of the word cloud so it’s more subtle and doesn’t interfere with the content on your slides.
Can I change the font style of the words in my word cloud for Google Slides?
While you can’t change the font directly within Google Slides, you can use word cloud generators that let you choose different fonts before downloading the image. That way, you can customize the look of your word cloud before adding it to your slides.
What are some popular online tools for creating word clouds?
There are several online tools that let you easily create word clouds, such as WordItOut, Tagul, and Wordle. These tools let you input your text and customize the design of your word cloud.
Are there any limitations to using word clouds in Google Slides?
Word clouds might not work well for presenting complex information or data with a lot of categories. Also, the quality of the word cloud depends on the text you use to create it. If the input text isn’t well-organized or clear, the word cloud might not be as helpful for your presentation.

