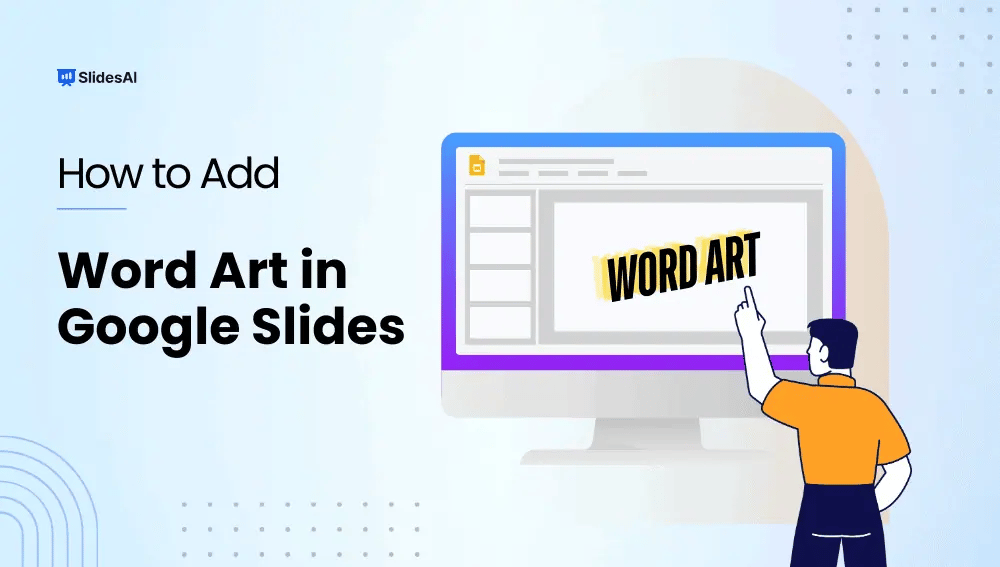
Do you ever want your presentations to stand out a bit more? Maybe you’d like something more interesting than just bullet points and plain text. If so, then Word Art in Google Slides might be a good option for you! This feature lets you change your text into fun shapes and styles, making it more eye-catching and helping you emphasize your points. Whether you’re making a presentation for school, work, or even for fun, Word Art can add a creative touch. And the good news? It’s very easy to use! This blog post will show you the simple steps to add Word Art to your Google Slides presentations, so you can take them from ordinary to extraordinary. Without waiting further, let’s dive in.
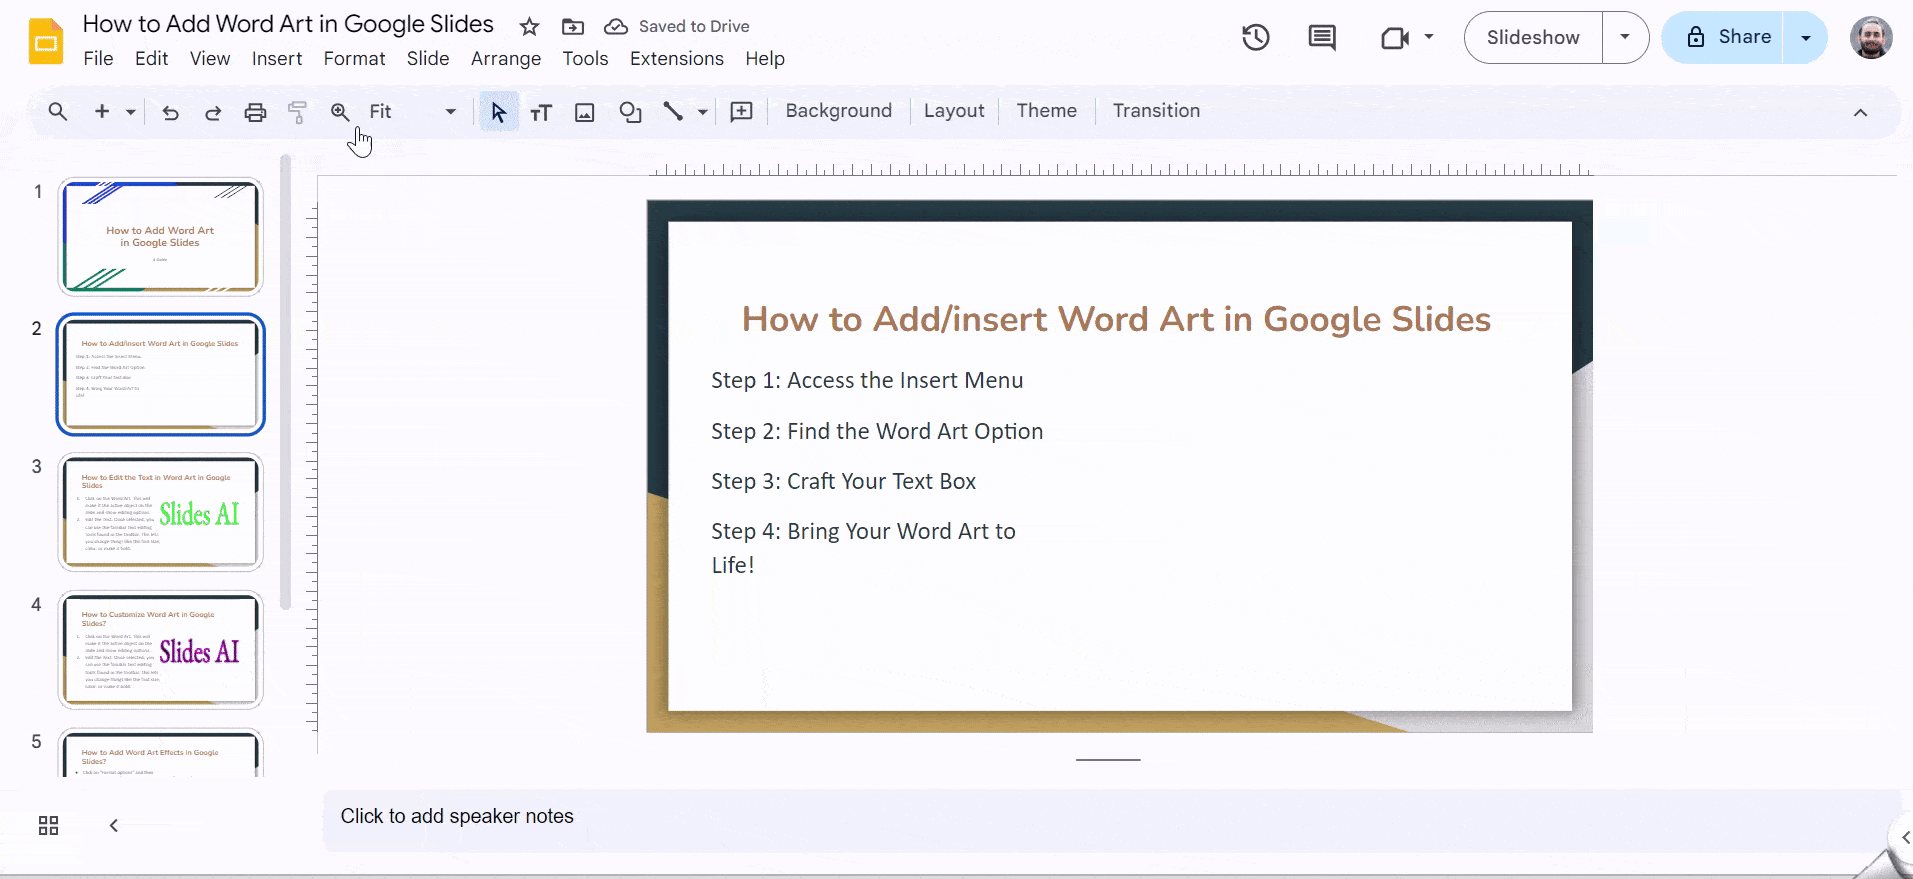
How to Add Word Art in Google Slides
Step 1: Access the Insert Menu
First things first, you need to access the tools for adding elements to your slide. Locate the menu bar at the top of your Google Slides window. Look for the option labeled “Insert” and click on it. This will display a dropdown menu with various options for adding content to your slide.
Step 2: Find the Word Art Option
Once you’ve clicked on “Insert,” a list of options will appear. Scroll down through the list until you find “Word Art.” This might be located towards the bottom of the menu depending on your version of Google Slides. Select “Word Art” to proceed.
Step 3: Craft Your Text Box
Choosing “Word Art” will trigger a text box to appear on your slide. This is where you’ll type the message you want to transform into Word Art. Feel free to customize the text as you would with any other text box in Google Slides. You can adjust the font style, size, and even add some basic formatting like bold or italics.
Step 4: Bring Your Word Art to Life!
Once you’ve typed your desired text and customized it to your liking, simply press the “Enter” key on your keyboard. This will finalize the creation of your Word Art element. Now you’ll see your text transformed on the slide, ready to add a touch of flair to your presentation.
Create presentation slides with AI in Seconds in Google Slides
14M+Installs
Works with Google Slides
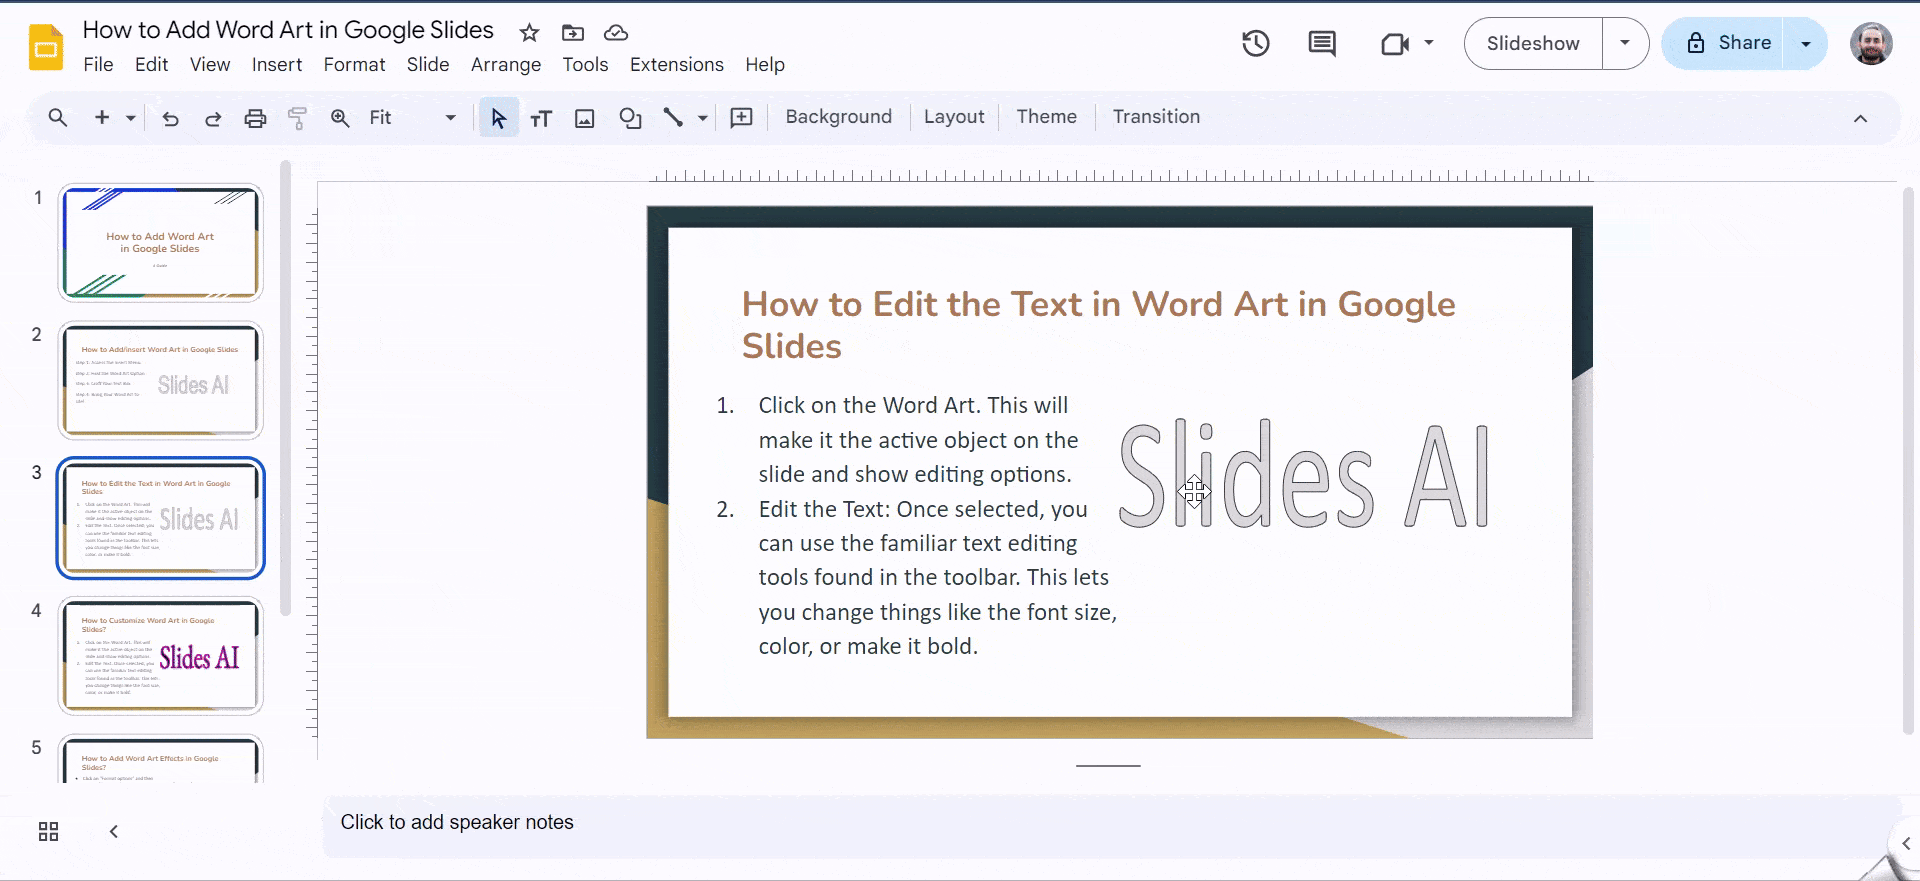
How to Edit the Text in Word Art in Google Slides
Want to change the text in your Word Art? Here’s how to do it:
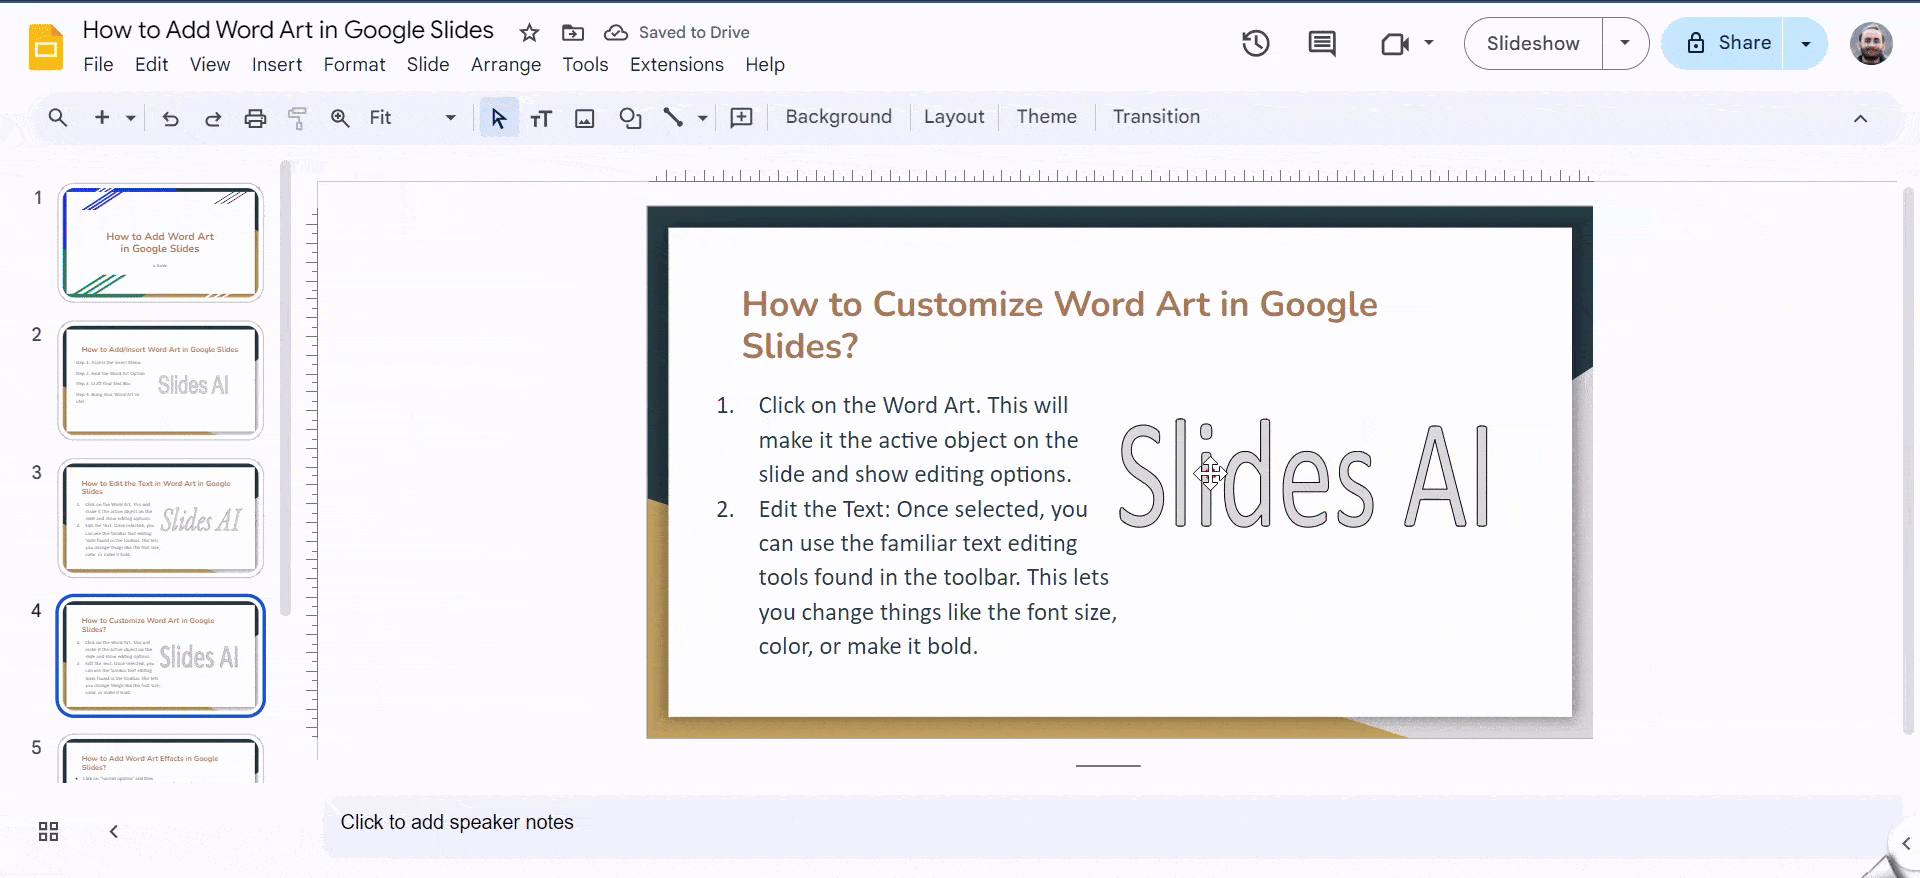
- Click on the Word Art. This will make it the active object on the slide and show editing options.
- Edit the Text: Once selected, you can use the familiar text editing tools found in the toolbar. This lets you change things like the font size, color, or make it bold.
How to Customize Word Art in Google Slides?
Step 1: Select the Word Art Object
First things first, locate the word art you want to modify on your slide. Click on the text box to make sure it’s highlighted with a blue border. This indicates that the word art is now selected and ready for editing.
Step 2: Explore the Formatting Options
Once your word art is selected, look at the toolbar that appears above your slide. This toolbar holds the key to customizing your text. Here are some options you can explore:
- Font Family: Click on the dropdown menu next to “Font” to choose from a variety of fonts. Pick a font that complements the overall style of your presentation and the message you’re trying to convey.
- Font Size: Adjust the size of your text using the font size options available on the toolbar. Make sure the text is large enough to be easily readable by your audience.
- Font Color: Click on the “Fill color” icon to change the color of your text. You’ll see a palette of pre-selected colors or the option to choose a custom color. Pick a color that stands out against your slide background but remains easy on the eyes.
Step 3: Personalize with Borders
Want to add a border around your Word Art? Click on the “Border color” icon on the toolbar. Similar to the fill color, you’ll see options to choose a pre-set border color or customize it yourself. You can also adjust the thickness of the border using the line style options.
Step 4: Witness the Transformation!
As you make your selections from the formatting options, you’ll see the changes reflected in your word art object in real-time. This allows you to experiment and find the perfect combination of font, color, and border (if used) for your specific needs.
Create presentation slides with AI in Seconds in Google Slides
- No design skills required
- 3 presentations/month free
- Don’t need to learn a new software
Works with Google Slides
How to Add Word Art Effects in Google Slides?
1. Shading and Drop Shadows
Want to give your text some depth? Here’s how to add shading or a drop shadow:
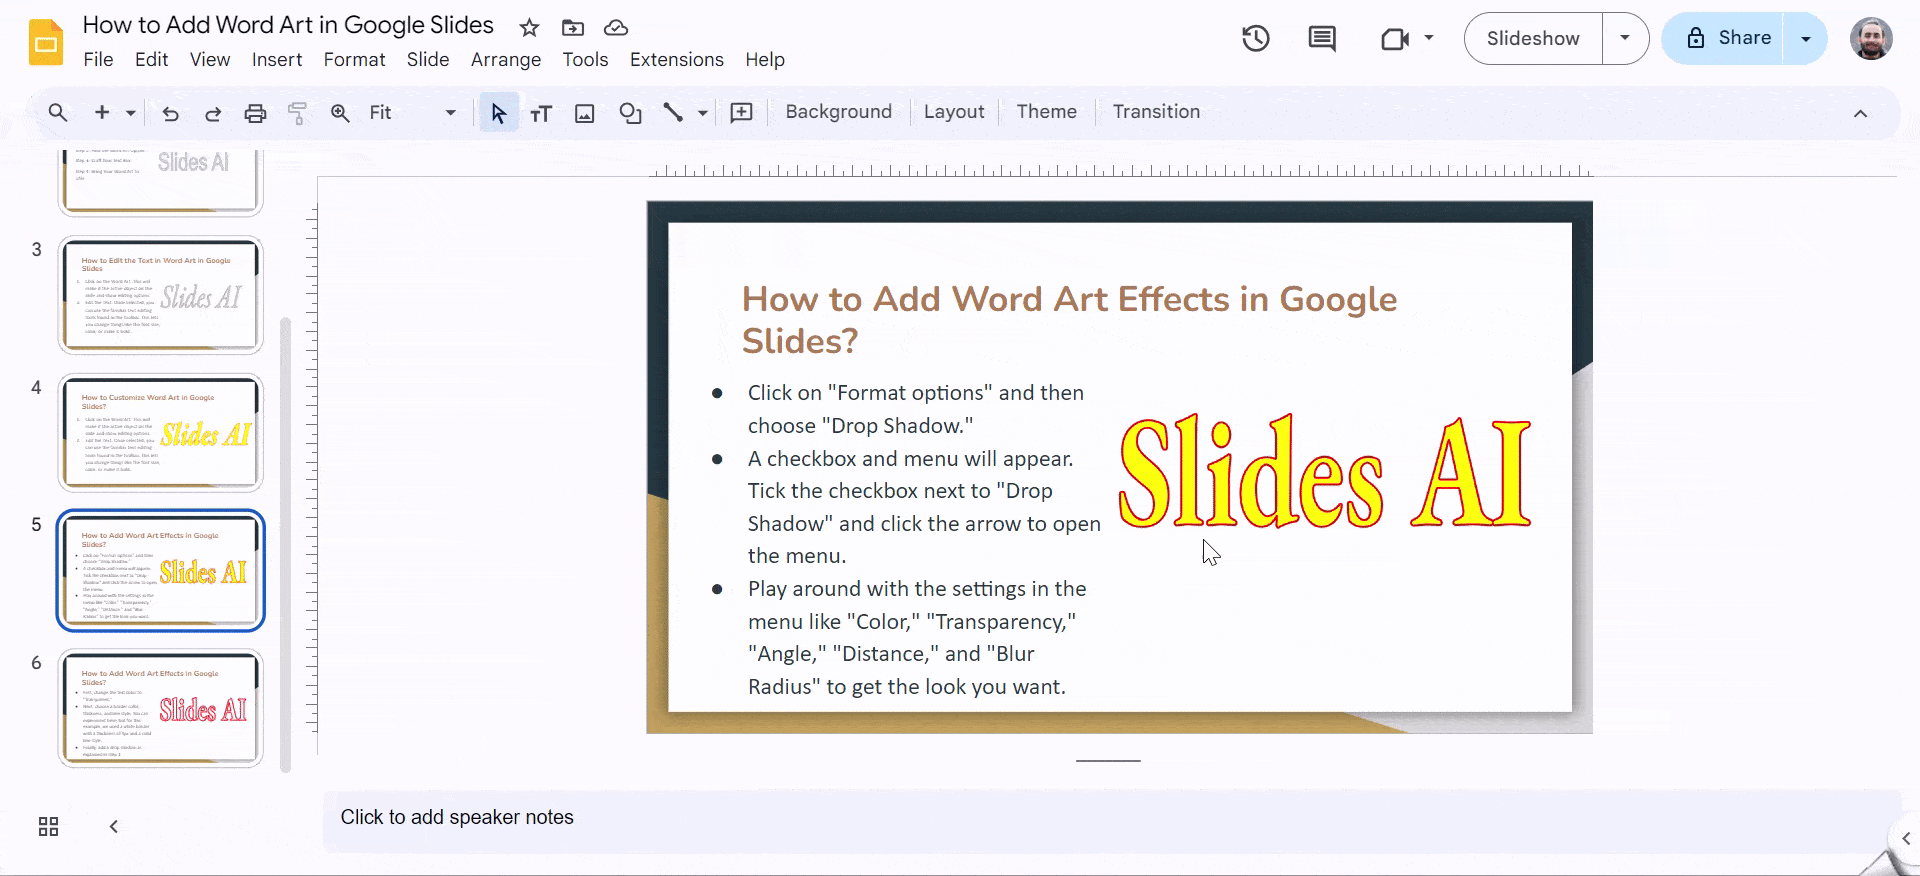
- Click on “Format options” and then choose “Drop Shadow.”
- A checkbox and menu will appear. Tick the checkbox next to “Drop Shadow” and click the arrow to open the menu.
- Play around with the settings in the menu like “Color,” “Transparency,” “Angle,” “Distance,” and “Blur Radius” to get the look you want.
2. Creating 3D Text
This trick creates a 3D effect for your text:
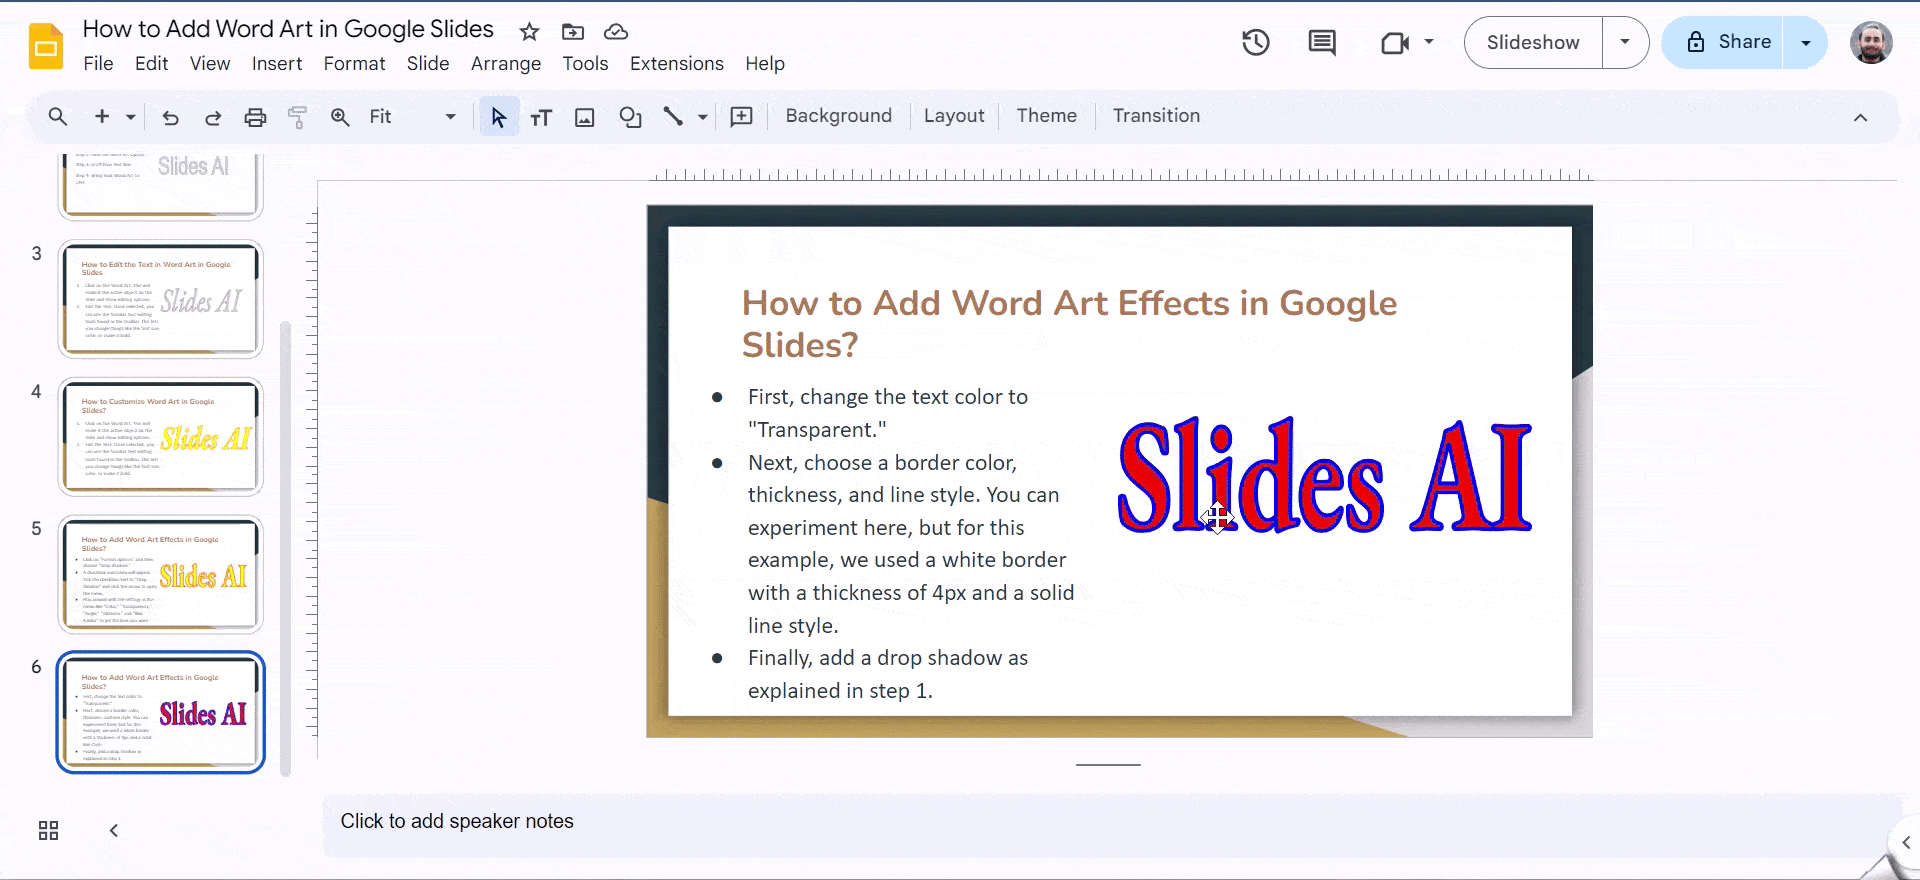
- First, change the text color to “Transparent.”
- Next, choose a border color, thickness, and line style. You can experiment here, but for this example, we used a white border with a thickness of 4px and a solid line style.
- Finally, add a drop shadow as explained in step 1.
3. Reflections
Want to make your text appear mirrored? Here’s how to use the reflection feature:
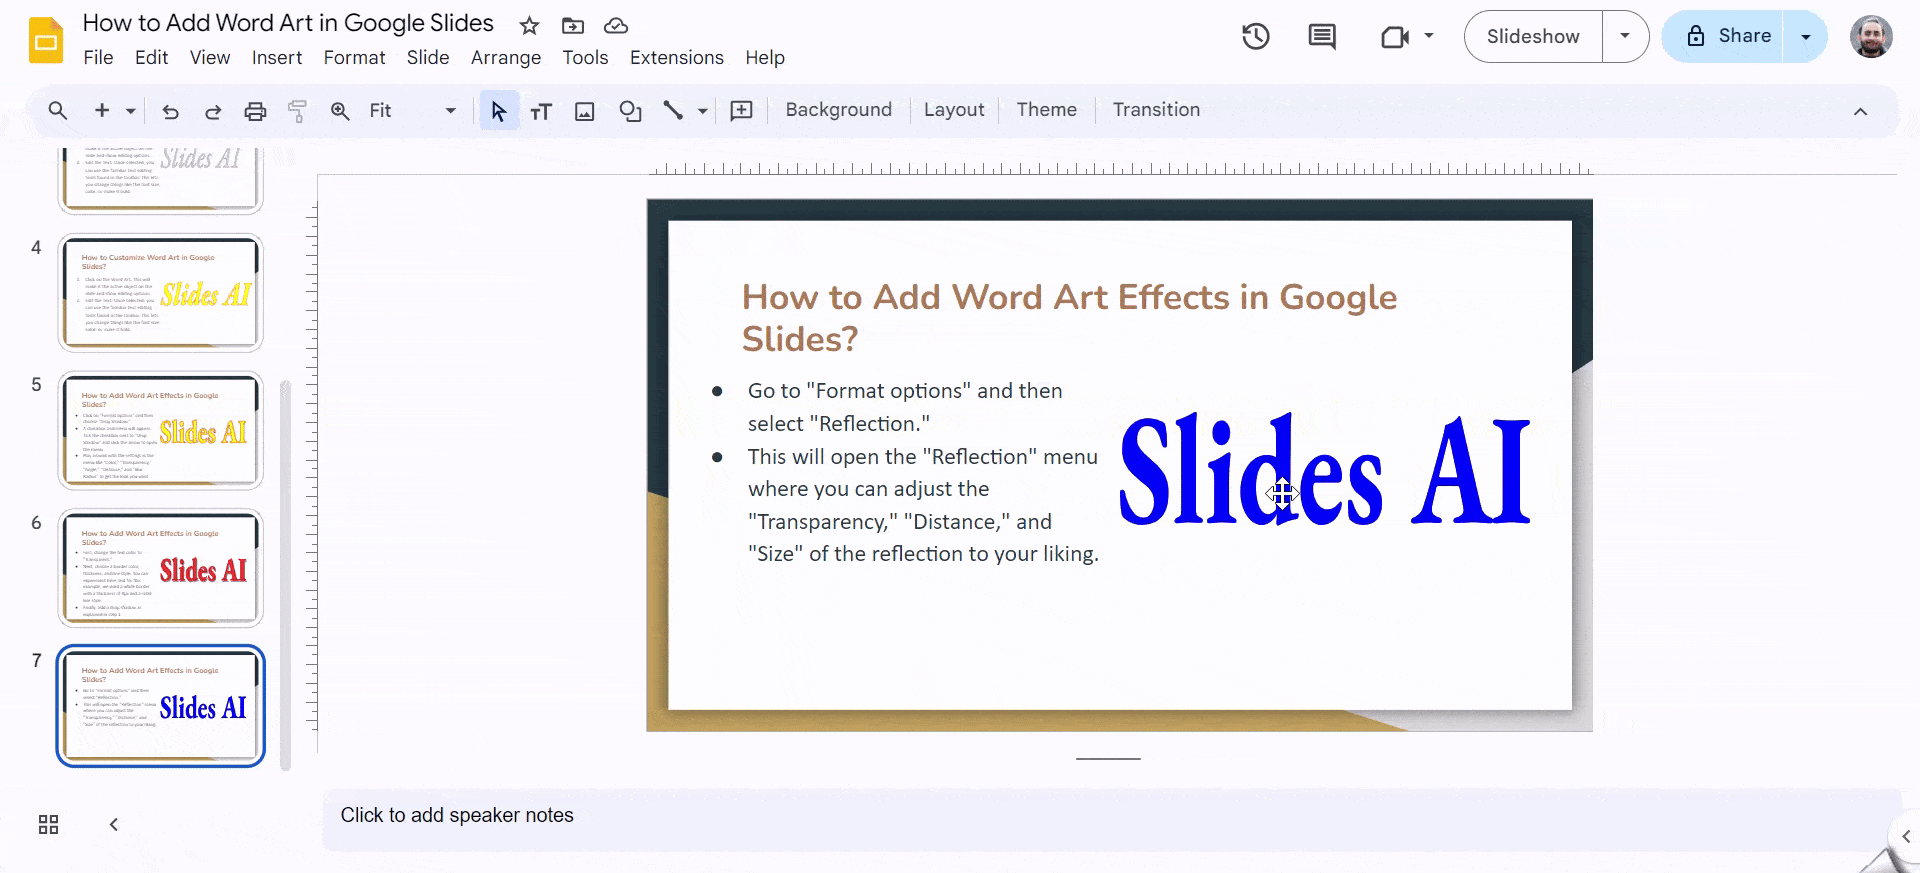
- Go to “Format options” and then select “Reflection.”
- This will open the “Reflection” menu where you can adjust the “Transparency,” “Distance,” and “Size” of the reflection to your liking.
4. Blending Colors with Gradients
Want your text to have a gradient effect with multiple colors? Here’s how:
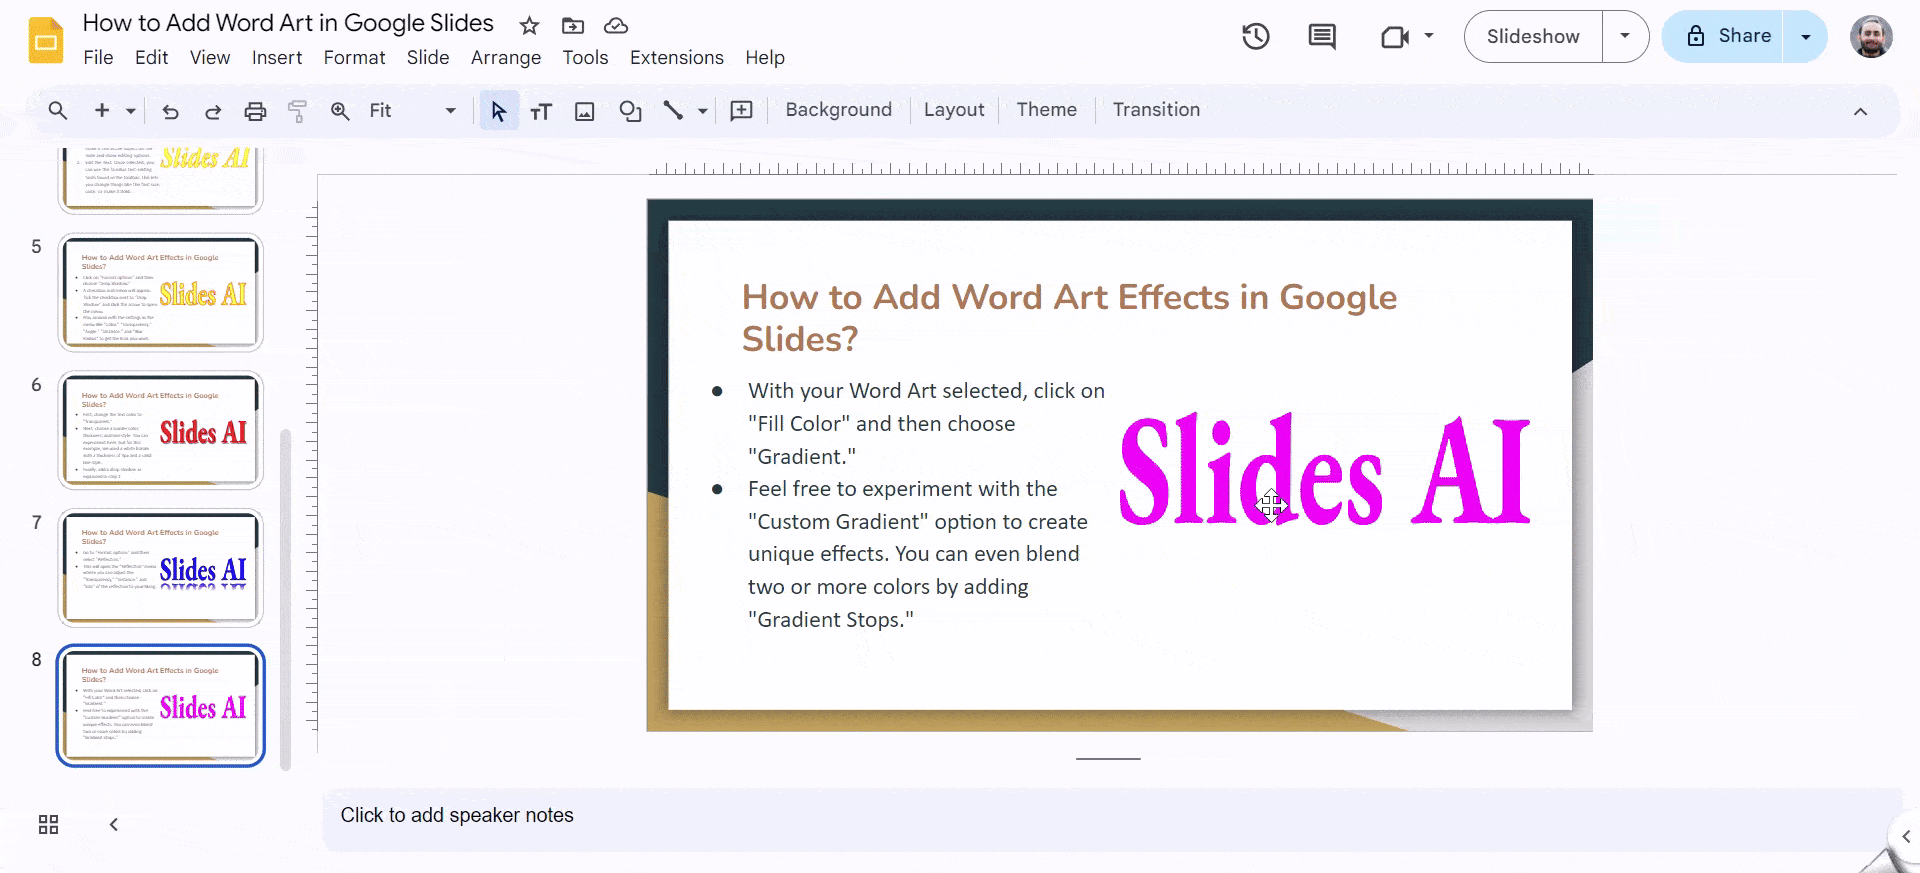
- With your Word Art selected, click on “Fill Color” and then choose “Gradient.”
- Feel free to experiment with the “Custom Gradient” option to create unique effects. You can even blend two or more colors by adding “Gradient Stops.”
Understanding the Use Case of Word Art in Google Slides
Here are some use cases for Word Art in Google Slides:
- Creating eye-catching Titles and Headings: By using different fonts, colors, and sizes, you can make your text stand out and grab the audience’s attention. This is particularly useful for key points you want viewers to remember.
- Adding Emphasis to Important Information: You can use word art to highlight important information or keywords in your presentation. This can help viewers focus on the most critical takeaways.
- Matching a Specific Theme or Style: Word art allows you to customize the look of your text to match the overall theme or style of your presentation. For example, if you’re giving a presentation about children’s books, you could use a playful font and bright colors for your word art.
- Creating Unique Shapes with Text: While Google Slides doesn’t offer pre-designed word art shapes like some other programs, you can use text formatting options to create custom shapes with your text. This can be a creative way to display information.
Closing Thoughts
Google Slides’ Word Art feature is a powerful tool that can take your presentations from ordinary to extraordinary. With its ability to transform text into visually engaging elements, Word Art allows you to capture attention, highlight key points, and align with your presentation’s style. So, next time you’re creating a presentation, consider using Word Art to add a creative touch and make your message truly stand out!
Create presentation slides with AI in Seconds in Google Slides
- No design skills required
- 3 presentations/month free
- Don’t need to learn a new software
Works with Google Slides
Frequently Asked Questions (FAQs)
Is there a way to animate my Word Art?
Yes! Google Slides offers animation options for most elements, including Word Art. Once you’ve created your Word Art, select it and navigate to the “Animations” tab in the toolbar.
How do I change the font size of my Word Art?
Click on the Word Art and use the font size options in the toolbar.
Is there a way to create a 3D effect with Word Art?
While there’s no built-in 3D option, you can experiment with layering and shadow effects to create a pseudo-3D look.
How do I make my Word Art text curved?
While Google Slides doesn’t have a direct text curving option, you can experiment with the “Wrap text” function (found in “Format options”) to achieve a curved effect within specific shapes.
Can I add an image inside my Word Art?
No, directly embedding images within Word Art isn’t possible. However, you can create the image you want in another program, insert it onto your slide, and then layer it behind your Word Art for a combined effect.
Is it possible to rotate the text in my Word Art?
Absolutely! Explore the rotation tool (often an icon with a curved arrow) in the toolbar. This allows you to adjust the angle of your text for a creative twist, especially for titles or call-to-action elements.