
Creating a collage in PowerPoint is a simple way to bring multiple images together in a visually appealing format. Whether you are working on a school project, a presentation, or just putting together memories from a trip, PowerPoint gives you the tools to arrange your pictures exactly how you want.
You don’t need advanced design skills to make a great-looking collage. With just a few clicks, you can resize, position, and add effects to your images, making them stand out. If you have never tried this before, don’t worry.
This guide will walk you through the process step by step, so you can make a collage in PowerPoint that lives up to your expectations. Without waiting further, let’s get started.
Why is a Photo Collage Important to Create in a PowerPoint Presentation?
A photo collage helps you show multiple images at once instead of flipping through them one by one. It keeps everything in one place, making it easier to explain ideas without jumping between slides. Whether you’re summarizing an event, comparing things, or just organizing pictures neatly, a collage makes it simple.
1. Shows More Without Cluttering Slides
Instead of using multiple slides for different images, a collage puts them all in one place. It keeps the flow smooth and makes it easier for the audience to take in the information.
2. Makes Ideas Clearer
Whether you’re showing progress, comparisons, or related concepts, a collage brings everything together visually. It helps people connect the dots without needing long explanations.
3. Keeps People Interested
Too much text can make a presentation dull. A collage breaks the monotony and makes the slide more engaging, keeping the audience focused on what you’re saying.
4. Easy to Create with PowerPoint Tools
You don’t need advanced design skills to put together a clean, professional-looking collage. PowerPoint has built-in tools that let you arrange images neatly without much effort.
If you have more than one image to show, using a collage just makes sense. It saves time, keeps everything in one place, and makes it easier to get your point across.
Create presentation slides with AI in Seconds in Google Slides
15M+Installs
Works with Google Slides

How to Make a Photo Collage in PowerPoint (5 Simple Ways)
If you want to make a photo collage in PowerPoint, there are a few ways to do it. The process is quick and easy, so let’s go through all 5 methods below:
Method 1: Using a Picture Layout in PowerPoint
This method works well if you want a structured layout for your collage. PowerPoint provides built-in picture arrangements that make organizing photos quick and easy.
1. First, add all the pictures you want to include in your collage. If you need them in a specific order, make sure to select them in that sequence.
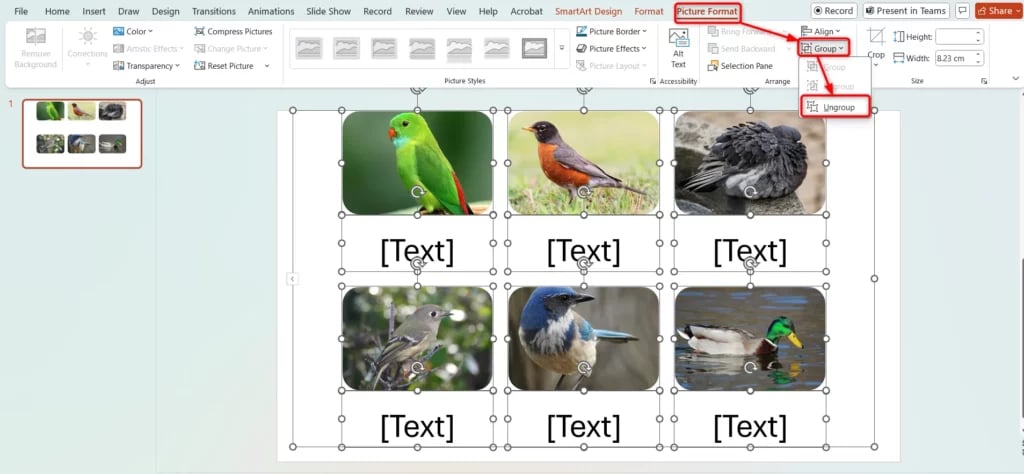
2. Click on “Picture Format” at the top of the screen.
3. Find the “Picture Layout” option in the “Picture Styles” section. Click to open the menu.
4. Hover over the different layout options to see how your pictures will look.
5. Choose the layout you like. For example, the “Picture Grid” layout gives a neat and organized look.

6. To add captions, type directly into the text boxes that appear below each image. You can also click the small arrow on the left side of the slide to enter text in a box that pops up.
7. If you want to tweak the collage later, go to the “SmartArt Design” tab. You can adjust spacing, change colors, or modify the overall arrangement.
8. If you want to remove text under the images, you can also do this:
- Select all the images.
- Click on “Picture Format” at the top.
- In the “Arrange” section, click “Group Objects” and then “Ungroup“. This removes the text boxes while keeping your images in place.

Method 2: Using the Designer Tool (For Microsoft 365 Users)
If you have a Microsoft 365 subscription, PowerPoint’s Designer tool can do most of the work for you. It automatically suggests stylish layouts based on the images you add.
- Add all your pictures to the slide. No need to select them first—just insert them.
- If the “Designer” panel doesn’t open automatically, go to the “Home” or “Design” tab at the top and click on “Designer“.
- A side panel will appear with different layout suggestions for your images. Click on one you like, and PowerPoint will apply the design instantly.
- If nothing stands out, scroll to the bottom of the panel and select “See More Design Ideas” for additional options.
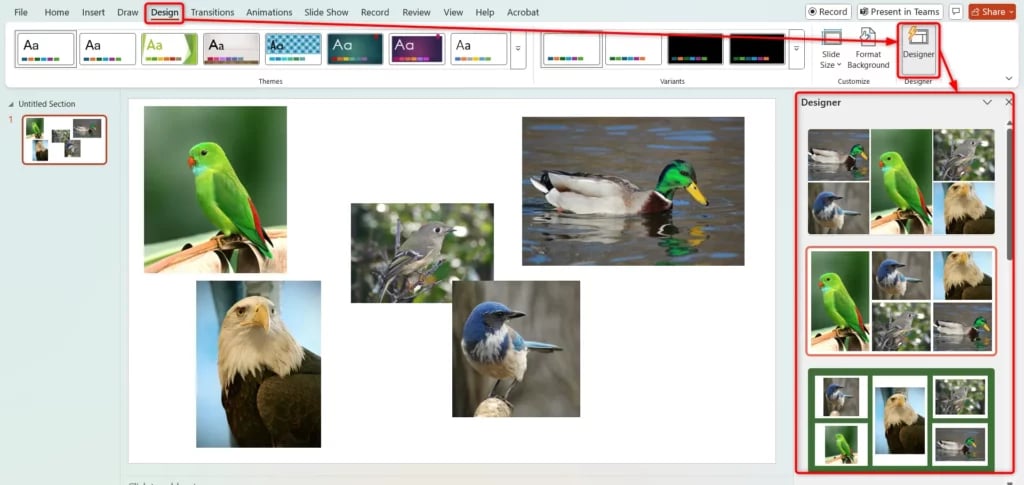
This method is perfect if you’re short on time and want a visually appealing collage with minimal effort.
Create presentation slides with AI in Seconds in Google Slides
- No design skills required
- 3 presentations/month free
- Don’t need to learn a new software
Works with Google Slides
Method 3: Using a PowerPoint Template
PowerPoint also has built-in templates designed for photo albums and collages. This is a great option if you want a polished look without manually arranging images.
1. Open PowerPoint and go to the File tab at the top left.
2. Click New to start a new presentation.
3. In the search bar, type in words like “photo collage”, “picture album”, or “photo template” to find relevant templates.
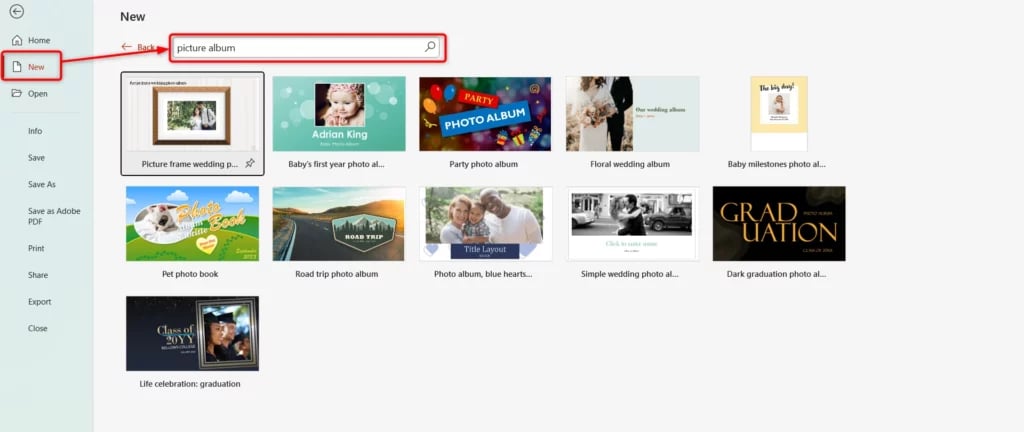
4. Depending on your PowerPoint version and whether you have a Microsoft 365 subscription, different template options will appear. Choose the one you like and click Create.
5. To replace the placeholder images in the template:
- Click on any image.
- Go to the Picture Format tab and click Change Picture in the Adjust section.
- Alternatively, right-click on an image and select Change Picture to swap it with your own photo.
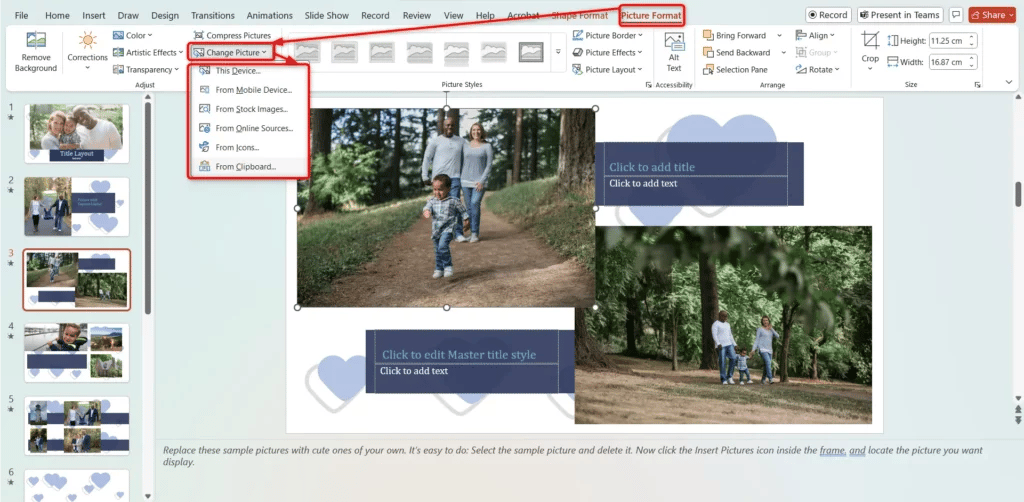
This method works well when you want a professional-looking collage without much customization.
Create presentation slides with AI in Seconds in Google Slides
15M+Installs
Works with Google Slides
Method 4: Using the Photo Album Option in PowerPoint
This method works great if you want PowerPoint to do most of the work. It automatically arranges your photos into a slideshow, and you can customize it as needed.
1. Open PowerPoint and go to the Insert tab at the top.
2. Click Photo Album in the Images group, then select New Photo Album from the dropdown menu.
3. A window will pop up. Click File/Disk to choose the images you want to add. Your selected pictures will appear in the Pictures in Album box.
4. Now, let’s customize it:
- Add a text box: Click New Text Box if you want to insert text between the images.
- Picture options: You can check the box to add captions below all pictures or apply a black-and-white effect to all photos.
- Change the order: Select a photo or text box and use the up/down arrows to move it.
- Remove an image or text box: Select it and click Remove if you no longer want it in the collage.
- Edit photos: Click on an image to rotate, adjust brightness, or apply simple corrections using the tools below the preview.
- Pick a layout: Open the Picture Layout menu and choose how you want the photos to be arranged.
- Choose a frame style: Open the Frame Shape menu and pick a design to give your pictures a creative look.
- Apply a theme: Click Browse to select a pre-saved theme for your collage.
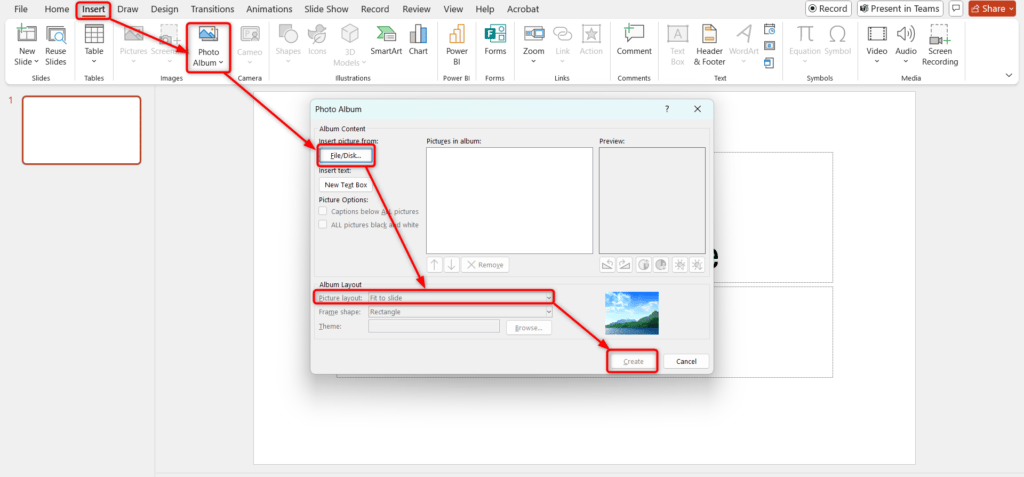
5. Once you’re happy with the setup, click Create.
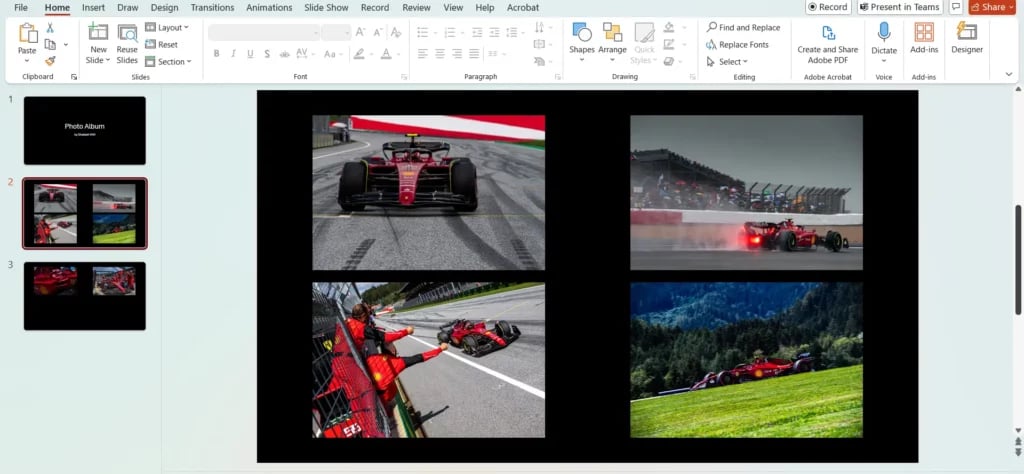
Your collage will now open as a new PowerPoint slideshow. From here, you can adjust the layout, add text, or refine the design before finalizing it.
Method 5: Creating a Custom Collage
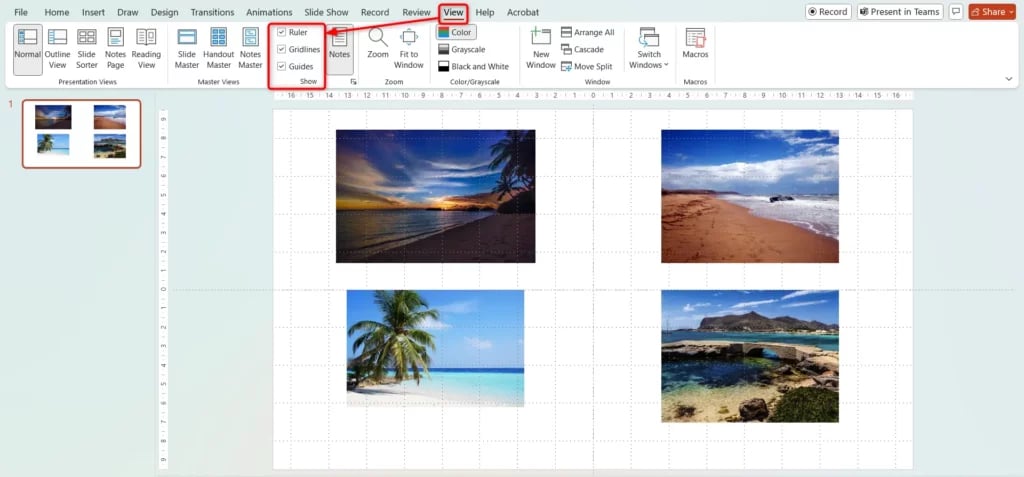
If you want complete control over the arrangement, effects, and design of your collage, this method is for you. It lets you position images freely, crop them into different shapes, and apply creative styles.
Step 1: Enable Guides and Gridlines for Alignment
To keep your collage neat and well-organized, turn on PowerPoint’s alignment tools:
- Go to the View tab at the top.
- In the Show section, check the boxes for Ruler, Guides, and Gridlines.
- These tools will help you position and align your photos evenly.
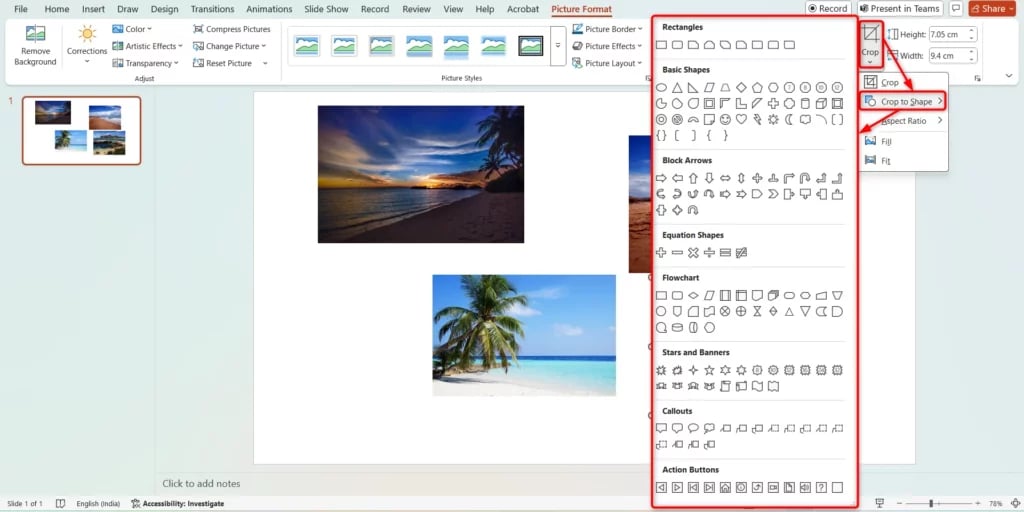
Step 2: Crop Photos into Shapes
Instead of keeping all images as simple rectangles, you can crop them into different shapes for a more artistic look:
- Select a photo and go to the Picture Format tab.
- Click Crop, then choose Crop to Shape.
- A menu will appear with different shapes like circles, ovals, and stars. Pick one to frame your image in a unique way.
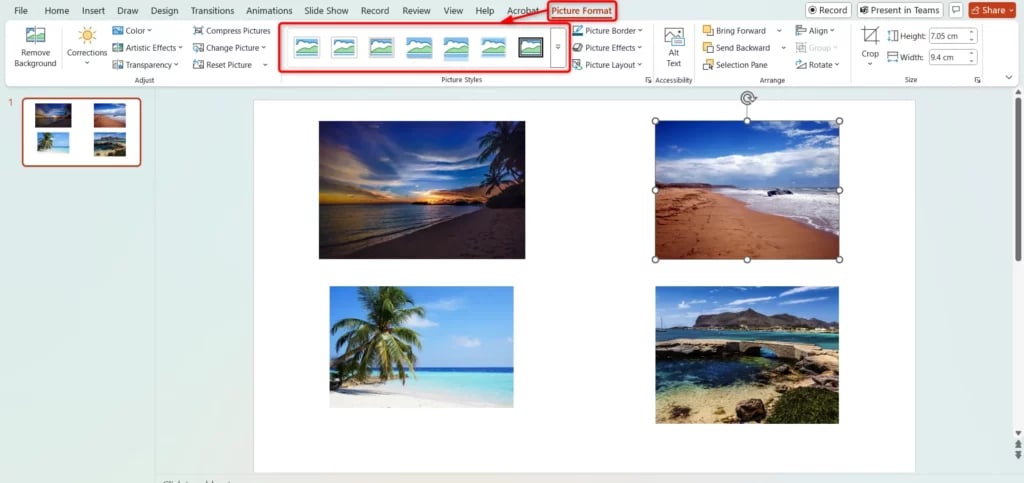
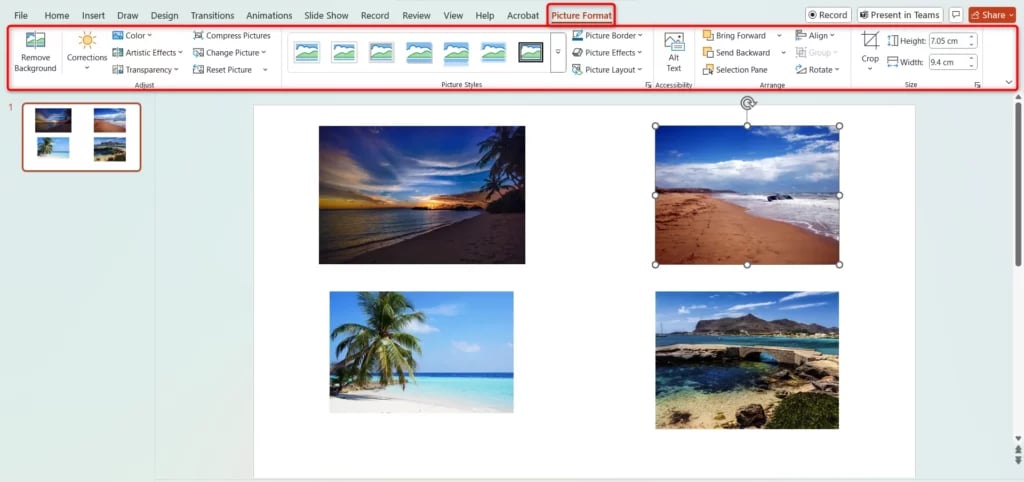
Step 3: Apply Picture Styles
To make your collage more visually appealing, you can add effects to your photos:
- Select an image and go to the Picture Format tab.
- In the Picture Styles section, explore options like frames, shadows, reflections, and soft edges.
- Try out different styles until you find a combination that looks good.
Step 4: Use Additional Editing Tools
You can further refine your collage by adjusting how the images interact with each other:
- Rotate images to change their orientation.
- Adjust transparency to blend images together creatively.
- Layer pictures by sending some forward or backward using the Arrange section in the Picture Format tab.
Create presentation slides with AI in Seconds in Google Slides
- No design skills required
- 3 presentations/month free
- Don’t need to learn a new software
Works with Google Slides

Closing Thoughts
Hope these methods make it easier for you to create a collage in PowerPoint. Whether you’re using built-in layouts, templates, or customizing your design, there’s plenty of room to get creative. Try out different options and see what works best for your project. Happy designing!
Frequently Asked Questions
Can you create a collage in PowerPoint?
Yes, PowerPoint has built-in tools that let you create a photo collage. You can insert multiple images, adjust their placement, add effects, and customize the layout to get the look you want.
Can I use PowerPoint’s SmartArt for a collage?
Yes, SmartArt provides ready-made layouts where you can insert images. This helps create a structured collage without arranging everything manually.
Why should I use a photo collage in a PowerPoint presentation?
A photo collage makes your slides more engaging. It helps organize multiple images in a neat way and makes storytelling more impactful by grouping related visuals.
What are the best ways to create a collage in PowerPoint?
- Create one using a Picture Layout.
- Use the Designer option for quick formatting.
- Try a PowerPoint template for a ready-made design.
- Use the Photo Album option to arrange multiple images at once.
- Customize your own collage by manually placing and editing pictures.