PowerPoint is a great tool not just for making presentations, but also for working together on them. If you want to share your slides with others and get their feedback, PowerPoint’s Review feature can help you track changes and see comments.
This feature allows you to compare different versions of your presentation side-by-side, so you can see exactly what’s been added, removed, or edited. You can then choose to accept or reject those changes, and even add your own notes to discuss them further.
This blog post will guide you through using the Review feature in PowerPoint to track changes made to your presentations. Let’s get started!
Steps to Track Changes in PowerPoint
Step 1: Create a Copy and Send Your Presentation for Review
Before sharing your presentation for feedback, it’s important to create a separate working copy. This ensures you don’t accidentally overwrite your original version with edits. Here’s how to do it:
- Save a Draft: Start by saving your current presentation as a draft. This can be helpful for referring back to your initial ideas during the review process.
- Create a Dedicated Review Copy: Next, save another copy of your presentation with a different filename. This will be the version your reviewers will work on. Consider including “For Review” or “Feedback” in the filename to avoid confusion.
- Choose a Sharing Platform: Select a secure, shared location to store your review copy. Popular options include OneDrive, SharePoint, or a similar cloud storage platform. Uploading your presentation there allows reviewers to access it easily.
- Generate a Shareable Link: Once uploaded, right-click the review copy file and find the option to “Copy Link. This link is what you’ll send to your reviewers in an email.
- Provide Instructions: In your email to reviewers, include clear instructions on how you’d like them to provide feedback. Do you want them to add comments directly within the slides, or would you prefer a separate document summarizing their thoughts?
By following these steps, you’ll have a dedicated review copy ready for collaboration and can effectively track the changes made by your reviewers.
Create Presentations Easily in Google Slides and PowerPoint
15M+Installs
Step 2: Use the Compare Feature and Merge Both Versions
After everyone has finished reviewing your shared presentation, you can use the Compare feature to review their changes and integrate them into your original document. Here’s how to do it:
1. Open the Original Version: Start by opening the original version of the presentation that you saved before sharing it for review. This will serve as the baseline for comparing the changes.
2. Navigate to the Review Tab: Locate the “Review” tab on the PowerPoint ribbon. This tab houses all the functionalities related to reviewing and editing presentations collaboratively.
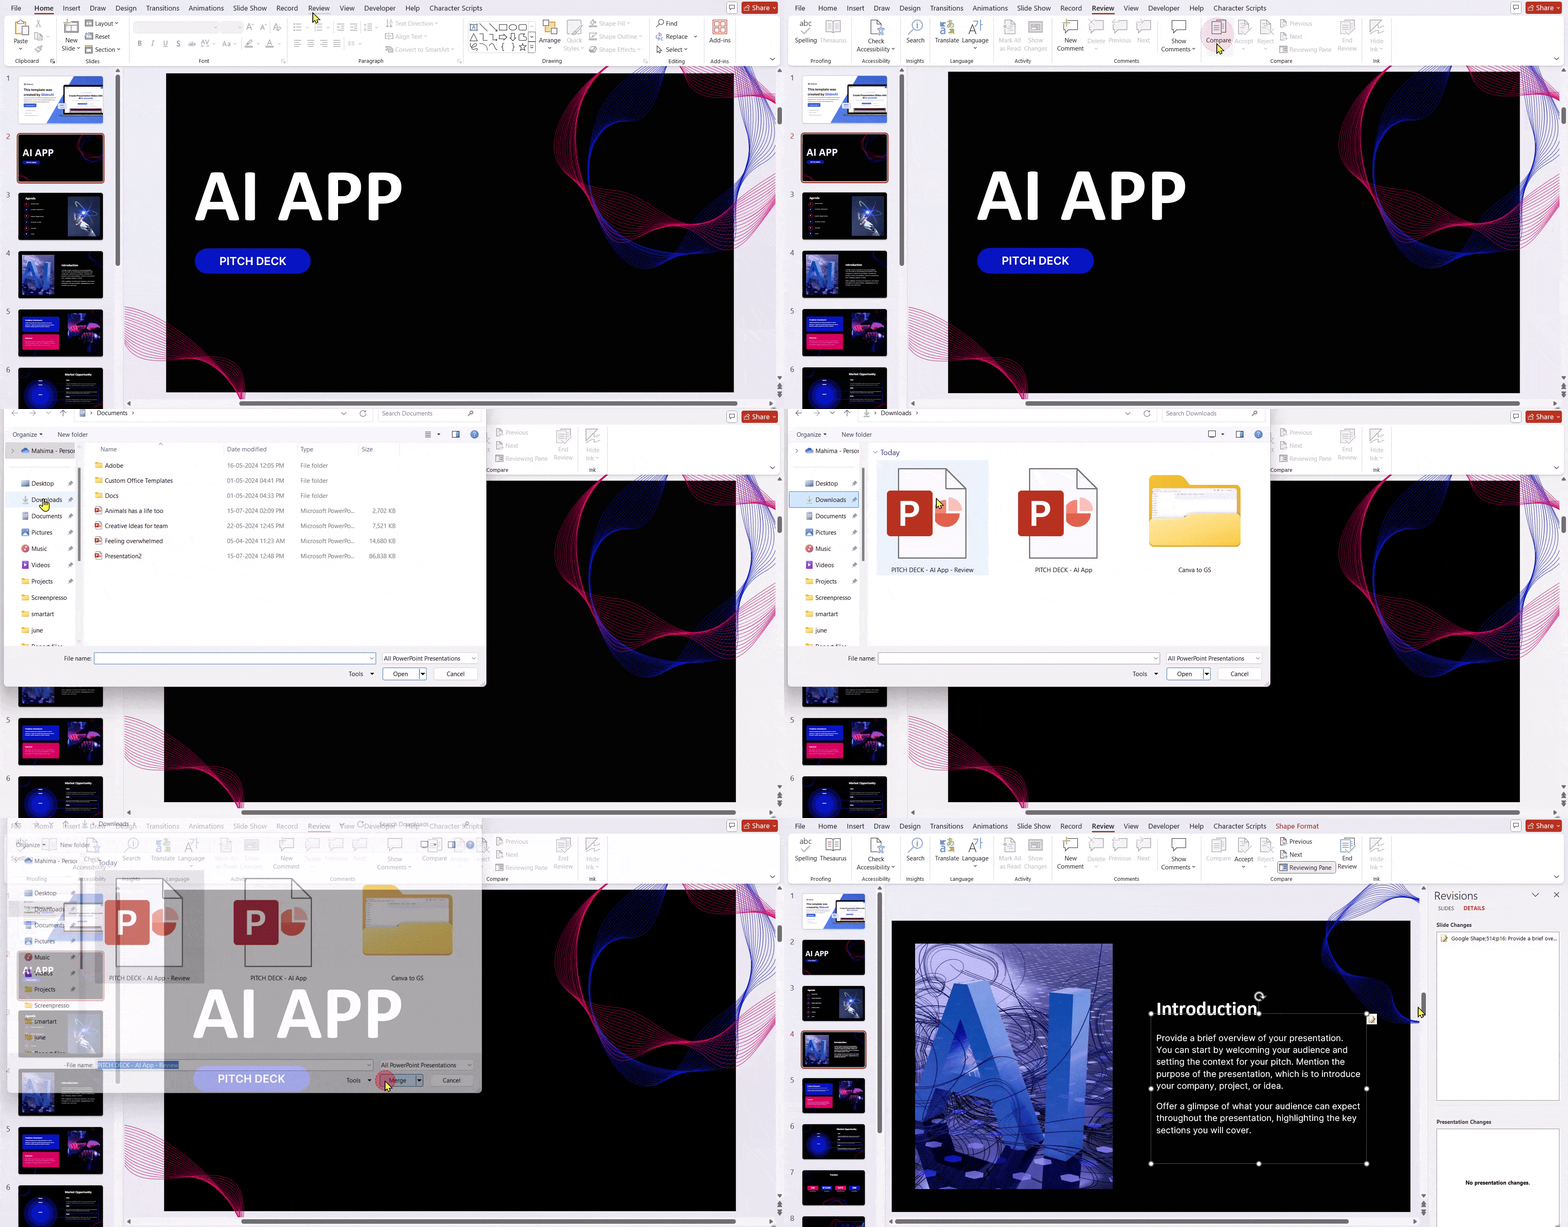
3. Access the Compare Feature: Within the “Review” tab, look for the “Compare” button. Clicking this button will initiate the process of comparing your original version with the edited version received from reviewers.
4. Select the Edited Version: A window titled “Choose File to Merge with Current Presentation” will appear. Here, browse and select the edited version of the presentation that contains the reviewers’ comments and changes. This could be a file you received via email or downloaded from a shared folder.
5. Merge the Presentations: Once you’ve selected the edited version, click the “Merge” button. This will initiate the merging process, where PowerPoint will compare both presentations and highlight the differences.
6. Review Changes in the Revisions Pane: A new pane on the right side of your screen called the “Revisions” pane will appear. This pane displays all the changes made by reviewers on each slide. Look for sections titled “Slide Changes” and “Presentation Changes” to identify specific modifications.
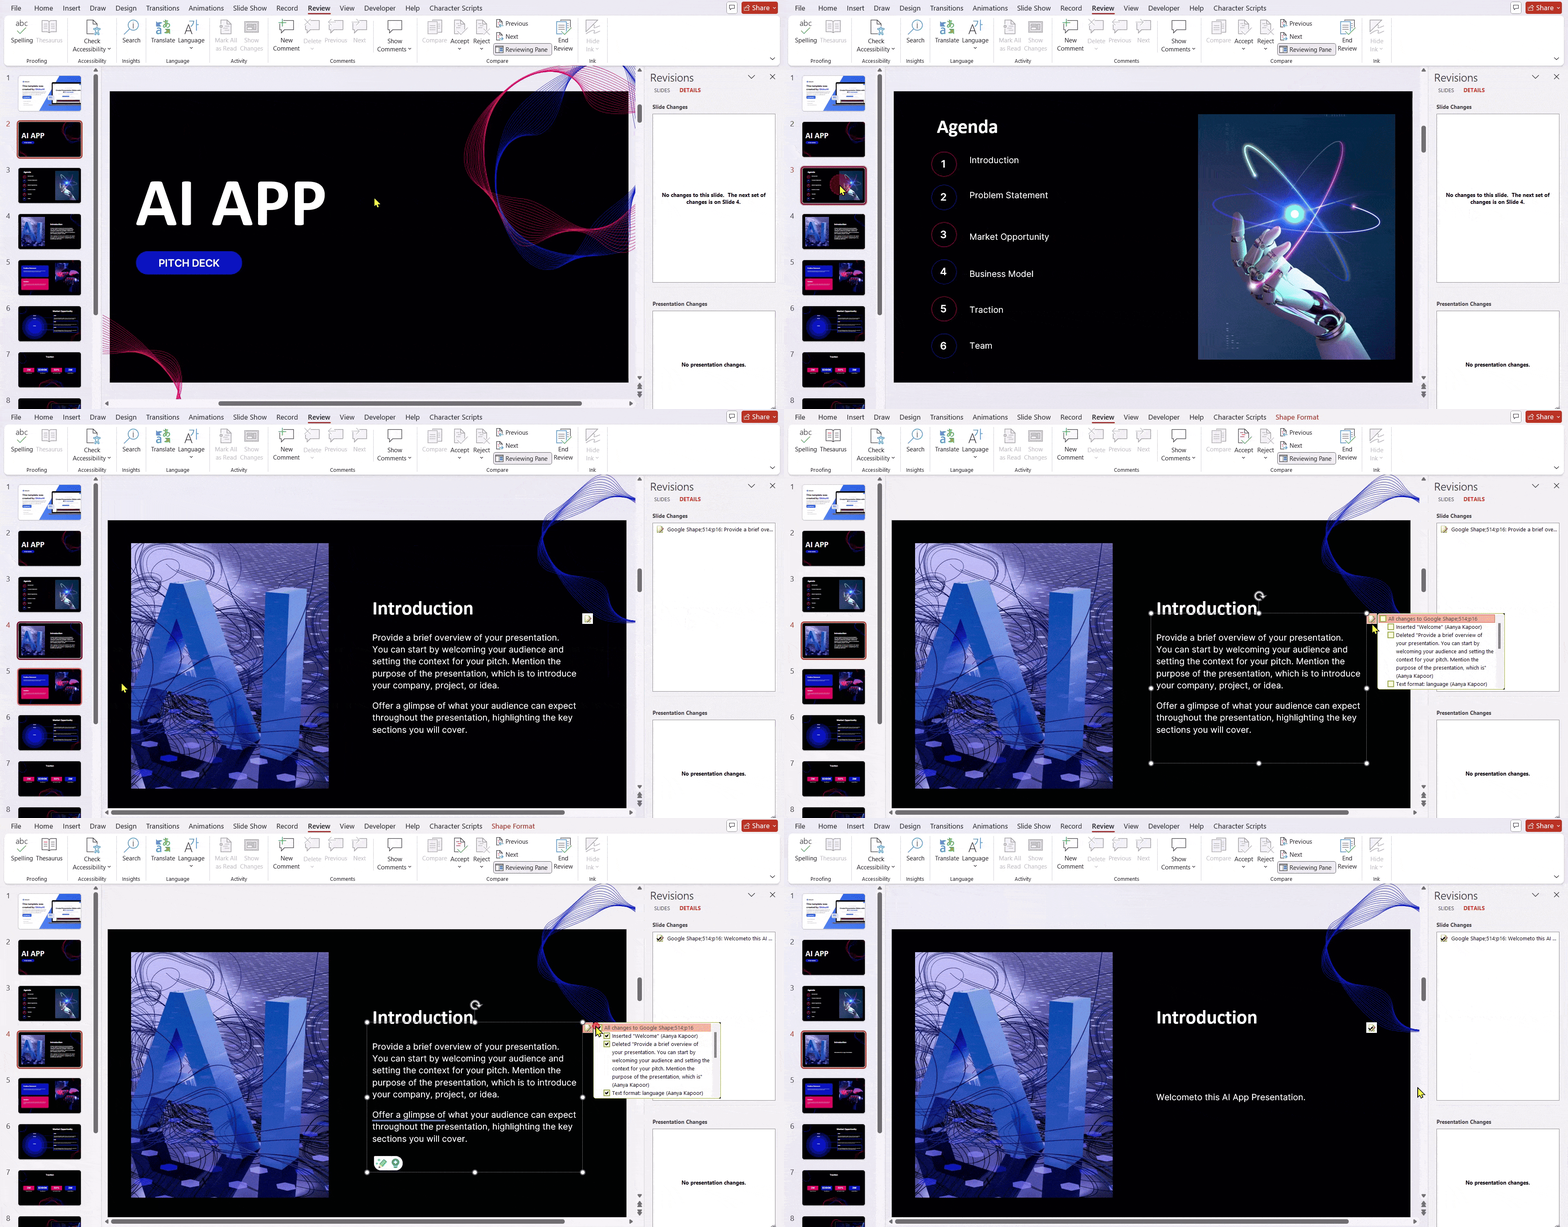
7. Inspect Individual Changes: Click on each list item within the “Slide Changes” or “Presentation Changes” section to see the details of the edits made to specific elements on the slide. This could include added text, deleted content, formatting changes, or image replacements.
8. Review Reviewer Comments: If reviewers left comments alongside their edits, you’ll find them displayed under “Slide Changes” in the “Revisions” pane. Clicking the “Comments” button at the bottom of the PowerPoint window (on the status bar) will open a dedicated section for viewing all comments left by reviewers.
Step 3: Reviewing and Accepting/Rejecting Changes
This step lets you review the edits suggested by others and choose whether to keep them.
- Keeping a Change: If you like a change, simply click the checkbox next to the edit that says “Other authors: A change has been made.” This will accept the change and incorporate it into your presentation.
- Skipping a Change: If you don’t want to accept a change, you don’t need to do anything! Changes without checked boxes won’t be applied to your final presentation.
Benefits of Track Changes in PowerPoint
- Streamlined Collaboration: Multiple editors can work on a single presentation simultaneously. Track Changes highlights edits, clearly indicating who made what modification and when. This eliminates confusion and allows you to easily see the proposed changes. You can then decide to accept or reject them, ensuring everyone contributes effectively.
- Effortless Version Control: Tracking Changes makes managing different versions of your presentation a breeze. You can easily revert to an earlier version if needed, or compare multiple versions to see the specific changes made in each. This is helpful for tracking progress or making sure you haven’t lost important information.
- Enhanced Quality Control: By using Track Changes, you can guarantee that all edits are reviewed and approved before finalizing the presentation. This helps to catch errors or missing information before they become a problem in the final product.
- Regulatory Compliance: In some regulated industries like finance or healthcare, Track Changes can be crucial for meeting compliance requirements. It ensures that all changes made to the presentation are documented and verifiable. This provides a clear audit trail for regulatory purposes.
In addition, using tools like a phishing link checker when sharing review copies ensures that links exchanged between collaborators remain secure and compliant.
Build Stunning Slides in Seconds with AI
- No design skills required
- 3 presentations/month free
- Don't need to learn a new software

Closing Thoughts
PowerPoint’s Track Changes feature offers a powerful and user-friendly solution for collaborative presentations. By following the steps outlined in this guide, you can effectively track edits, manage reviewer feedback, and ensure a streamlined workflow for creating high-quality presentations. From improved collaboration to enhanced quality control, Track Changes empowers you to deliver polished and impactful presentations every time.
Frequently Asked Questions (FAQs)
Can I track changes made by multiple users in PowerPoint?
Yes, you can track changes made by multiple users in PowerPoint by turning on Track Changes through the Review tab and saving the file to OneDrive or SharePoint. PowerPoint will highlight edits, comments, and revisions from each collaborator so you can review and approve them easily.
What types of changes can be tracked using the Compare feature in PowerPoint?
PowerPoint’s Compare feature can track changes like edited text, layout adjustments, formatting updates, and added or deleted slides. It highlights every modification made in the revised file so you can review, accept, or reject each change easily.
Can I revert to the original version after using the Compare feature?
Yes, you can revert to an earlier version, but not directly through the Compare feature itself. To restore the original file, you’ll need to use Version History and select the version you want to return to.
Does PowerPoint automatically track changes as they are made?
No, PowerPoint does not automatically track changes like Microsoft Word. To review edits, you need to manually use the Compare feature, which lets you check differences between two versions of the presentation.
