Google Slides is a handy tool for creating presentations, with features designed to make your slides more engaging. One useful option is the ability to insert maps, which can help you display geographical information or add context to your content.
In this guide, we’ll show you step-by-step how to insert and edit maps in Google Slides. Whether you’re new to Google Slides or have been using it for a while, this tutorial will help you easily add maps to your slides.
Let’s get started!
How to Embed a Map into Google Slides?
While Google Slides doesn’t allow directly embedding interactive maps, here’s how you can include a static map image:
1. Create Your Map Image:
There are two options for this step:
- Grab a Screenshot from Google Maps: Open Google Maps and navigate to the specific location you want to showcase. Zoom in or out to get the desired level of detail. Take a screenshot using your computer’s screenshot tool (usually PrtSc on Windows or Command+Shift+4 on Mac).
- Pro Tip: You can crop the screenshot later to focus on the relevant area of the map.
- Use an Existing Map Image: If you already have a suitable map image (JPG, PNG, etc.), you can use that instead.
2. Upload the Image:

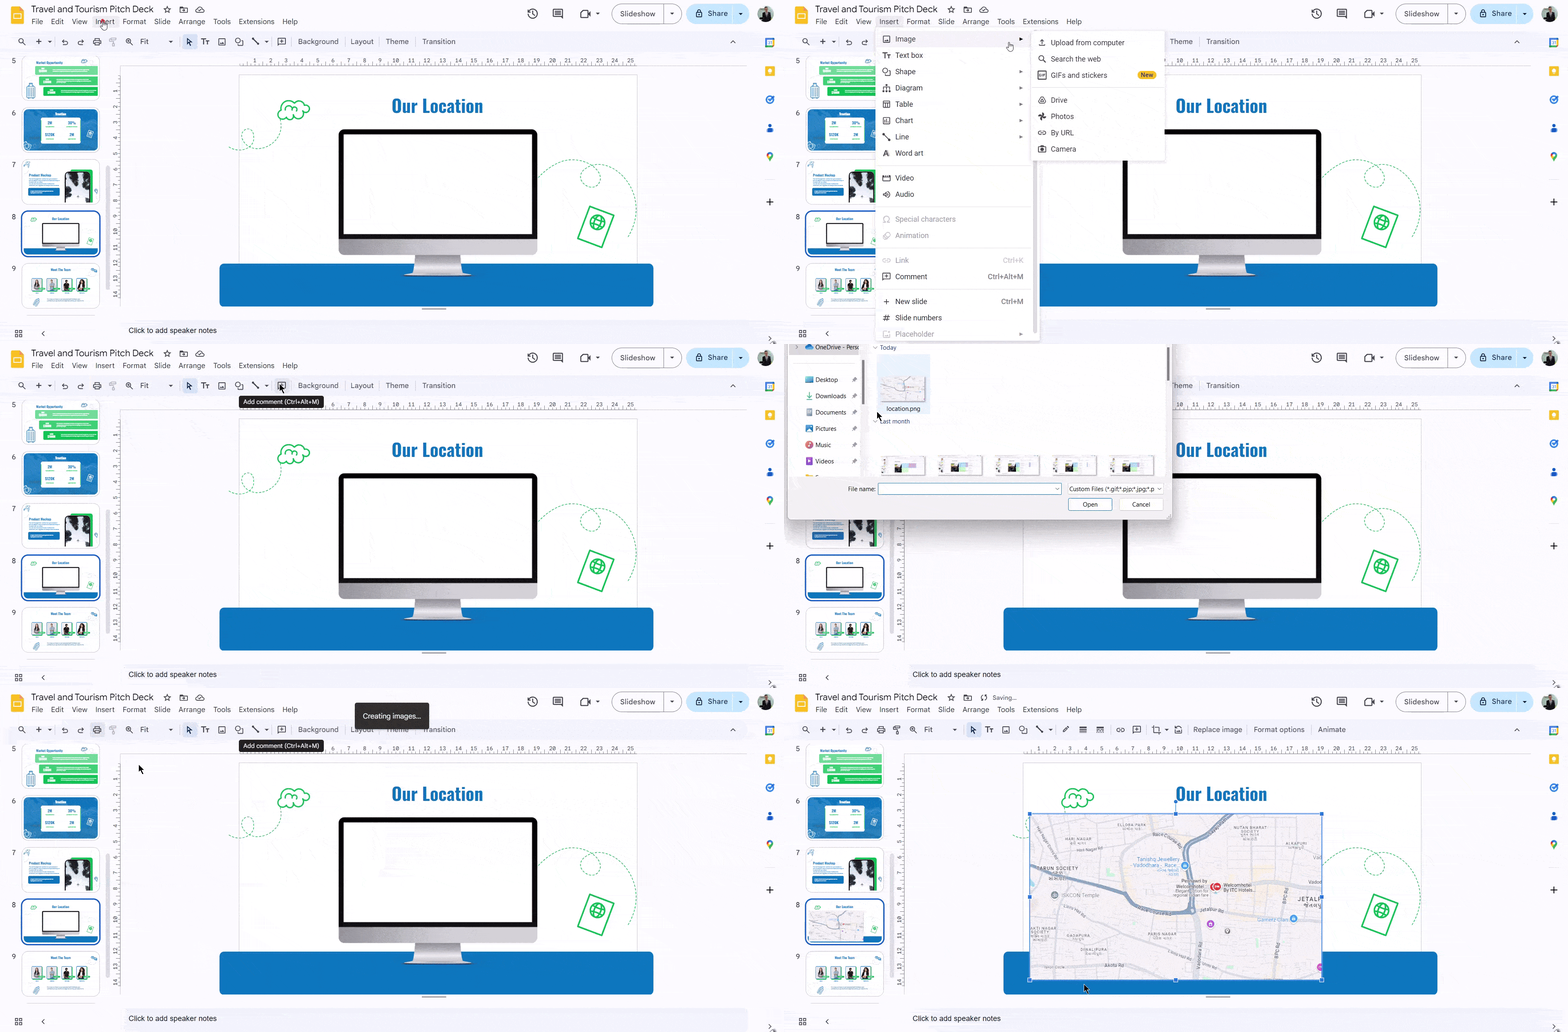
- Open your Google Slides presentation and navigate to the slide where you want to add the map.
- Click on the “Insert” menu from the top toolbar.
- Select the “Image” option. This will open a file explorer window on your computer.
- Locate the screenshot or map image you prepared earlier and select it. Click “Open” to upload the image onto your slide.
3. Position and Style:
Once uploaded, you can drag and drop the image to the desired location on your slide. Use the blue handles around the image to resize it proportionally.

- Additional Customization: Google Slides offers tools to personalize your map image further. Click on the image and explore the options available in the toolbar. You can adjust transparency to make text or other elements on your slide easier to read over the map.
- Borders or Callouts (Optional): If helpful for your presentation, consider adding a border around the map image. Google Slides provides border options, or you can insert shapes to create custom borders. You can also insert callout shapes with text to highlight specific points of interest on the map.
With these steps, you’ll successfully incorporate a map image into your Google Slides presentation, even though direct embedding isn’t currently supported.
Create presentation slides with AI in Seconds in Google Slides
15M+Installs
Works with Google Slides

Closing Thoughts
Inserting a map into your Google Slides is a simple way to enhance your presentation. By following these steps, you can easily add and customize a static map image to suit your needs. While interactive maps aren’t supported, this method still allows you to share important geographical details effectively. Happy presenting!
Frequently Asked Questions (FAQs)
1. Can I embed a live map from Google Maps into Google Slides?
No, Google Slides doesn’t allow you to directly embed live maps.
2. Can I customize the embedded map?
Since you can’t embed a live map, you can only add a static image or screenshot of the map. You can then edit the image by adding text or other elements, but direct map embedding isn’t possible in Google Slides at the moment.
3. What types of maps can I embed?
You can’t embed any type of live map, but you can use a screenshot or image of any map—whether it’s from Google Maps, Apple Maps, or another source. You’ll just need to upload the image into your slide as a workaround.


