Pictures can be a great way to get your point across in a presentation. If you’re using Google Slides, a popular tool for making presentations, you can change how pictures are layered on top of each other.
This can be helpful if you want one picture to stand out more than the others. This guide will show you the easy steps to do this in Google Slides. Without waiting further, let’s jump right into it.
Steps to Bring an Image Forward in Google Slides
1. Open Your Presentation: Get started by opening the Google Slides presentation you want to work on. If you don’t have one yet, you can easily create a new one.
2. Find the Slide With the Image: Click on the specific slide where you want to adjust the image’s position.
3. Click on the Image: Look for the image you want to move forward and simply click on it to select it.
4. Bring the Image Forward: There are a couple of ways to do this. You can find the “Arrange” menu at the top of the screen. Click on “Arrange” and then choose “Move forward” from the options.
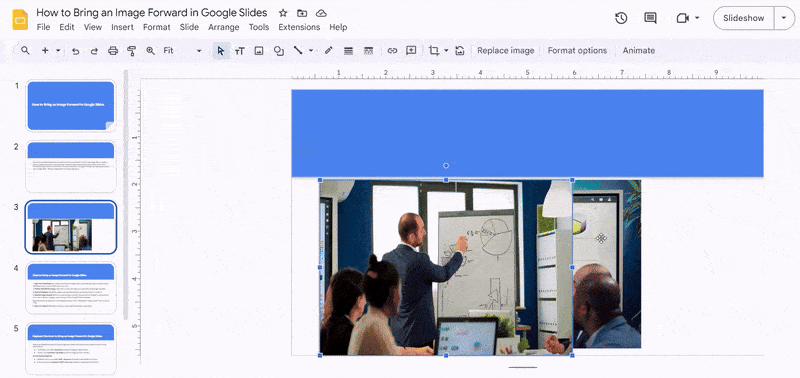
Alternatively, you can right-click on the image and choose “Order” followed by “Bring forward” from the pop-up menu.
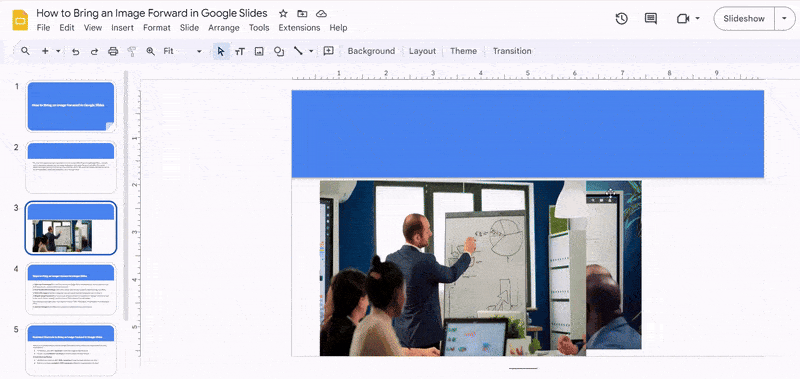
5. Save Your Changes: Remember to save your presentation to keep your adjustments.
Keyboard Shortcuts to Bring an Image Forward in Google Slides
Want to use keyboard shortcuts instead? Google Slides makes it easy to move your image to the front using your keyboard:
- On Windows, press Ctrl + Up Arrow to move the image one layer forward.
- On Mac, press Command + Up Arrow to move the image one layer forward.
For even faster positioning:
- Windows users can press Ctrl + Shift + Up Arrow to bring the image directly to the front.
- Mac users can press Command + Shift + Up Arrow to bring the image directly to the front.
Closing Thoughts
By following these simple steps, you can effortlessly control the layering of your images in Google Slides. This allows you to prioritize specific visuals and ensure your message is delivered with maximum impact. So go forth, experiment with image placement, and create visually engaging presentations that will capture your audience’s attention.
Create presentation slides with AI in Seconds in Google Slides
15M+Installs
Works with Google Slides
Frequently Asked Questions (FAQs)
Why would I need to bring an image forward in Google Slides?
Bringing an image forward helps emphasize important visuals and create a more visually engaging presentation.
Can I adjust the layering of multiple images on a single slide?
Absolutely, you can bring forward or send backward any number of images within a single slide.
What if I accidentally bring the wrong image forward?
No worries! Simply follow the same steps and choose “Send Backward” or “Send to Back” from the “Arrange” submenu to move the image back to its original position or behind other elements. Or just undo the process and re-do it the correct way.