Google Slides has transformed how we produce and deliver presentations, providing a dynamic platform for educators and professionals alike. Whether you are preparing a school lecture or a business proposal, learning basic Google Slides presentation techniques like image modification can significantly improve the visual attractiveness of your slides.
This detailed article walks you through the steps to move an image to the back in Google Slides. By the conclusion of this tutorial, you’ll know how to efficiently handle picture layers, ensuring that your presentations are clean and professional.
How Do You Move an Image to the Back in Slides?
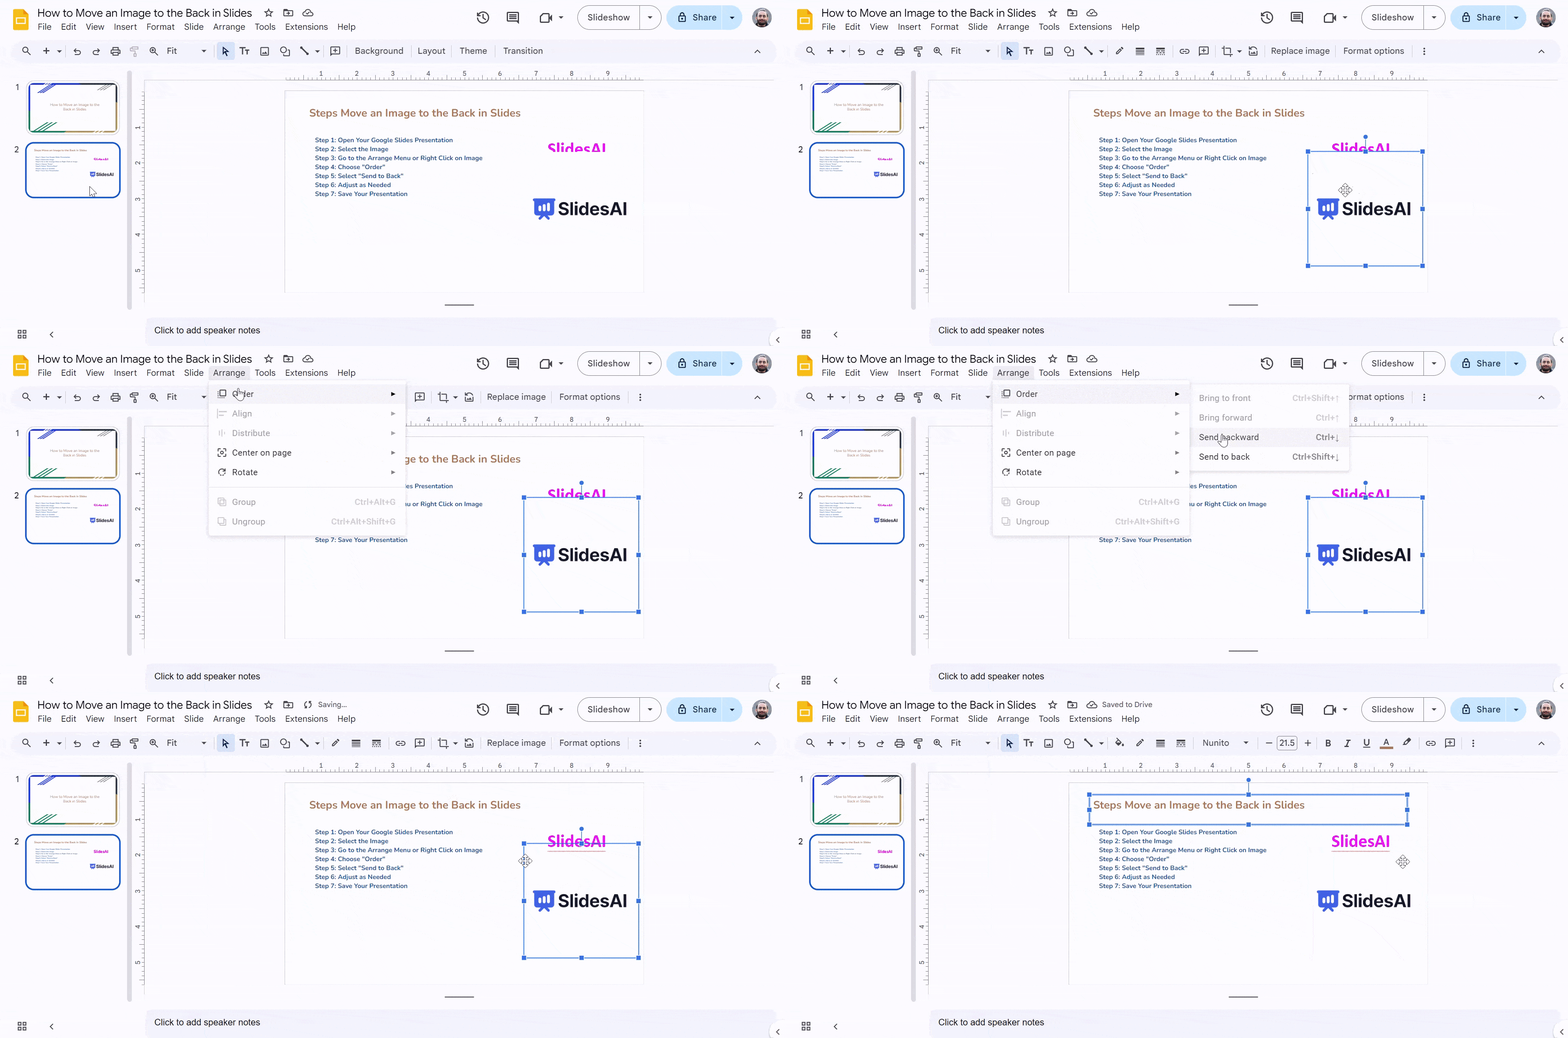
Mastering fundamental activities is the first step towards unlocking the full potential of your Google Slides presentations. Follow these precise instructions to shift a picture to the rear of your slide, enabling other components to take precedence.
Step 1: Open Your Google Slides Presentation
Start by viewing the presentation containing the picture you wish to relocate. If you haven’t previously developed a presentation, now is the time to get started. Remember that adequately organizing your elements from the start saves time in the long run.
Step 2: Select the Image
Click the image you want to move to the back. Once selected, a bounding box will appear around the image, indicating that it is ready for further processing. Remember, choosing the proper picture is critical, especially when working with various visual components.
Step 3: Navigate to the Arrange Menu or Right-click on the Image
Navigate to the “Arrange” menu at the top of the screen. Alternatively, you may get a context menu by right-clicking on the selected picture. Both approaches guide you to the appropriate options for changing the image’s location.
Step 4: Select “Order”
In the “Arrange” section, use the dropdown menu to pick “Order.” This submenu provides several options for positioning the selected object with respect to the other components on the slide. Understanding the “Order” function is essential for organizing complicated slide designs.
Step 5: Choose “Send to Back”
In the “Order” submenu, select “Send to Back.” This operation positions the selected image behind other elements of the presentation. It’s a primary but effective tool for ensuring your presentation’s layout is precisely as you want it.
Step 6: Adjust as Needed
If your slide has numerous items, you may need to repeat these steps to obtain the correct layering. If you need to rearrange a picture, click and drag it. Mastery of these tweaks can be the difference between a disorganized slide and a unified visual story.
Step 7: Save Your Presentation
Finally, save your Google Slides presentation to retain the modifications you made to the picture layering. Saving often prevents work loss and ensures content integrity.

Create Presentations Easily in Google Slides and PowerPoint
15M+Installs

Conclusion
Mastering the art of image editing in Google Slides greatly improves the visual quality of your presentations, making them more engaging and professional. By following the instructions in this post, you can easily relocate photos to the background, enabling other components to shine.
So, are you ready to elevate your Google Slide presentation?
Feel free to experiment with your slides and make full use of Google Slides’ features. Remember that every detail is vital in crafting a fascinating presentation, and the abilities you gain definitely create an impression on your audience.
Frequently Asked Questions Related to Moving an Image to the Back in Slides
1. How do I move an image to the front of Google Slides?
To move a photo to the front in Google Slides, follow these steps: First, open your presentation and scroll to the slide with the image. Click on the image to choose it. Then, from the “Arrange” option at the top, pick “Order” and then “Bring to Front.” This places the picture above all other components on the slide.
2. What should I do if I can’t find the “Send to Back” option?
Make sure you’ve chosen the image you wish to relocate. If you’re still having problems, look into your software’s help or manual. Often, a simple search query in the help section may answer such issues.
3. What if I accidentally move an image too far back and can’t see it anymore?
You can use the “Undo” or “Redo” functions to reverse your actions. If you are still unable to find the image, try to rearrange the objects which are in front of the image. Familiarizing yourself with these functions can save time and frustration.
4. How do I move an image to the back in PowerPoint?
To transfer an image to the back in PowerPoint, use the “Send to Back” option. First, click on the photo you wish to relocate. Next, go to the “Home” tab on the top ribbon. In the “Drawing” group, select “Arrange” from the dropdown menu. From there, choose “Send to Back.” This option places the selected image behind all other items on the slide.


