Do you regularly make presentations using PowerPoint to communicate your ideas and plans? If so, don’t underestimate the power of curving arrows. They can efficiently guide your audience’s attention when you are presenting a procedure or emphasizing important topics.
By combining these visual elements into your presentations, you may provide a more dynamic and understandable experience for visitors.
This post shows you how to make a curved arrow in PowerPoint from start to finish. From this article, you can also learn how to draw basic shapes and discover other customization choices to improve the visual attractiveness of your presentations.
So, let’s get started on making your slides stand out!
Why Should You Use Curved Arrows in PPT?
Curved arrows serve various important functions in presentations, such as:-
- Effective Indicator: Curved arrows efficiently represent flow or direction, making them perfect for demonstrating processes and linkages. This visual clue helps your audience understand the movement of ideas more clearly.
- Visual Engagement Tool: Curved arrows also improve visual engagement by adding a sense of fluidity that breaks up the monotony of straight lines. This results in a more polished and professional appearance in your presentations.
- Simplification: Finally, when dealing with complex topics like feedback loops or circular systems, these arrows make learning easier by clearly illustrating intricate interactions visually. Thus, using curved arrows in PPT can improve the clarity and aesthetic appeal of your presentation.
How to Make a Curved Arrow in Powerpoint – Effective Methods
By applying the following methods, you can masterfully incorporate curved arrows into any presentation, making complex ideas easier for your audience to digest. Check out these step-by-step procedures:-
Method 1: Use the Curved Arrow Shapes
- Step 1: Start by launching the application on your computer.
- Step 2: Navigate to the slide where you wish to add the arrow.
- Step 3: Click on the “Insert” tab. From there, select “Shapes,”
- Step 4: Choose “Block Arrows” from the drop-down menu.
- Step 5: Pick your desired curved arrow shape and simply drag or draw it onto your slide as needed.

Create presentation slides with AI in Seconds in Google Slides
14M+Installs
Works with Google Slides

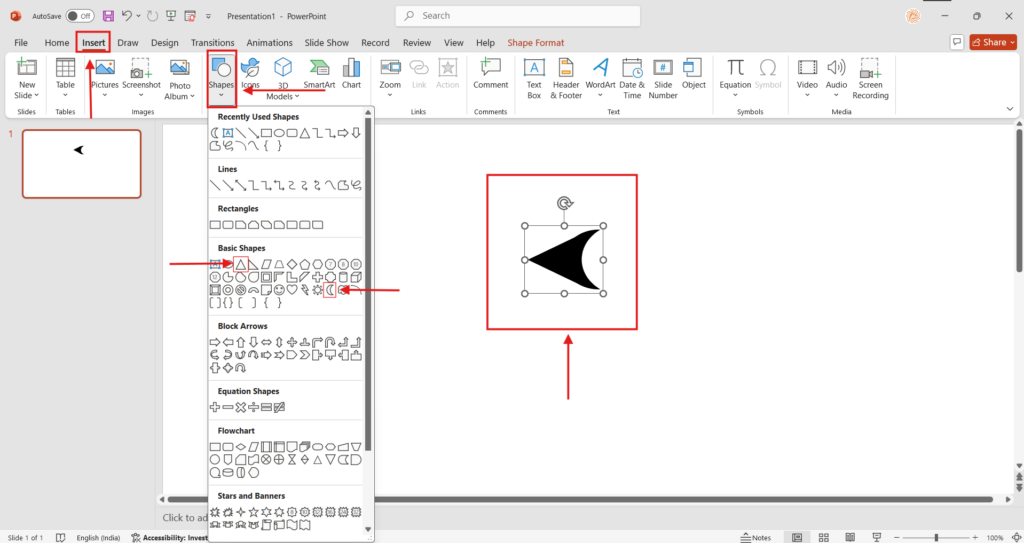
Method 2: Merge Shapes
- Step 1: Pick the slide to which you want to add it.
- Step 2: Navigate to the “Insert” menu and select “Shapes.”
- Step 3: Choose from the basic forms offered.
- Step 4: Choose the “Moon shape.”
- Step 5: Modify the size to suit your choice for the curved arrow.
- Step 6: Choose a triangle shape to form the tip of your arrow and place it at one end of your Moon shape.
- Step 7: Once both shapes are properly aligned, hold down Shift while clicking on each to select them together
- Step 8: Right-click and select “Group” from the menu options to create a single curving arrow design suitable for use in your presentation.

Method 3: Apply SmartArt Graphics
- Step 1: Start by opening a new slide.
- Step 2: Head over to the “Insert” tab and select “SmartArt.” This brings up a dialogue box prompting you to choose a graphic.
- Step 3: Look for the “Cycle” options and pick one of the templates that feature curved arrows.

Finally, mastering the use of curved arrows in PowerPoint presentations helps you explain complicated ideas more effectively and engage your audience.
This blog post walked you through the different benefits of using curved arrows, as well as simple ways to make them in PowerPoint. So, now that you have the tools and information to improve your presentation skills, it’s time to put them to use! Begin generating interesting and visually appealing slides to engage your audience.
Create presentation slides with AI in Seconds in Google Slides
- No design skills required
- 3 presentations/month free
- Don’t need to learn a new software
Works with Google Slides

FAQs
Can I animate the curved arrow to draw attention?
You may animate a curved arrow in PowerPoint to effectively grab attention. Simply go to the “Animations” page and select an option such as “Wipe” or “Grow/Shrink.” Adjust the direction, pace, and delay of your pick to create a more dynamic presentation.
Is it possible to change the color of the arrow without losing the curved shape?
If you want to change the color of your arrow without changing its shape, simply select it and navigate to the “Format” tab. There, you can discover the “Shape Fill” option, which allows you to choose any color while retaining the smooth curve.
Can I create a dashed or dotted curved arrow in PowerPoint?
Of course! The PowerPoint tools allow you to create dashed or dotted lines as well. Select your curving arrow again; return to “Format,” and then click “Shape Outline.” Simply select “Dashes,” where you can see options for both dotted and dashed designs.
How do I make a curved arrow that points in a specific direction?
To properly orient a curved arrow in a certain direction, modify both the angle of curvature and the arrangement of its heads until it points exactly where you want it to. Keep adjusting these settings until everything is precisely aligned!


