PowerPoint slides typically use a landscape orientation, where the width of the slide is wider than its height. This layout has become the norm for presentations because it matches the shape of many projectors and computer screens, ensuring that your content looks its best when displayed to your audience.
Landscape and Portrait Slide Sizes?
In PowerPoint, slides are typically set to Landscape orientation by default, coming in two sizes:
- Standard: 4:3 ratio (10×7.5 inches)
- Widescreen: 16:9 ratio (13.33×7.5 inches)
For Portrait slides, the default size is 10×5.626 inches.
Landscape orientation provides a wider space for your content, making it great for including visuals like images, charts, graphs, and tables. The text flows naturally from left to right, which is easier for viewers to read and understand.
On the other hand, Portrait orientation has a taller, narrower layout, with the height exceeding the width. While it’s not as common in presentations, Portrait orientation might be useful for specific situations where a different layout is needed.
How to Change PowerPoint to Portrait
On Windows:
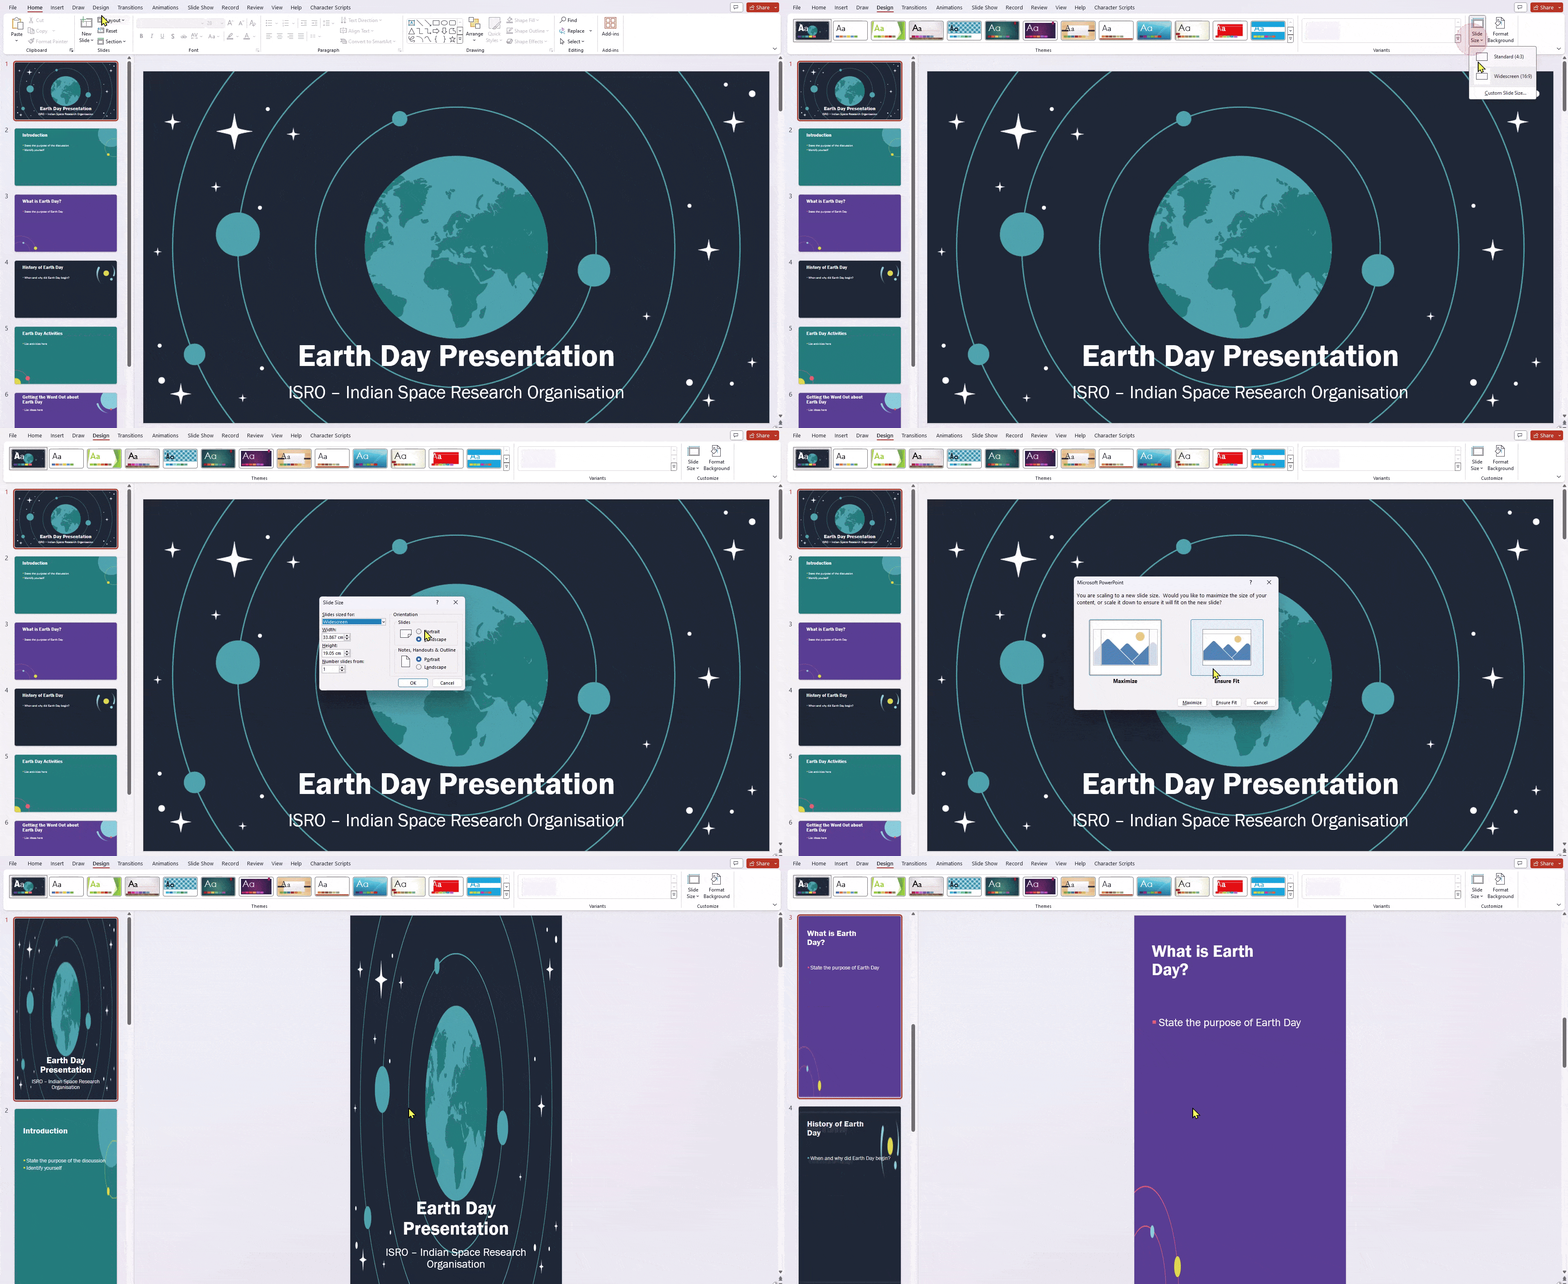
Step 1 – Open your presentation: Launch Microsoft PowerPoint and open the presentation you want to modify.
Step 2 – Access the Design tab: Locate the ribbon at the top of the PowerPoint window. Click on the “Design” tab.
Step 3 – Find the Slide Size options: Within the “Design” tab, look for the “Customize” group on the right-hand side. Click the dropdown menu under the label “Slide Size.”
Step 4 – Choose “Custom Slide Size”: Several pre-defined sizes will appear. Instead of selecting one of those, choose the option at the very bottom: “Custom Slide Size.”
Step 5 – Set Orientation to Portrait: A new window titled “Slide Size” will pop up. Under the “Orientation” section, you’ll see two radio buttons: “Landscape” (which is the default) and “Portrait.” Click the radio button next to “Portrait” to switch the orientation.
Step 6 – Click “OK”: Once you’ve chosen “Portrait,” simply click the “OK” button at the bottom of the “Slide Size” window.
Step 7 – Choosing Between “Maximize” and “Ensure Fit”
After clicking “OK” in the previous step, PowerPoint might prompt you with a choice between two options:
- Maximize: This option enlarges your existing slide content to fill the entire portrait space. However, this may cause some elements to appear distorted or cut off.
- Ensure Fit: This option shrinks your slide content to fit proportionally within the portrait layout. This ensures everything stays visible but may leave extra blank space around the edges.
Create presentation slides with AI in Seconds in Google Slides
15M+Installs
Works with Google Slides
On MacOS:
- Open your PowerPoint presentation.
- Go to the File menu and select Page Setup.
- In the “Page Setup” dialog box, under Orientation, choose Portrait. You can also adjust the width and height values here if needed.
- Click OK.
Recommendations:
- For presentations intended to be shown on a screen: Choose “Maximize” to utilize the full portrait area. Text and images might need slight adjustments to avoid being cropped.
- For printing handouts or notes: Opt for “Ensure Fit” to guarantee all content remains visible on the printed page, even if there’s extra space.
Are you a Google Slides user? Check our guide on How To Make Google Slides Vertical here!
How to Make a Single Slide Portrait in PowerPoint?
While PowerPoint doesn’t directly support both orientations within a single file, you can achieve this by linking separate presentations. Here’s how:

Step 1: Open your landscape presentation.
Step 2: Navigate to the slide where you want to insert the link.
Step 3: Add a text box or select existing text to act as the link.
Step 4: Go to Insert > Action.
Step 5: Choose between “Mouse Click” (triggers when you click the text) or “Mouse Over” (triggers when you hover over the text).
Step 6: Select “Hyperlink to:” and choose “Other PowerPoint Presentation” from the dropdown.
Step 7: Locate and select your portrait presentation. Then in “Hyperlink to Slide”, select the slide you want to start from.
Step 8: Click “OK.”
Now, during your presentation, clicking (or hovering, if you chose Mouse Over) the designated text will seamlessly switch to your portrait presentation.
Remember these things while linking the presentation:
- Ensure both presentations are saved in the same folder to avoid broken links.
- Consider using a clear call to action on the linked text, like “Click here for details” or “View data in portrait mode.”
Benefits of Portrait Orientation
There are several reasons why you might need to change the orientation to portrait:
1. Enhanced Viewing Experience
- Vertical Content Suitability: Documents, articles, and social media feeds primarily consist of text, making portrait orientation more efficient in utilizing the screen’s height. This allows for better readability with fewer scrolls needed to view content.
- Focused Viewing: Portrait orientation gives a better view of vertical content like portraits or tall buildings, allowing you to focus on the details without distractions.
2. Considering Device Limits
- Comfortable Handheld Use: Holding a phone or tablet in portrait orientation is often more comfortable for long periods.
- Optimized Screen Space: On smaller screens, portrait orientation might be the only way to see everything without zooming or scrolling sideways.
3. Tailoring to Application Needs
- App-Specific Design: Certain applications are primarily designed for portrait orientation, and using them in landscape mode may result in functionality or display issues.
- Seamless Reading Experience: Many ebooks and webcomics are formatted for vertical scrolling, making portrait orientation preferable for a smooth and uninterrupted reading experience.
Create presentation slides with AI in Seconds in Google Slides
- No design skills required
- 3 presentations/month free
- Don’t need to learn a new software
Works with Google Slides

Tips for Creating Visually Appealing Portrait Slides
Choosing the Right Images:
- Pick clear, well-lit portraits without blurriness or pixelation.
- Make sure the images match the slide content, avoiding generic stock photos.
- Select portraits that convey emotions and resonate with the audience, considering facial expressions and mood.
- Aim for diversity by including various genders, ethnicities, ages, and backgrounds.
Composition and Design:
- Crop images strategically to highlight the subject’s face and remove distracting background elements.
- Position portraits carefully within the slide layout for balance.
- Use empty space effectively to avoid clutter and draw attention to the portrait.
- Coordinate the color scheme of the portrait with other slide elements.
Text and Content:
- Keep text brief on the portrait slide to avoid overshadowing the image.
- Choose a clear, readable font that matches the overall style.
- Place text thoughtfully to ensure important parts of the portrait are visible.
Additional Considerations:
- Use filters sparingly to enhance the mood without compromising image quality.
- Consider adding subtle overlays or textures for visual interest.
- Maintain a consistent visual style for a professional look.
Closing Thoughts
Changing PowerPoint to portrait orientation is a straightforward process that lets you customize your presentations to fit different purposes. Whether you’re making a vertical infographic or getting slides ready for a poster presentation, these steps will help you easily switch between landscape and portrait orientations in Microsoft PowerPoint.
Frequently Asked Questions
Why change slide orientation in PowerPoint?
While landscape dominates presentations, switching to portrait in PowerPoint can be beneficial for showcasing tall content like portraits and infographics, creating handouts, adapting to specific screens, or adding visual variety. However, this format has limitations – you can’t mix orientations and content might require adjustments. Choose the orientation that best suits your content and presentation goals.
Can I mix Portrait and Landscape slides in one presentation?
While directly combining them isn’t possible, you can achieve a similar effect. Here’s how:
Create two separate presentations: One in landscape and another in portrait.
Link the presentations: Insert hyperlinks in your main presentation (landscape) to specific slides in the portrait presentation.
Does changing one slide’s orientation affect the whole presentation?
Yes. By default, all slides in a presentation share the same orientation (landscape or portrait). Changing one slide’s orientation will automatically adjust the entire presentation to match.
Can I revert my portrait PowerPoint back to landscape?
Yes, you can easily revert to landscape by adjusting the slide size settings.
Are there specific templates designed for portrait presentations?
Some templates are optimized for portrait mode, or you can customize existing ones.
Is there a quick way to switch between Landscape and Portrait in PowerPoint?
Unfortunately, there’s no single shortcut key to change the entire presentation’s orientation. However, you can access the orientation settings through the following methods:
- Go to the “Design” tab. In the “Customize” section, you’ll find the “Slide Size” option. Clicking the dropdown menu allows you to choose between Landscape and Portrait.
- Right-click on any slide. Select “Size and Layout” from the context menu. A window will appear where you can choose the desired orientation.
How to put PowerPoint in portrait mode for handouts?
In Print settings under “Handouts,” choose a portrait layout option like “2 Slides per Page (Portrait)” to display your slides in portrait on printed handouts.
What happens to my existing content if I change the orientation to portrait?
PowerPoint will attempt to scale your existing content to fit the new orientation. However, depending on the amount of content and its layout, adjustments might be necessary to ensure everything displays correctly.
Will my presentation work on all projectors if it’s in portrait orientation?
While most modern projectors can handle portrait presentations, some older models might have limitations. It’s recommended to test your presentation on the specific projector beforehand if unsure.
