If you’re struggling to organize elements in your Google Slides presentation, this tutorial is here to help. We’ll walk you through the simple process of grouping and ungrouping objects on a slide, making it easier for you to rearrange things.
Grouping helps maintain consistency in elements like chart colors and image placement. By grouping everything together, you can make adjustments more efficiently. It is especially handy when you need to move multiple elements at once or duplicate them as a single unit. And if you ever need to edit just one element separately, you can easily ungroup them.
Let’s dive into the tutorial and get your Google Slides looking just the way you want!
How to Group Elements in Google Slides
Grouping objects streamlines your workflow in Google Slides. It lets you manage multiple elements as a single unit, simplifying tasks like moving, resizing, and applying formatting. Here’s a quick guide to get you started:
Step 1: Open Your Presentation
Let’s organize your presentation for easy editing!
Step 2: Select the Elements You Want to Group
There are two ways to choose the elements you want to group:
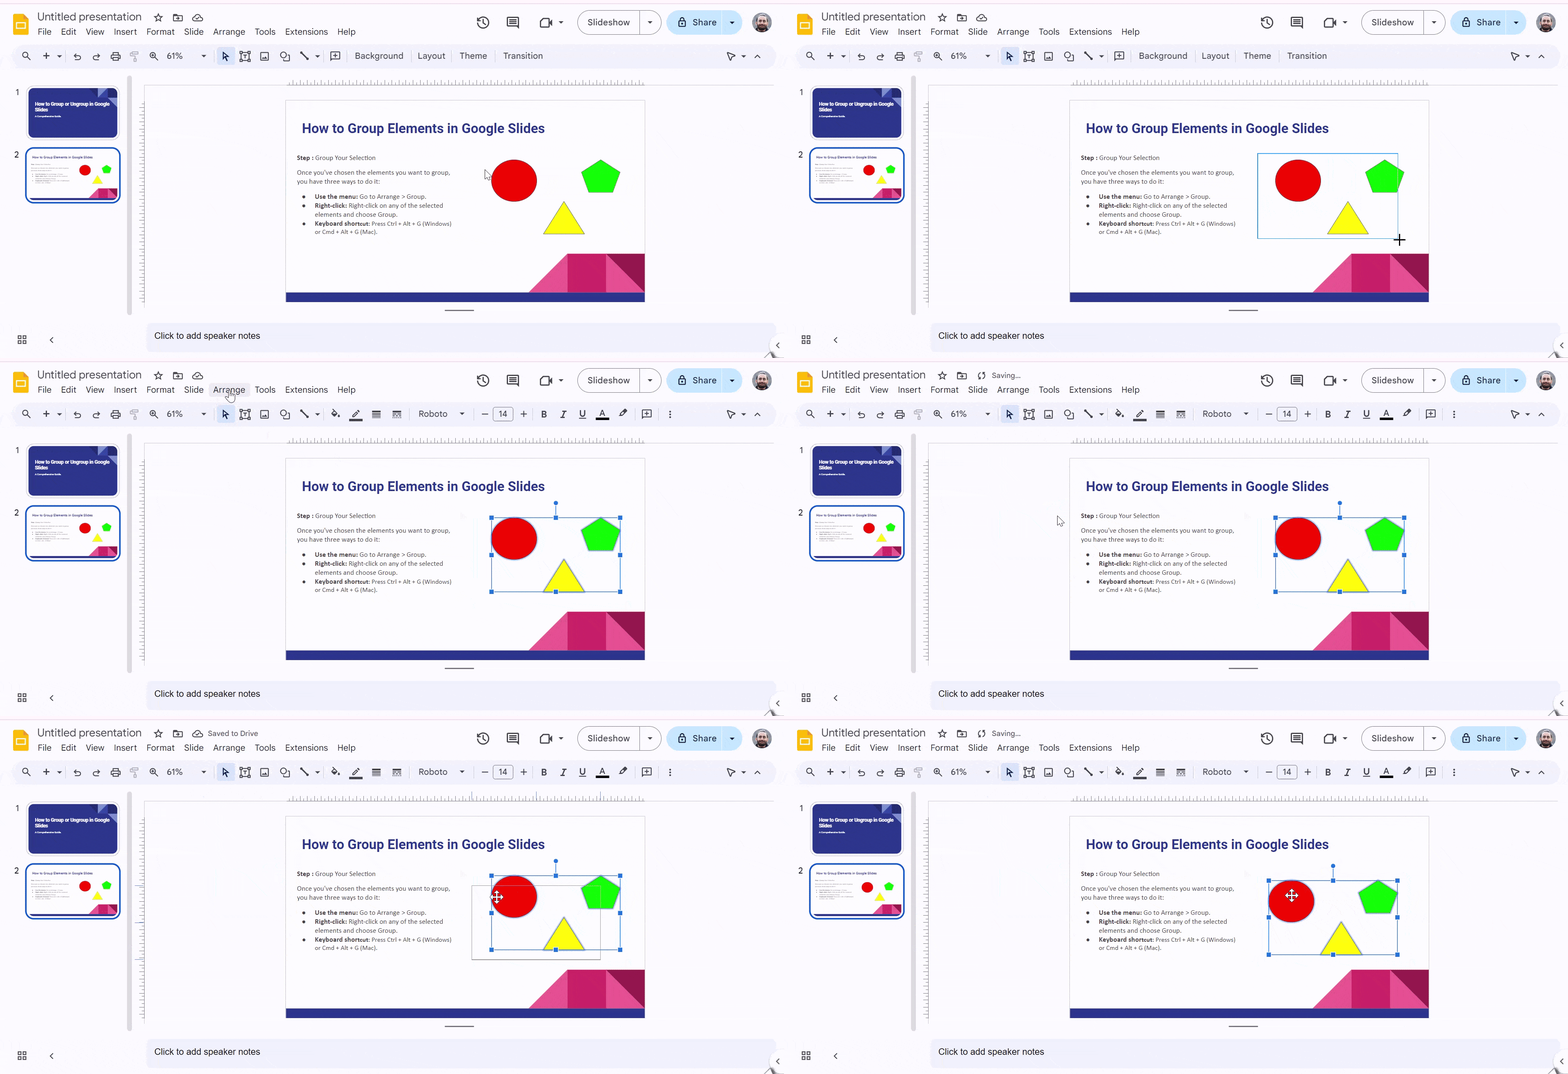
- Drag and select: Click and drag your mouse to create a box around the objects you want to group.
- Shift-click individual items: Hold down the Shift key while clicking each element you want to include.
Note: Only images and shapes can be grouped together. Text boxes can’t be part of the group, and all selected elements must be on the same slide.
Step 3: Group Your Selection
Once you’ve chosen the elements you want to group, you have three ways to do it:
- Use the menu: Go to Arrange > Group.
- Right-click: Right-click on any of the selected elements and choose Group.
- Keyboard shortcut: Press Ctrl + Alt + G (Windows) or Cmd + Alt + G (Mac).
Step 4: Work with Your Grouped Elements
Now that your elements are grouped, you can move, resize, or rotate them all at once. This keeps your formatting consistent across the group. Remember, you can always ungroup them later if you need to make changes to individual elements.
Create presentation slides with AI in Seconds in Google Slides
15M+Installs
Works with Google Slides

How to Ungroup Elements in Google Slides
Sometimes, grouped elements might need some individual attention. In Google Slides, ungrouping lets you edit objects one by one after they’ve been grouped together. Here’s how to break them free:
Step 1: Open Your Presentation
Jump into your Google Slides presentation and get ready to ungroup!
Step 2: Select the Group
Identify the group you want to ungroup. It might be a collection of images, shapes, or a combination.
Step 3: Ungroup Them Like a Pro
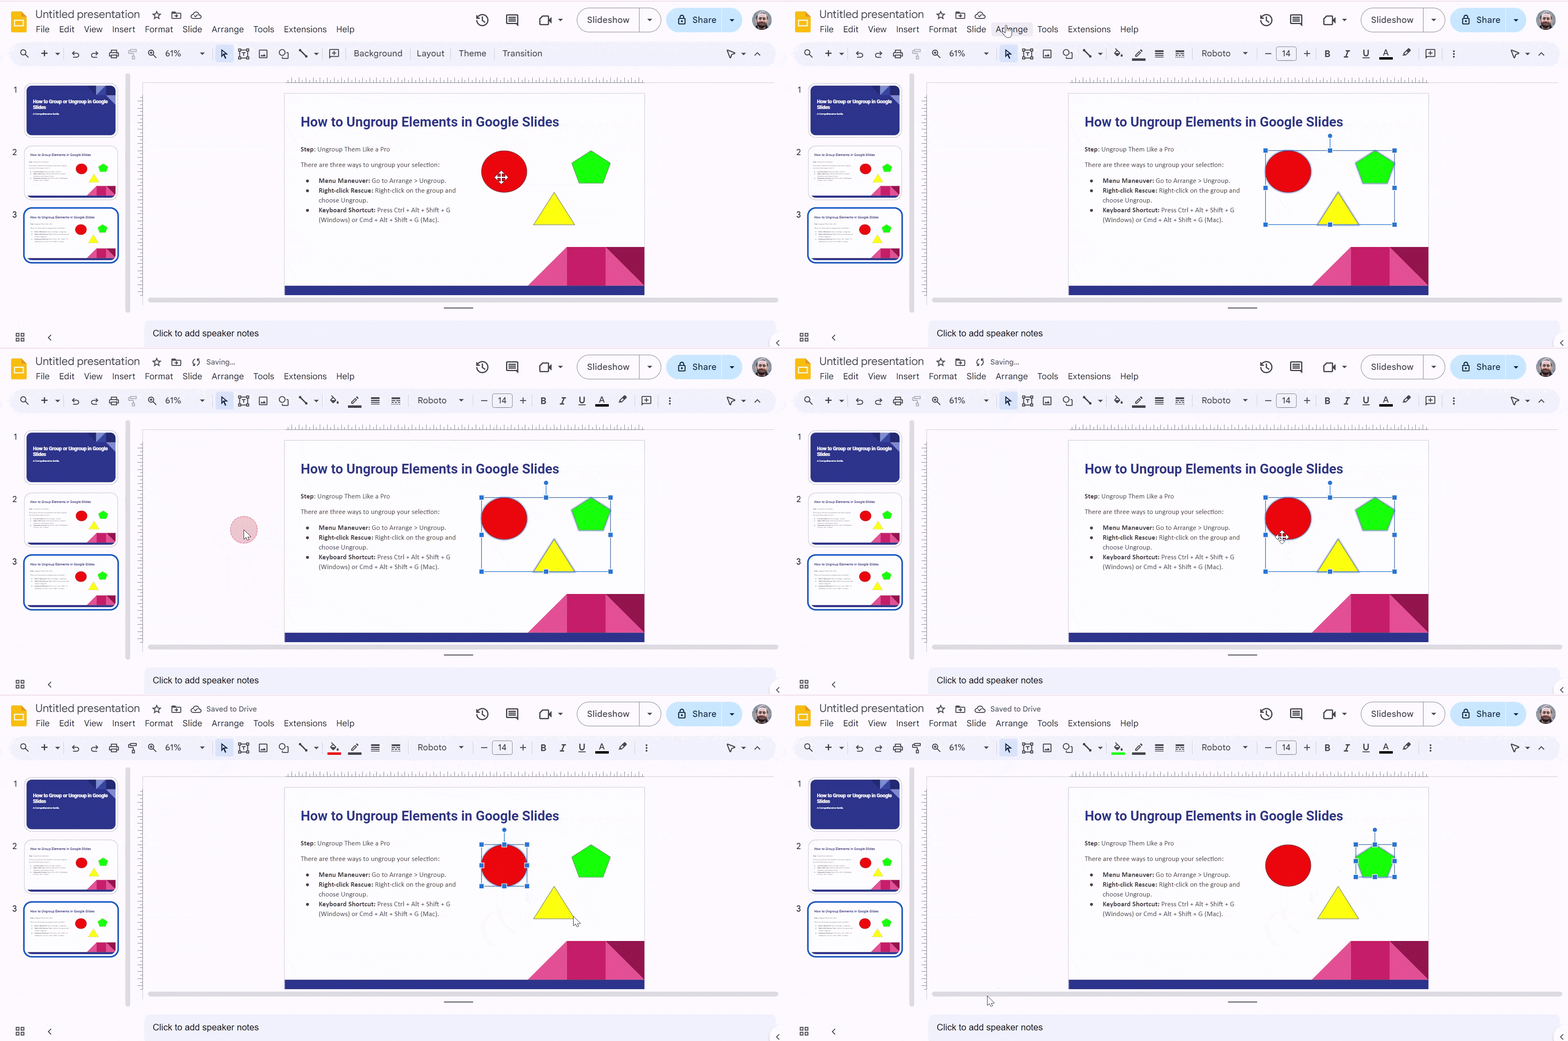
There are three ways to ungroup your selection:
- Menu Maneuver: Go to Arrange > Ungroup.
- Right-click Rescue: Right-click on the group and choose Ungroup.
- Keyboard Shortcut: Press Ctrl + Alt + Shift + G (Windows) or Cmd + Alt + Shift + G (Mac).
Now, you can edit each element within the former group independently!
Create presentation slides with AI in Seconds in Google Slides
- No design skills required
- 3 presentations/month free
- Don’t need to learn a new software
Works with Google Slides

Frequently Asked Questions
How to group objects in Google Slides on the phone?
On your phone, touch and hold an object to select it, then tap other objects you want to group. Finally, tap the three dots menu and choose Group.
What are the benefits of grouping objects in Google Slides?
Easier movement maintains alignment and creates visual cohesion.
What are the limitations of grouping in Google Slides?
Cannot group elements from different slides or text boxes
Why can’t I group items in Google Slides?
The inability to group objects could be due to not selecting multiple objects properly, already grouped items, or incompatible elements (e.g., embedded videos).
Is There a Limit to How Many Objects Can Be Grouped?
No specific limit; however, grouping a large number of objects can become unwieldy.
Can I Regroup Previously Ungrouped Elements Easily?
Yes, simply reselect the elements and use the grouping method again to regroup them.
What Happens to Grouped Objects When I Copy and Paste Them?
Grouped objects maintain their grouping and relative positioning when copied and pasted.
Can I Resize Grouped Objects Without Affecting Their Proportions?
Yes, resizing a group maintains the proportions and relative layout of its elements.
Is It Possible to Apply Animations to a Group of Objects?
Yes, animations can be applied to the entire group, affecting all elements collectively.
How to Ensure Precise Alignment When Grouping Objects?
Use the “Arrange” menu options like “Align” and “Distribute” before grouping for precise alignment.
Can I Group Objects Across Different Slides?
Grouping is limited to objects within the same slide; it cannot span multiple slides.
