
Images can make PowerPoint presentations more engaging and easier to understand, but it’s important to give proper credit to the original creators. To cite pictures in PowerPoint, you can add a text box directly below the image that includes the creator’s name, image title or description, date, and source URL.
For academic citation styles such as APA, the format usually follows: Figure number, image title or description, source, creator, year, and link. In addition, many presentations include a References or Works Cited slide at the end to list all image sources used throughout the slides.
This article will explain how to add citations to images in PowerPoint, give you some helpful tips, and answer some common questions people have about this topic.
Methods for Citing Pictures in Presentations
There are several ways to cite images in PowerPoint depending on your design preferences and slide layout. Each method keeps your presentation clean while ensuring you properly credit image sources.
1. Caption Below the Image
Add a concise caption directly below the picture using a text box. This caption can include a figure number, a brief image description, and a shortened citation or source name.
For example:
Figure 1. Mountain view at sunrise (Photo by J. Kim, Unsplash).
2. Footer on the Slide
If you want a cleaner layout, place the citation in a smaller font at the bottom of the slide (similar to a page footer). You can even use a superscript number after the image reference, linking it to a full citation list on a later slide. This method keeps your main slide content uncluttered while maintaining academic integrity.
3. Dedicated Citation Slide
Include a final slide labeled “Image Credits,” “Sources,” or “Works Cited.” This slide should list each image used in your presentation with complete information following your style guide (APA, MLA, or Chicago).
Example: Photo by Addison Douglas. “Maine Marigolds.” xyz.com (Accessed May 9, 2021).
How to Cite Pictures in PowerPoint: Step-by-Step Guide
Step 1. Find the Source Information
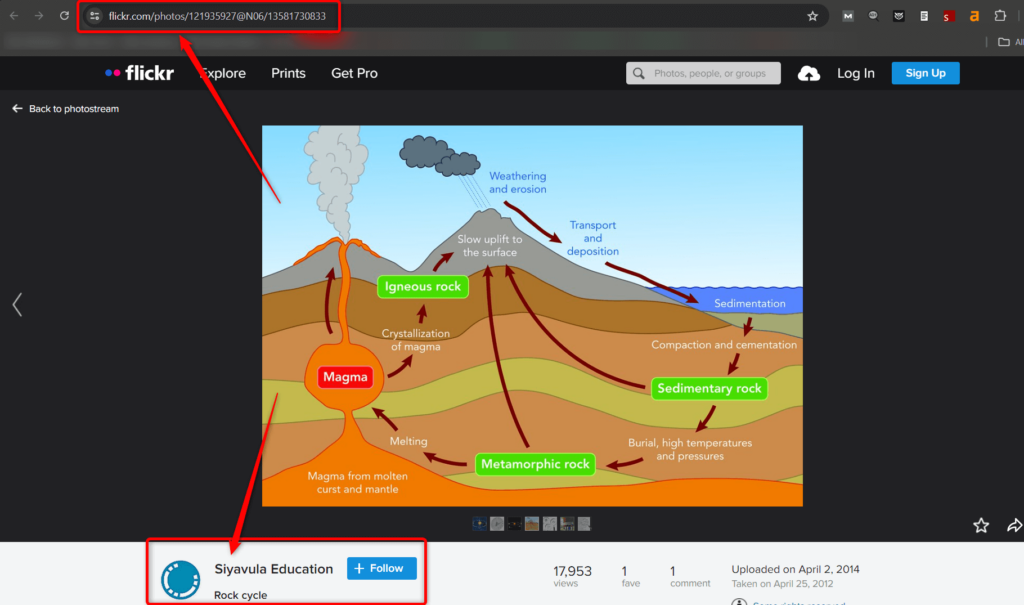
Track down the details about using the image you picked. The way the image is licensed will likely tell you how to give credit to the owner if you use it in your presentation. See if you can find the license information and take a look at the terms. Some licenses will clearly say you don’t need to mention the source. If that’s the case, you can use the image without giving credit.
Other licenses might have instructions about how to credit the owner. If you can’t find any licensing information, it’s best to assume the image is protected by copyright and plan to credit it anyway.
Read Related – How to Highlight a Picture in PowerPoint
Step 2. Create a Citation Slide
Set aside a slide at the end of your presentation to list all the sources of the images you used. You can title this slide “Image Credits” or “Sources.”
Inserting Your Image:
- Save the image: First, save the image you want to use to your computer’s desktop.
- Open your presentation: Then, open the PowerPoint presentation you’re working on.
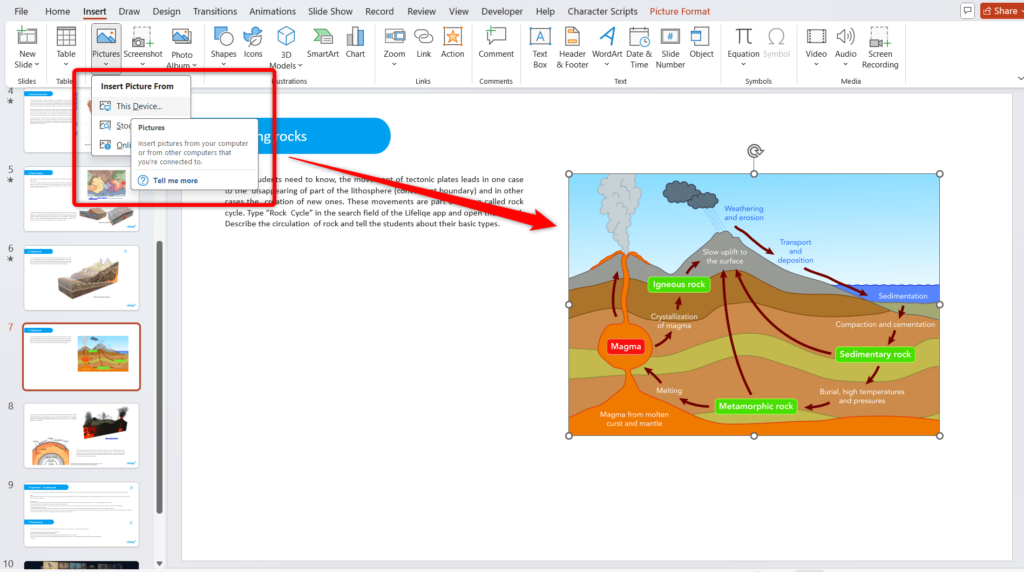
- Find the “Insert” tab: Look for the “Insert” tab at the top of the PowerPoint window. This is where you’ll find tools for adding things to your slides.
- Add the image: Click the “Insert” tab, and then choose “Picture” from the options. This will open a file explorer window where you can find the image you saved earlier on your desktop.
- Place the image: Once you’ve found the image, double-click it to insert it into your slide. You can then drag and drop the image to position it where you want it.
Adding Text for the Citation:
- Insert a text box: Click the “Insert” tab again. This time, look for the option to “Text Box”. It might be in a drop-down menu or have an icon on the toolbar.
- Draw the text box: Click on “Text Box”, and then use your mouse to draw a text box on the slide. Drag it to a position just below the image. Try to line it up with the image as best you can.
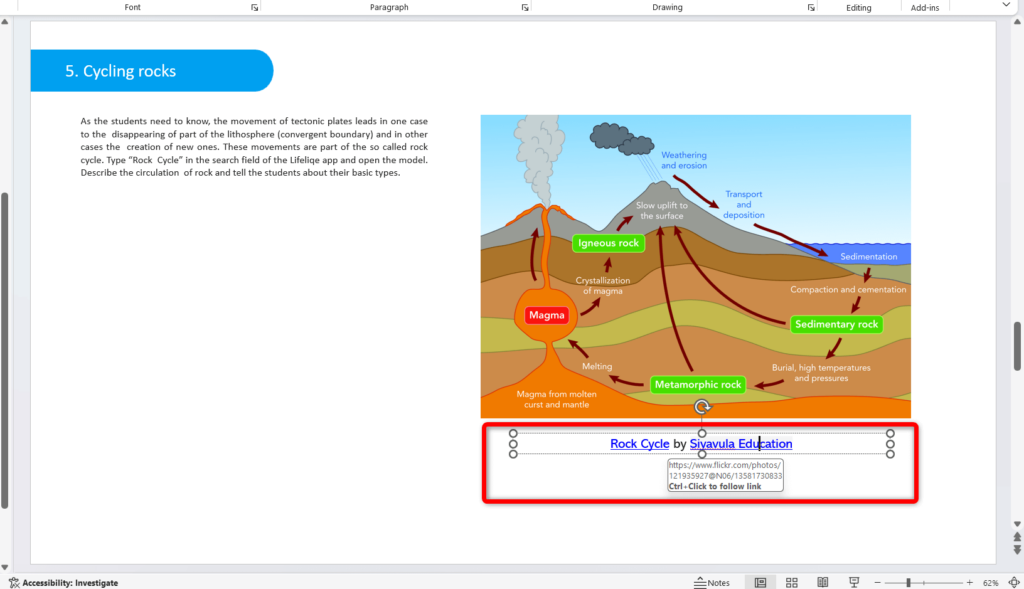
Optional: Linking to the Source Directly
If you have the information, you can add a hyperlink to the original source of the image in the citation text box. This allows viewers of your presentation to click on the citation and go directly to the webpage where the image came from.
Create Presentations Easily in Google Slides and PowerPoint
14M+Installs

Step 3. Write Your Citation Using the Proper Format for Your Style Guide
Use the citation style required by your organization or school (such as APA, MLA, or Chicago). Each style has specific rules for image citation formatting.
To make the process faster and ensure accuracy, you can use citation formatting tools that automatically create well-structured image citations. These tools help you format, proofread, and insert citations directly into your slides with minimal effort.
Recommended Tools to Format Image Citations
- Scribbr Citation Generator – An easy-to-use tool that can generate citations for images, websites, and media in APA, MLA, or Chicago formats.
- Citation Machine – Allows you to create accurate citations for digital images in APA format quickly and copy them into PowerPoint.
- APA Style Online Guide – Offers official examples and detailed citation structures for images, figures, and clip art.
After generating your citation, review it for completeness
Step 4: Group Your Image and Citation Together
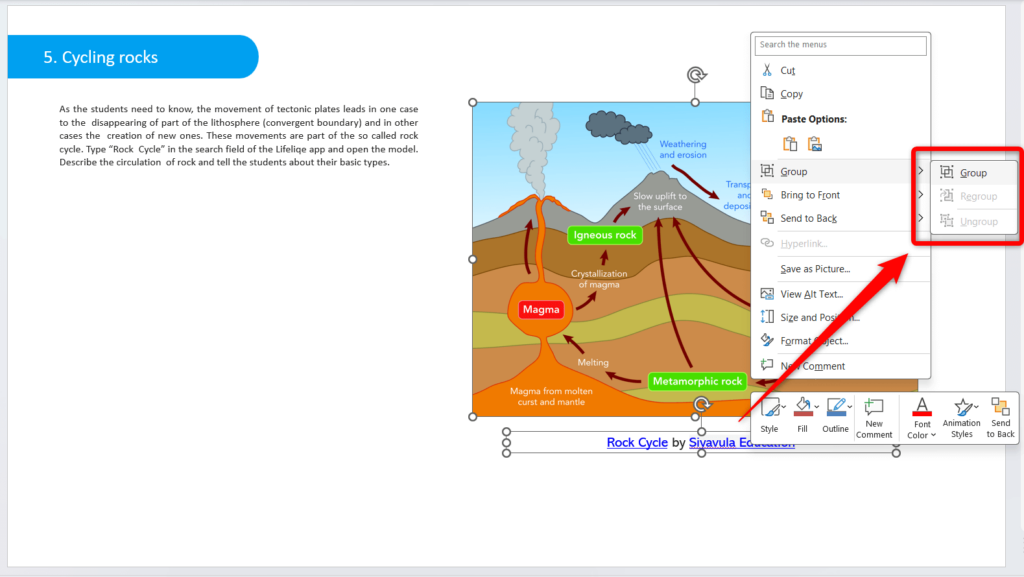
If you want the citation to stay with your image whenever you move it around the slide, you can group them together. Here’s how:
- Click and drag your mouse to select both the image and the text box containing your citation.
- Right-click anywhere on the selected area.
- A menu will appear. Choose the option that says “Group”. You might need to click “Group” twice depending on your version of Google Slides.
This step is totally optional, but it can definitely make it easier to adjust your presentation later on.
If you have more images in your presentation that need citations, just follow the same steps we just went through. Remember to change the figure number for each new image citation to keep things clear. Feel free to refer back to these instructions and the examples throughout your work to make sure everything is accurate.
Build Stunning Slides in Seconds with AI
- No design skills required
- 3 presentations/month free
- Don't need to learn a new software

Step 5: Review And Update
Before you present, it’s always a good idea to take a final look at your slides and make any necessary updates. Here are some things to consider:
- Proofreading: Give your slides a quick once-over for any spelling or punctuation mistakes. Double-check that author names are spelled correctly. If you’re using citations, compare them to an example to make sure they follow the right format.
- Style Guide: If you’re unsure about formatting or citations, refer to your style guide (MLA, APA, Chicago, etc.). Many guides are available online or in libraries. Look for information from the style guide itself or a trusted source like an academic library or writing center.
- Image Sources: When using images, choose sources that clearly show licensing, copyright, and creator information. Stock photo libraries, library databases, and reputable news outlets are good options.
Read Related – How to Format a Picture in PowerPoint
Information to Include in an Image Citation
When citing images in your PowerPoint presentation, ensure you gather and include the following essential details. This supports clear attribution and complies with copyright and licensing requirements:
- Creator: The author, artist, or photographer’s name. This credits the individual or entity responsible for creating the image.
- Title: The title of the image, if available, or a brief description if no official title exists.
- Source: The name of the website, book, database, or publication where you found the image.
- Date: The date the image was originally created or published, along with the date you accessed it.
- URL: The direct URL or Digital Object Identifier (DOI) if the image was retrieved online.
- Copyright/License: The copyright holder or license information, such as Creative Commons terms, especially if you are not the image’s creator.
Including all this information helps your audience locate the original source and respects the rights of creators, ensuring your presentation maintains professionalism and ethical standards.
Different Citation Style Format Examples for Images in Presentations
1. APA Format
When creating an image citation in APA, start with Figure 1 in italics, followed by a brief description of the image content. Then, use the phrase “Adapted from” followed by the image title in quotation marks. Include the creator’s initials and last name, the publication year, and the website or source title. Finally, add the phrase “Retrieved from” with the full website URL and the date you accessed the image. Include copyright information if available.
Example:
Figure 1. A close-up photo of a sunflower in full bloom. Adapted from “Exploring Nature’s Beauty” by M. Jones, 2022. Nature Photography Blog. Retrieved from https://www.naturephotographyblog.com/ on June 20, 2024. Copyright 2022 by M. Jones Photography.
2. MLA Format
The way you cite an image in MLA format depends on how you use it in your presentation. If the image is just for decoration and you don’t talk about it, you’ll need a full citation. If you do discuss the image, include a caption with a shorter citation in your slides and a full citation on a separate “Works Cited” slide at the end. You must remember that MLA citations don’t use italics.
Here’s an example of a full citation for an image you don’t discuss:
Figure 1: Montez, Olivia. “Mountain Goat Herd Climbing Fence.” Arpeggio Newsroom, October 9, 2012, https://m.youtube.com/watch?v=340ODYnfCJY. Accessed January 15, 2021.
Here’s an example for an image you do discuss:
Figure 2: Unstable wooden fence (A Herd of Goats Climbing Fence).
Remember to include the full citation (like the one above) on your “Works Cited” slide.
3. Chicago Manual of Style
Need to format your citation using the Chicago Manual of Style (CMS)?
Here’s a quick breakdown to help you out. First, start with the creator’s last name, followed by a comma and their first name. Then, add another comma and write the title of the image in italics. Include the year it was published after the title. Next, list the website name in italics. Finally, finish with the URL in parentheses, followed by the date you accessed the information.
For example, suppose you found a photo titled “Maine Marigolds” by Addison Douglas on a website called [xyz.com] in 1999. Here’s how your citation would look: Douglas, Addison. Maine Marigolds, 1999. [xyz.com] (May 9, 2021).
Closing Thoughts
Citing your images properly adds a touch of professionalism to your presentations and ensures you give credit where credit is due. By following the steps outlined in this guide and using the appropriate citation style for your project, you can easily acknowledge the creators of the visuals that enhance your presentations. Remember to double-check your citations for accuracy and choose high-quality images from reputable sources whenever possible. With a little extra effort, you can ensure your presentations are both informative and ethically sound.
Frequently Asked Questions About How to Cite and Image in PowerPoint
What information should I include in a citation?
A good citation should include details like the creator’s name, the title of the image (if it has one), the source where you found it (website name or publication title), the date it was published (if available), and any copyright information like a Creative Commons license.
Do I need to cite clip art?
Internal clip art from PowerPoint itself doesn’t require a full citation. However, APA style recommends mentioning the software (PowerPoint) in an in-text citation. If you use the web search option within PowerPoint and choose an image with an external creator, then a full citation is necessary.
How do I cite a scanned image from a book?
Treat scanned book images similar to digital images. Instead of website details, include the book’s title, edition, and page number where the image appears. Refer to your specific style guide for formatting instructions.
Can I use a general image credit slide for all sources?
While it saves space, it’s generally better to provide specific citations for each image. This ensures accuracy and makes it easier for others to find the original sources.
Do I need to cite free-to-use images?
Yes, even for free images, citing the source is good practice. This acknowledges the creator’s work and helps others locate the original source.
How do I cite a screenshot in PowerPoint?
Follow the same guidelines as above. Instead of an artist or title, you can mention “Screenshot” or “Screen capture” in the citation.