The size of your slides is crucial, especially when presenting on big screens or for different types of content. For larger screens, using a widescreen format is essential, and you might need to tweak it to fit perfectly. Likewise, certain infographics and illustrations may need adjustments in slide orientation to show up right during your presentation. Just like in PowerPoint, you can also modify slide dimensions in Google Slides.
Tools and Requirements:
- A Google account
- Access to Google Slides
- Basic know-how of using Google Slides
What Are the Dimensions of a Google Slide?
1. Regular Slide Layout (4:3)
The regular 4:3 slide layout shows content in a slightly smaller size than widescreen layouts. This layout was popular in older versions of PowerPoint and Google Slides when projectors and screens didn’t support widescreen slides well.
It’s still used for smaller slides and screens where content might look better in a standard size. This could include images, diagrams, tables, and other content that might look too stretched on a widescreen layout.
2. Wide Screens (16:9)
The 16:9 widescreen format is very common and often seen as the regular size for modern presentations. It became popular after 2008, replacing the 4:3 aspect ratio, as screens and display standards changed for monitors, projectors, and TVs worldwide.
3. Wide Screens (16:10)
While not as popular as 16:9, the 16:10 widescreen format is frequently used on tablets and computer monitors. It’s a bit closer to the Golden Ratio of 1.618, but the higher cost of making devices has led manufacturers to mostly stick with 16:9 for electronic gadgets.
4. Custom Orientation
Google Slides offers a feature called custom orientation, allowing you to select the slide size in inches, centimeters, points, or pixels. This option is handy when you want to adjust the slide layout for a particular document, image, infographic, and more. For instance, you can switch to 8.5 x 11 inches for a Letter layout or 8.27 inches for A4 size. You can also make adjustments using pixels, points, or centimeters.
Create presentation slides with AI in Seconds in Google Slides
15M+Installs
Works with Google Slides
How to Change Dimensions of Google Slide?
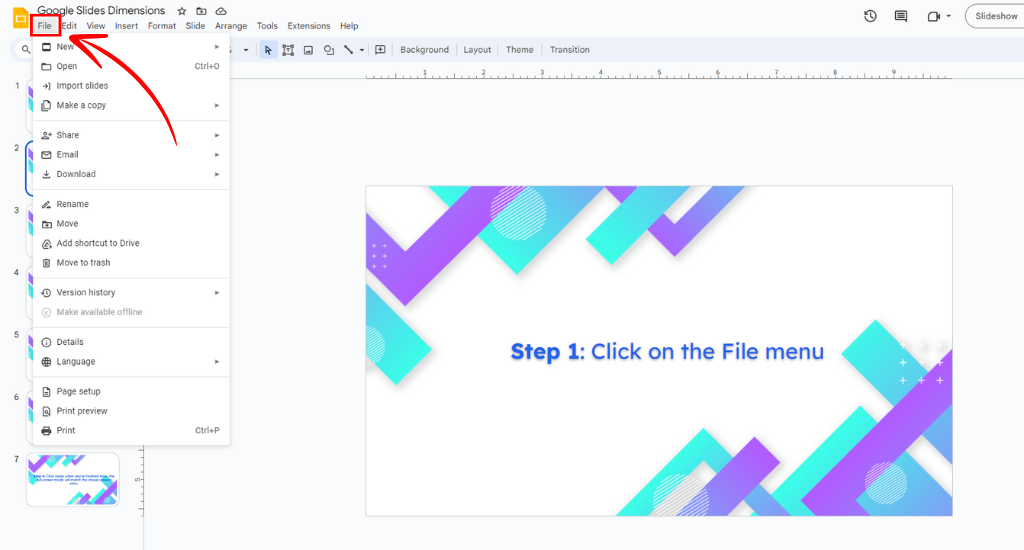
Step 1: Click on the File menu in the upper left of the Google Slides app.
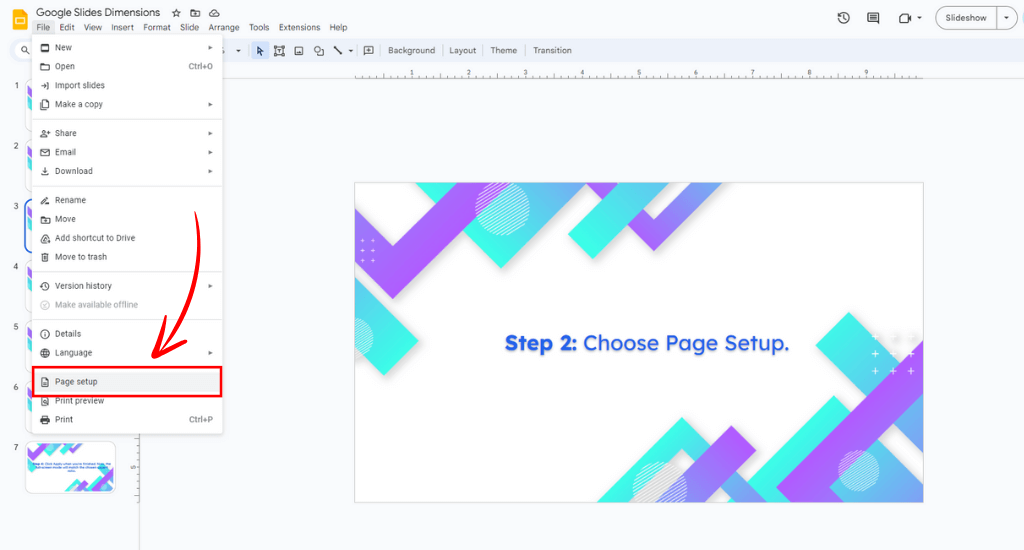
Step 2: Choose Page Setup.
Step 3: In the new window, click on the current aspect ratio to open its menu. You’ll see options like 4:3, 16:9, and 16:10. If these don’t suit your needs, choose Custom to set specific measurements in inches, pixels, or other preferences.
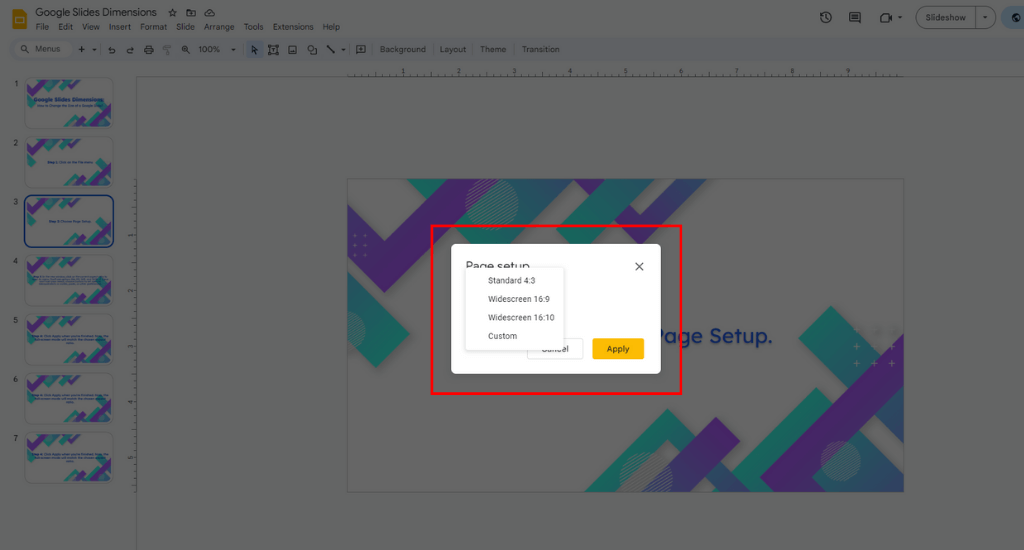
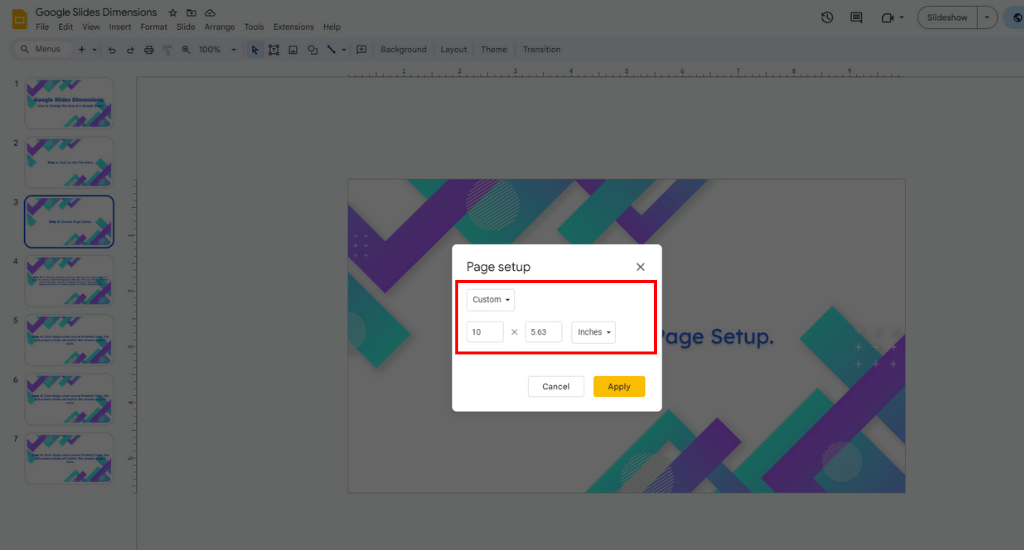
Step 4: Click Apply when you’re finished. Now, the full-screen mode will match the chosen aspect ratio.
Also Read: How To Make Google Slides Vertical?
Why It Is Necessary to Change Dimensions of Google Slides?
1. Different Screens
Depending on where you’ll present, the size of your slides might change. Different screens have different shapes, so you’ll need to adjust your Google slides size based on where you’re presenting. For instance, you might present on a tablet, mobile phone, or wide laptop, each with different screen sizes.
2. Flexibility
This feature gives you the ability to adjust if you’re not sure what kind of screen your presentation will be on. You can create your presentation for the most common format, like widescreen (16:9), and then change it if you’re presenting on smaller screens like mobile phones, which have a 4:3 aspect ratio.
3. Printing Slides
If you’re thinking of printing your slides, the 4:3 ratio works best for that.
Create presentation slides with AI in Seconds in Google Slides
- No design skills required
- 3 presentations/month free
- Don't need to learn a new software
Works with Google Slides
4 Tips and Best Practices for Changing Dimensions of Google Slides
1. Plan Ahead
Think about your audience and where they’ll see your slides before you change anything. Consider what devices and screens they’ll use. Pick dimensions (aspect ratio) that work best for how they’ll view your presentation.
2. Resize Everything
When you change sizes, make sure everything on each slide gets resized the same way. This means text boxes, pictures, shapes, and other things. Don’t stretch or squish things, or your slides might look weird.
3. Save Copies and Back Up
Before you make changes, save a copy of your presentation and back it up. This way, if something goes wrong, you can go back to an earlier version and not lose your work.
4. Get Opinions
Once you’ve resized your presentation, ask your colleagues or friends for their thoughts. They might notice things you didn’t and can help you fix any problems or mistakes you missed.
Common Mistakes to Avoid While Changing Google Slides Dimensions
1. Forgetting Aspect Ratios
When using Google Slides, pick the right aspect ratio (like 4:3 or 16:9) for the device you’re using. If you don’t, your slides might look stretched or cut off.
2. Ignoring Content Placement
Be careful when changing slide dimensions, as it can move or resize text, images, and shapes unexpectedly. After resizing, double-check each slide to make sure everything is correctly aligned.
3. Neglecting Font Sizes
Changing dimensions can affect how big or small the text appears. Make sure to adjust font sizes so that your audience can easily read the text on all slides.
4. Overlooking Image Quality
Enlarging slides might make images look fuzzy or pixelated. Always use high-quality images or vectors, and if you have to resize lower-quality images, do it carefully to maintain image clarity.
Also Read: 10 Best AI Image Generators to Elevate Your Presentations
5. Ignoring Slide Transitions and Animations
Altering dimensions can mess up slide transitions and animations. Review each slide to fix transitions and animations for a smooth presentation.
6. Not Checking Compatibility
Ensure your presentation works well on different devices. Various devices may handle slide dimensions differently, so test your presentation on different devices to avoid display issues.
7. Disregarding Backgrounds and Themes
Resizing slides can change how backgrounds and themes look. Adjust them to fit the new dimensions while keeping a consistent look throughout your presentation.
8. Failing to Save Versions
Before making major changes to dimensions, save a version of your presentation. This way, you can go back to the original if needed and avoid irreversible mistakes.
Create presentation slides with AI in Seconds in Google Slides
- No design skills required
- 3 presentations/month free
- Don't need to learn a new software
Works with Google Slides

Closing Thoughts
And there you have it – a straightforward guide to conquering Google Slides dimensions. Whether you’re a professional or just getting started, now you know how to make your slides look top-notch on any screen. Go ahead, rock that presentation, and show the world what you’ve got!
Frequently Asked Questions About Changing the Slide Size in Google Slides
1. How do I get my Google Slides back to normal size?
Certainly! You can go back to the “page setup” menu, select “standard,” and click “apply” to return to the default size.
2. Does changing the size impact the content on my slides?
When resizing, review and edit content to keep the layout and design looking good.
3. Is it possible to have different sizes for each slide?
As of my last update in January 2022, Google Slides allows different sizes for individual slides, but only within the same presentation.
4. Will changing the size affect the presentation’s aspect ratio?
Certainly! Altering the dimensions might change the aspect ratio, so ensure your content stays visually balanced when resizing.
5. How do you change Google Slides to A3 portrait?
To change your slides to A3 size, go to File, then Page Setup. Select “Custom” and enter the width and height values: 29.7 x 42 cm or 297 x 420 mm. In pixels, at 72 DPI, it’s 842 x 1,191 pixels, and at 300 DPI, it’s 3508 x 4960 pixels.
6. How Can You Adjust the Slide Size in Google Slides on Your Phone?
The Google Slides app on Android phones doesn’t allow you to change slide size. You can only do this on your computer.
 Install SlidesAI