Ever felt like your slides look a bit plain? Sometimes, a small touch like stickers can make a big difference. Whether you’re creating a lesson for students, a fun quiz or just want to add some personality to your slides, stickers help bring them to life.
They can highlight important points, add humor, or make information stand out. The best part is, adding stickers in Google Slides is quick and simple. You don’t need any design skills or extra software. This guide will take you through the steps to add them easily.
How to Add Stickers in Google Slides Using the Built-in Feature?
Google Slides has a built-in option to add stickers without needing to upload images manually. Follow these simple steps to insert and customize stickers in your presentation.
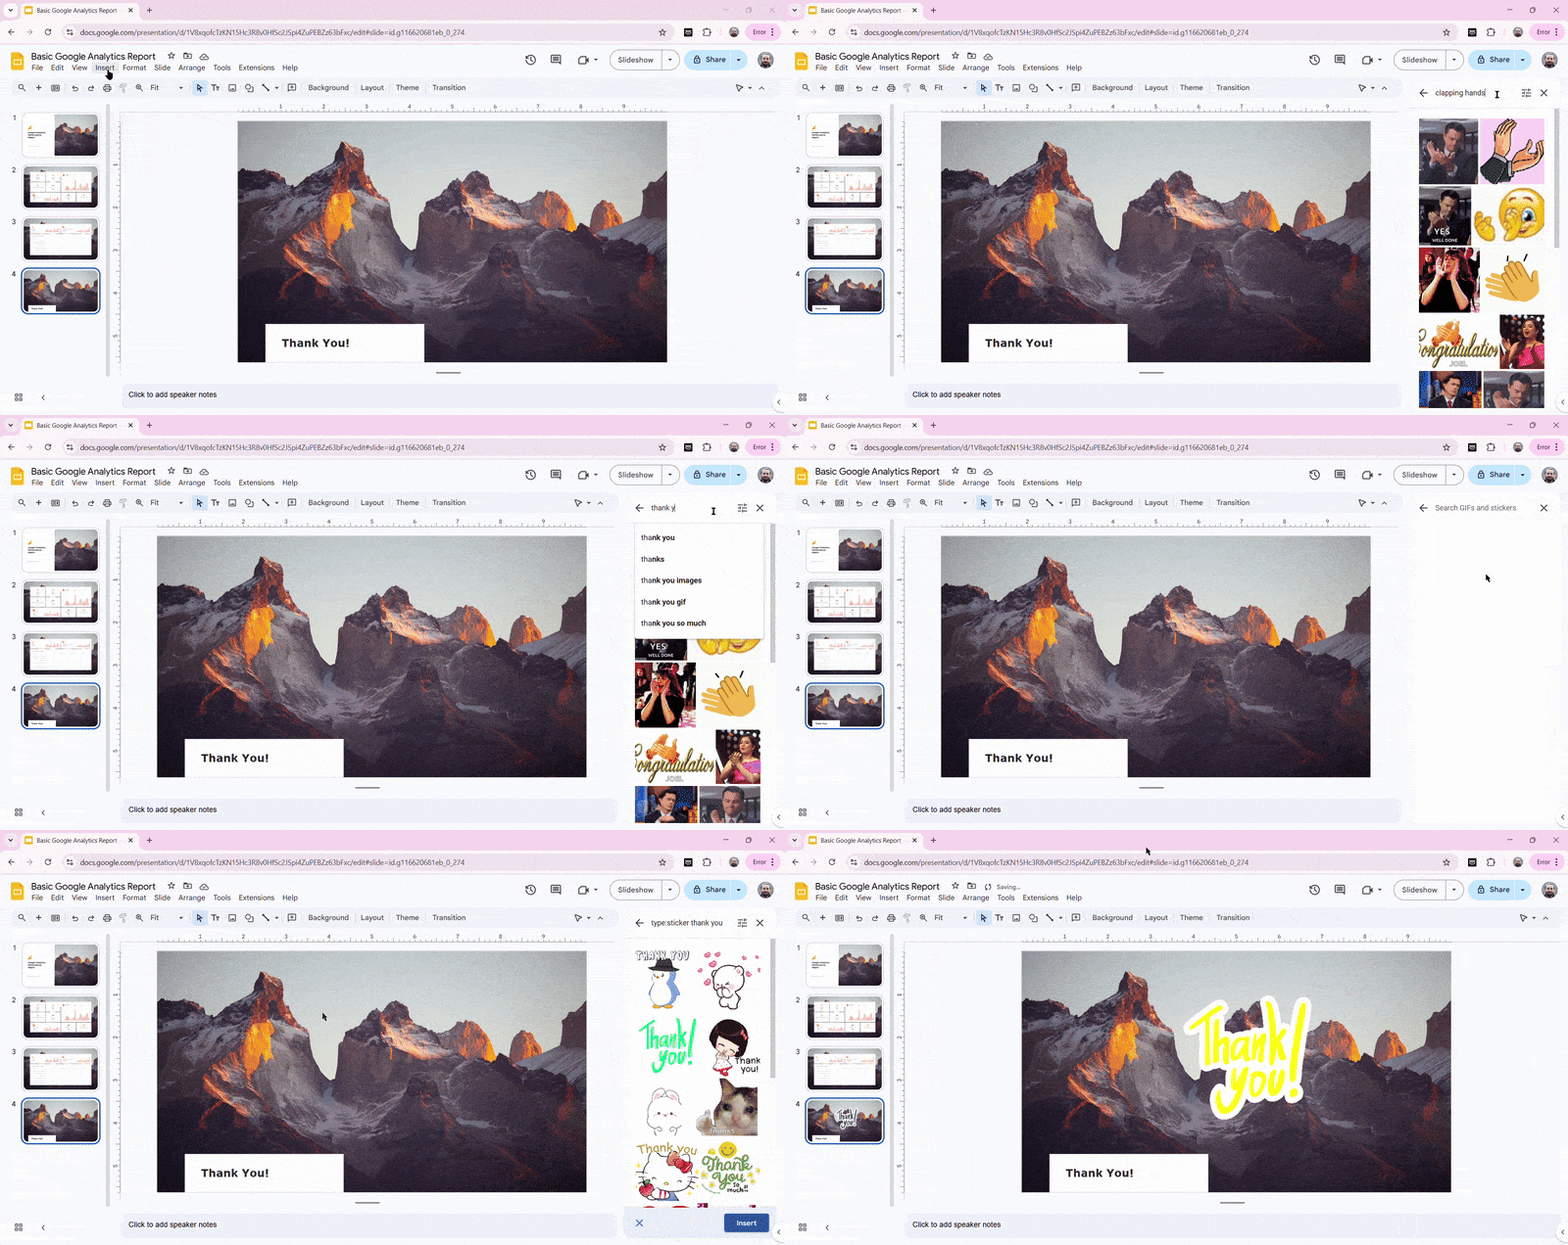
Step 1: Open the Sticker Tool
- Click on the slide where you want to add a sticker.
- Go to the top menu and click Insert → Image → GIFs and Stickers.
This will open a sidebar where you can search for stickers.
Step 2: Search for Stickers
- In the search box, type a keyword related to the sticker you need.
- Press Enter or Return to see matching results.
- To see only stickers (not GIFs), click the Filter button next to the search box and select Stickers.
Now, you’ll only see sticker options related to your search.
Step 3: Insert and Customize the Sticker
- Scroll through the results and select the sticker you want.
- Click Insert at the bottom of the sidebar to add it to your slide.
- To resize or move the sticker, click on it and use the handles to adjust its size.
- For more customization, right-click the sticker and select Format options to change its appearance.
Now, your sticker is added to the slide and can be adjusted to fit your design.
Create presentation slides with AI in Seconds in Google Slides
15M+Installs
Works with Google Slides
How to Add Stickers in Google Slides Using Special Characters?
Using special characters to add stickers in Google Slides is super easy. Follow these simple steps to do it.
Step 1: Add a Text Box
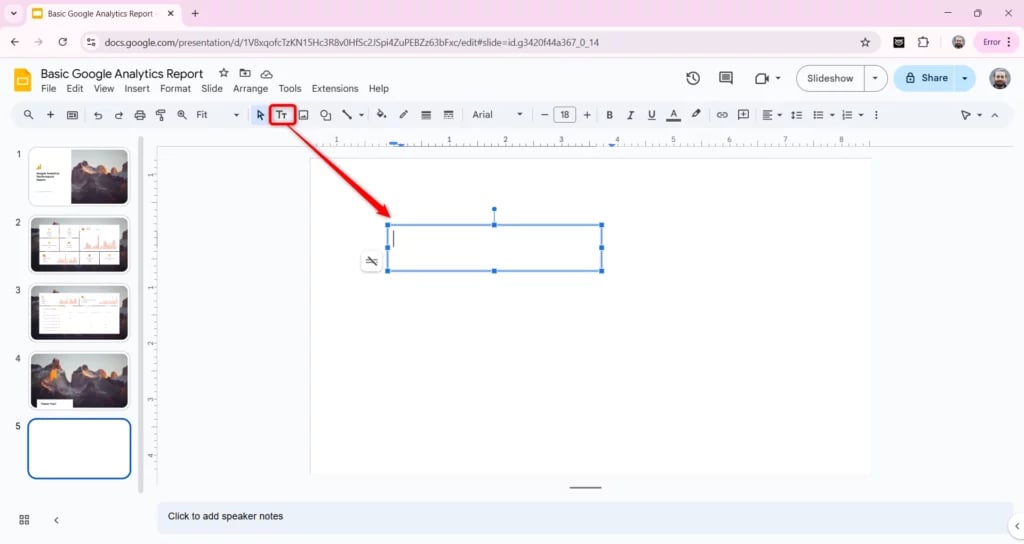
Before inserting a sticker, you need a text box to place it inside.
- Open your Google Slides presentation.
- Click on Text box in the toolbar.
- Click anywhere on the slide and drag to create a text box.
Step 2: Open the Special Characters Menu
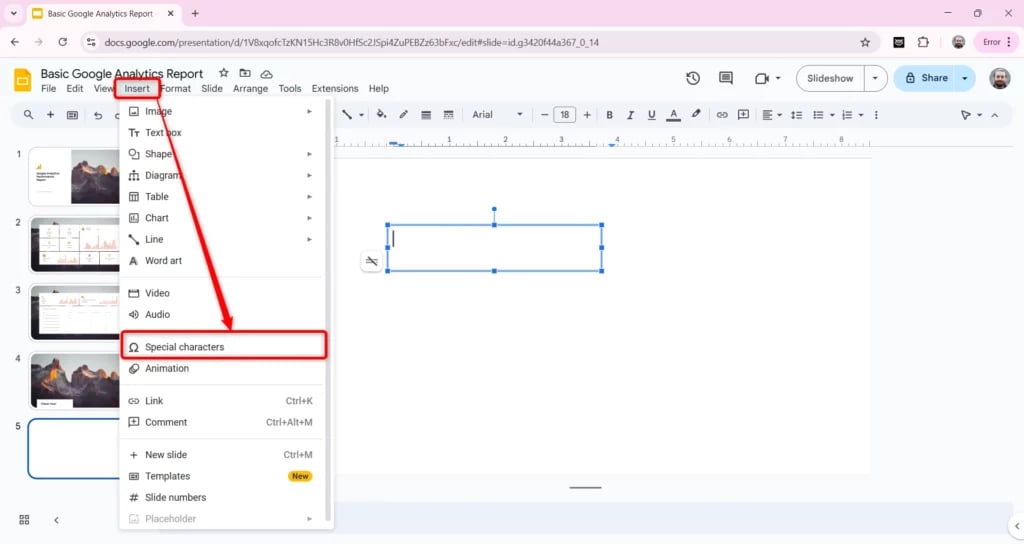
- Click inside the text box.
- Go to Insert in the top menu.
- Select Special characters from the dropdown menu.
Step 3: Find a Sticker
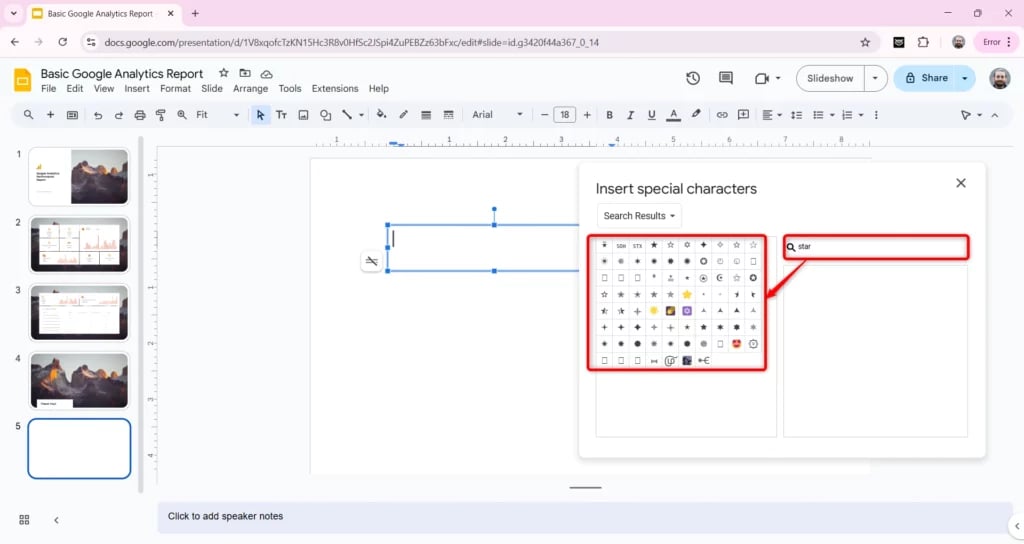
You can find a sticker using three different methods:
- Use the drop-down menu to browse symbols.
- Type a word like “star” or “heart” in the search bar to find related stickers.
- Draw a shape in the drawing box to find similar icons.
Click on the sticker you want, and it will appear in the text box.
Step 4: Customize the Sticker
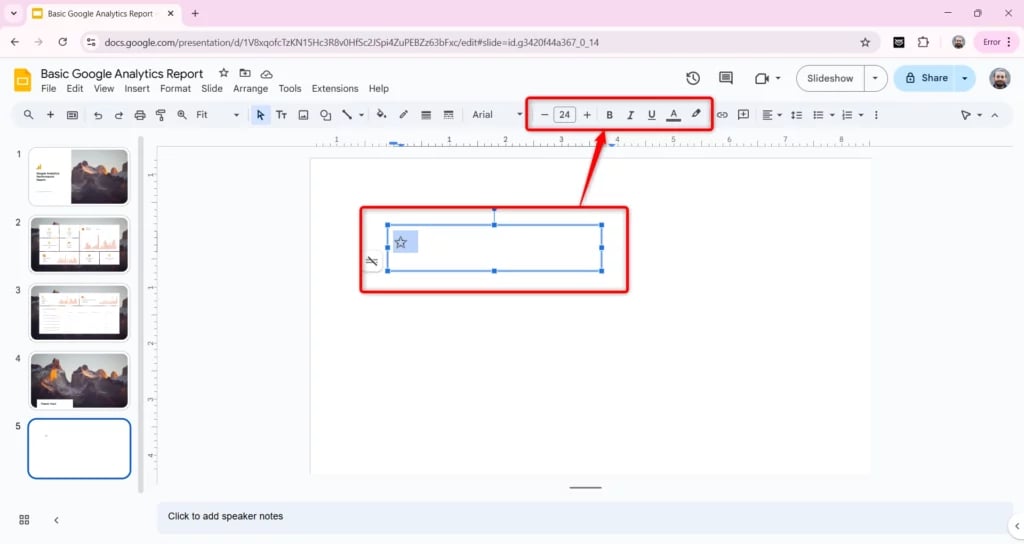
Once the sticker is added, you can change its size and style.
- Click on the sticker inside the text box.
- Use the font size option in the toolbar to make it bigger.
Change the color or boldness using the text formatting tools.
Create presentation slides with AI in Seconds in Google Slides
- No design skills required
- 3 presentations/month free
- Don’t need to learn a new software
Works with Google Slides

How to Create a Custom Sticker in Google Slides?
If you want to design a custom sticker in Google Slides, follow these simple steps.
Step 1: Add a Blank Slide
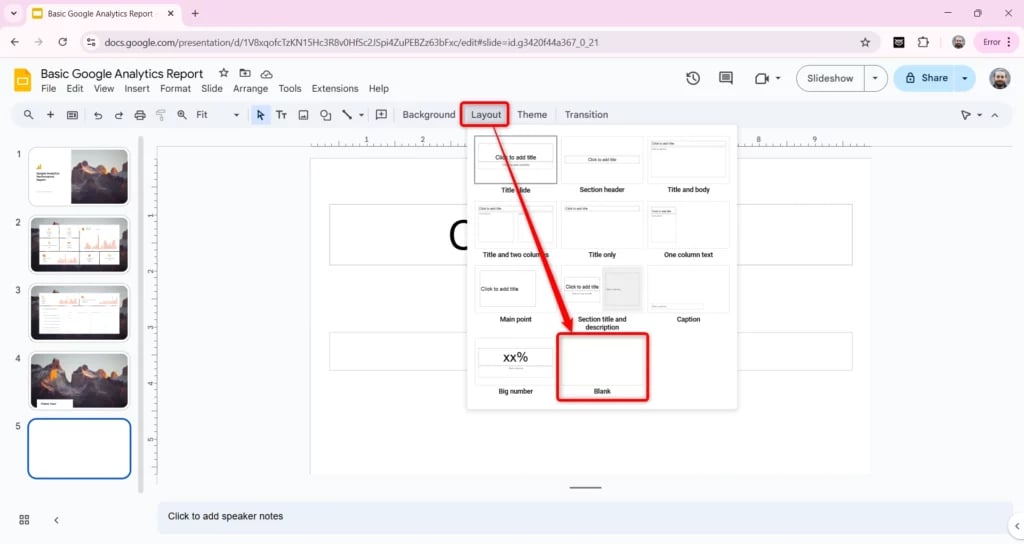
First, create a blank slide to use as your workspace.
- Open your Google Slides presentation.
- Click Slide → New Slide to add a slide.
- Click Slide → Apply Layout and choose Blank to remove any default text boxes.
Now, you have a blank canvas to create your sticker.
Step 2: Design Your Sticker
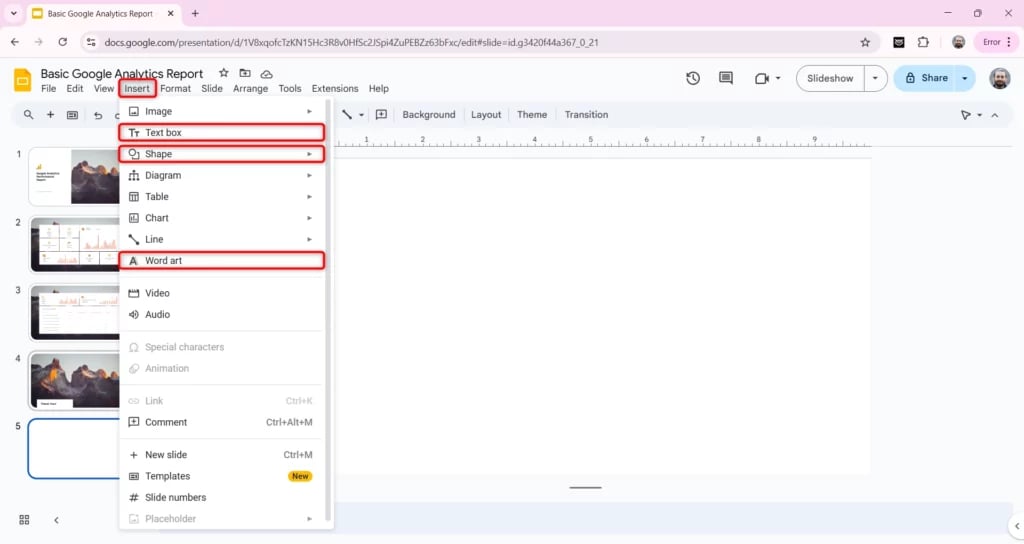
You can add different elements to make your sticker unique.
- Click Insert and choose Shape, Text Box, or Word Art to add designs or text.
- Customize the sticker using the toolbar. You can change colors, fonts, borders, and effects.
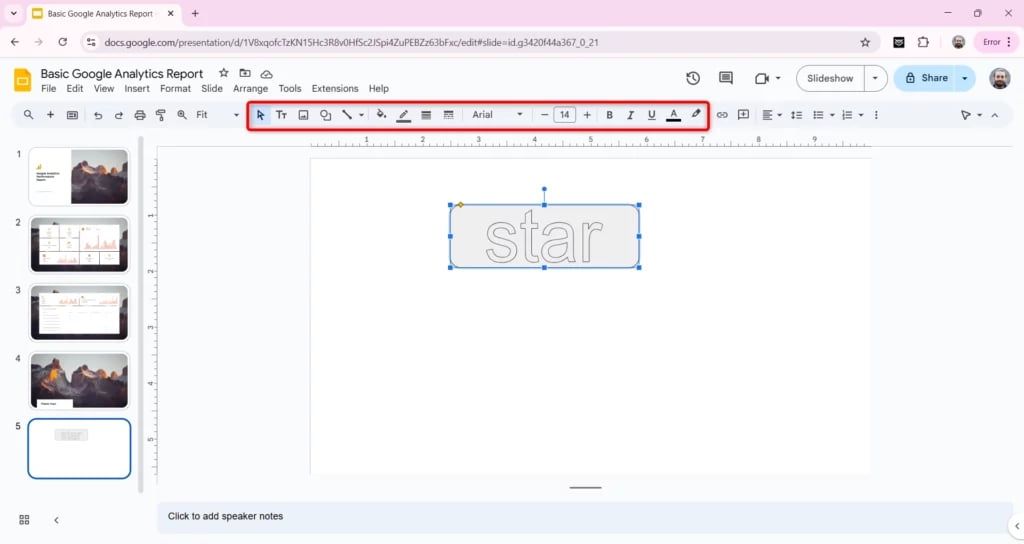
Play around with different shapes and styles until you’re happy with the design.
Step 3: Save Your Sticker as an Image
Once your sticker is ready, save it as an image file.
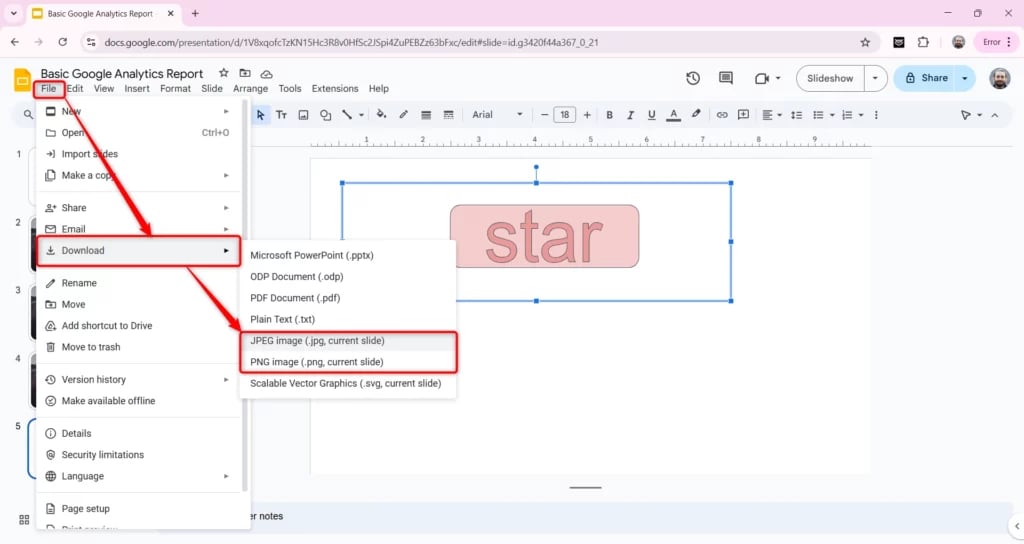
- Click File → Download.
- Choose a JPG image or PNG image to save the current slide.
A PNG file is best if you want a transparent background.
Step 4: Use Your Sticker in Other Slides
After saving it, you can insert the sticker into any presentation.
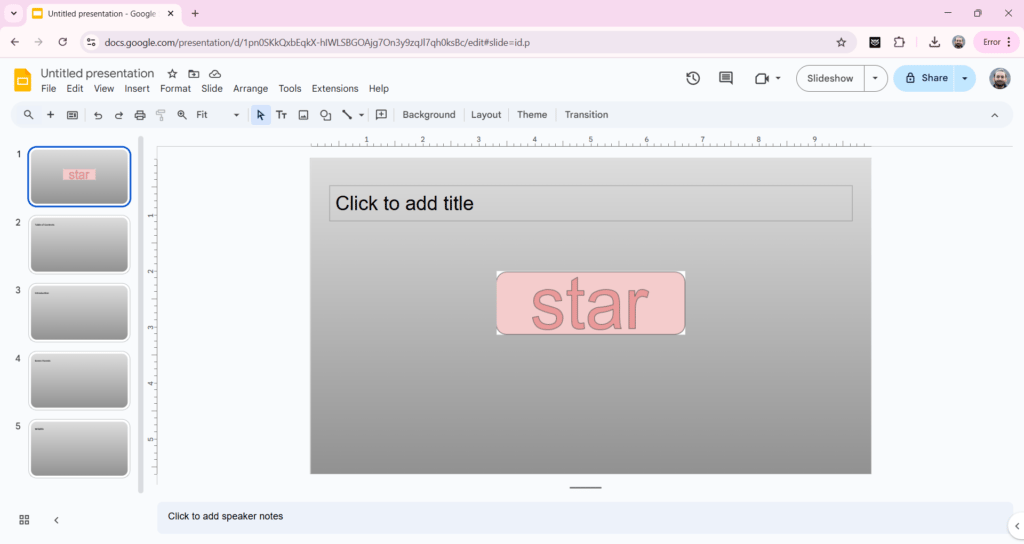
- Click Insert → Image → Upload from computer.
- Select the saved sticker and place it on any slide.
- Resize or adjust it using Format Options if needed.
Tip: If your sticker design needs more space, you can change the slide size. Click File → Page Setup and adjust the dimensions to fit your design better.
Create presentation slides with AI in Seconds in Google Slides
- No design skills required
- 3 presentations/month free
- Don’t need to learn a new software
Works with Google Slides
Closing Thoughts
Adding stickers to Google Slides is a simple way to make presentations more engaging. Whether using built-in options, special characters, or custom designs, there’s a method for everyone. Try experimenting with different styles to find what works best for your presentation.
Frequently Asked Questions
Can I add my own stickers to Google Slides?
Yes, you can! Just click on Insert, then Image, and choose Upload from computer. Select your sticker file, and it will appear on your slide.
Is it possible to animate stickers in Google Slides?
Yes! Once you’ve added a sticker, click on it, open the Motion panel, and go to Animations. You can apply different effects to make it move or appear in a fun way.
Do I have to pay for stickers in Google Slides?
No, but Google Slides offers a collection of free stickers. If you want more, you can always upload your own without any extra cost.
