Are you a student, educator, business professional, designer, or small business owner? No matter your role, mastering the art of creating visually stunning PowerPoint presentations can enhance your communication skills. A well-structured presentation not only delivers your message clearly but also captivates your audience.
Let’s dive into how you can make your presentations more engaging and effective!
One of the most effective strategies to improve your slides is to arrange the text into columns. They can turn a boring PowerPoint into an engaging visual experience. They improve readability and enhance the visual appeal of your presentation while aiding efficient use of space.
This article walks you through the process of establishing text columns in PowerPoint to help your presentations stand out.
How to Add Columns in PowerPoint
Columns can be added to PowerPoint in several ways. This article is here to explore two popular methods to help you organize text effectively.
Method 1: Add Columns to a Text Box in PowerPoint
This method allows you to place columns straight into a text box, giving you more control over your text layout. Take these steps:
Step 1: Open PowerPoint and Select Your Slide
Start by opening PowerPoint and navigating to the slide where you wish to add columns. If you are beginning from scratch, add a new slide.

Step 2: Insert or Select a Text Box
To add columns to the text box in PowerPoint, click on the text box to which you want to add columns. If you need to add a new text box, go to the Insert tab and choose the text box. Draw a text box on your slide.
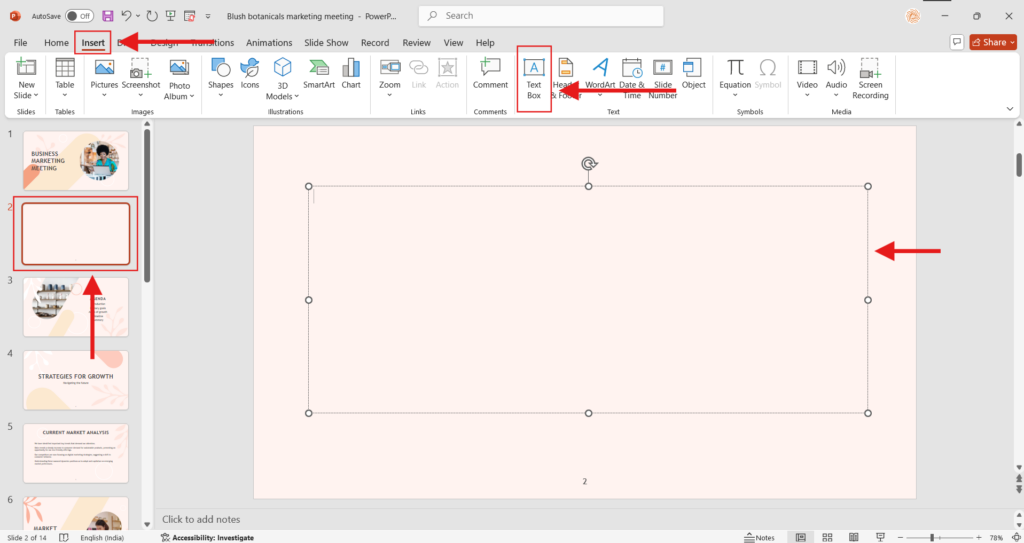
Step 3: Select the Text Box
Ensure that you select the text box by clicking on its border. This is crucial as it activates the formatting options for the text.
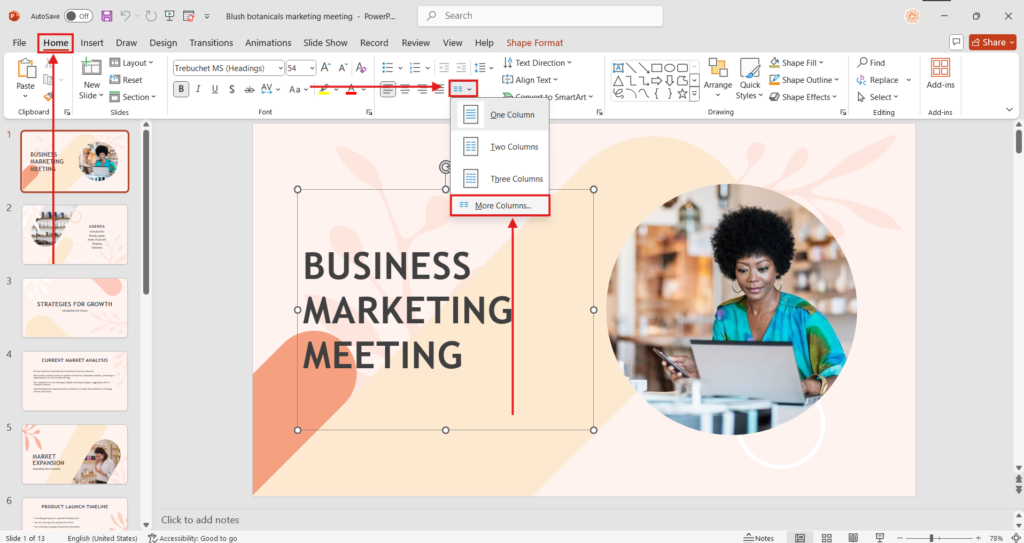
Step 4: Open the Home Tab
Go to the Home tab on the PowerPoint ribbon, which is located at the top of the window.
Step 5: Click the Columns Button
Locate the Columns button within the Paragraph group. Click on it to see your options.
Step 6: Select the Number of Columns
You can choose from one, two, or three columns. If you need more control, select More Columns to change the amount of columns and custom widths.
Create presentation slides with AI in Seconds in Google Slides
14M+Installs
Works with Google Slides

Method 2: Use a Multi-column Layout in PowerPoint
If you prefer a more easy approach, using a pre-designed multi-column layout can save you time. Here is how.
Step 1: Open PowerPoint and Choose a Slide
As previously said, open your PowerPoint presentation and select the necessary slide.
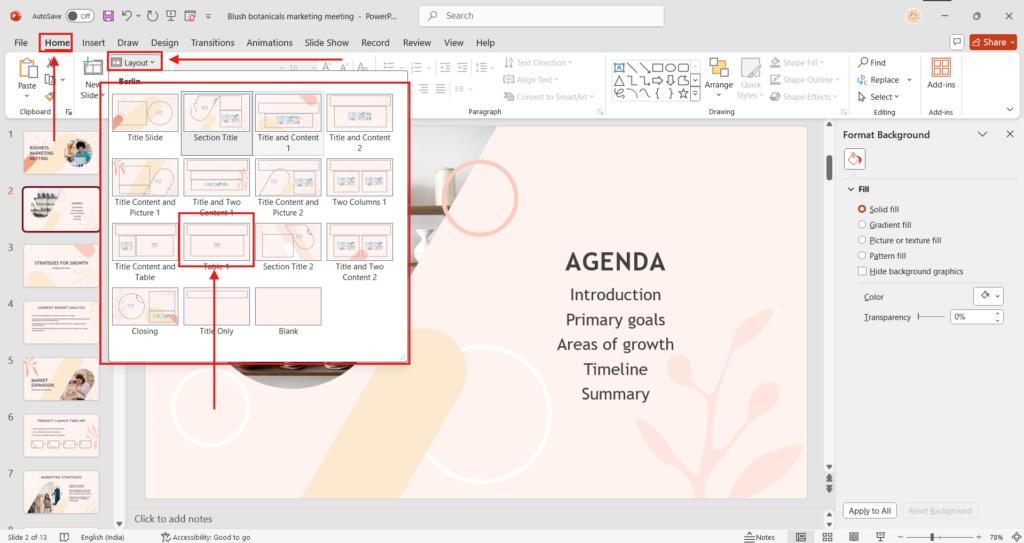
Step 2: Go to the Layout Tab
Navigate to the Layout tab, where you can select several slide layouts.
Step 3: Select a Layout With Many Columns
Choose a layout in PowerPoint that already has several columns, like “Two Content” or “Comparison.” This can save you time on formatting.
Step 4: Adjust Column Widths as Needed
After picking a layout, you can change the width of each column as desired. Click and drag the borders to achieve the desired effect.
Step 5: Add Content to Each Column
Enter the content you want to include in each column. Make sure the text is clear and simple.
Step 6: Format the Text and Elements
Format your text, graphics, and other items within the columns to provide a uniform look. Ensure that the text size is readable and that the colors contrast nicely.
Step 7: Save your Slides
Finally, save your presentation to avoid losing any work.
Creating text columns in PowerPoint is an effective approach that can dramatically improve your presentations. You can increase readability, visual attractiveness, and the organization of your material by using the methods indicated above. Implementing excellent column layouts can not only benefit your audience but also help you communicate your message more clearly.
Take the first step towards creating stunning presentations today!
Create presentation slides with AI in Seconds in Google Slides
- No design skills required
- 3 presentations/month free
- Don’t need to learn a new software
Works with Google Slides

Frequently Asked Questions
Can I format each column individually?
Columns built with the “Columns” tool use the same formatting. If you want to format each column differently, you must create separate text boxes for each column and format them as needed.
Is my column formatting preserved if I convert the PowerPoint presentation to a different format (e.g., PDF)?
Yes, column formatting is often retained when converting PowerPoint presentations to PDFs or other standard formats, ensuring that the layout is consistent across file types. This is critical for ensuring that your presentations remain professional when shared with others.
