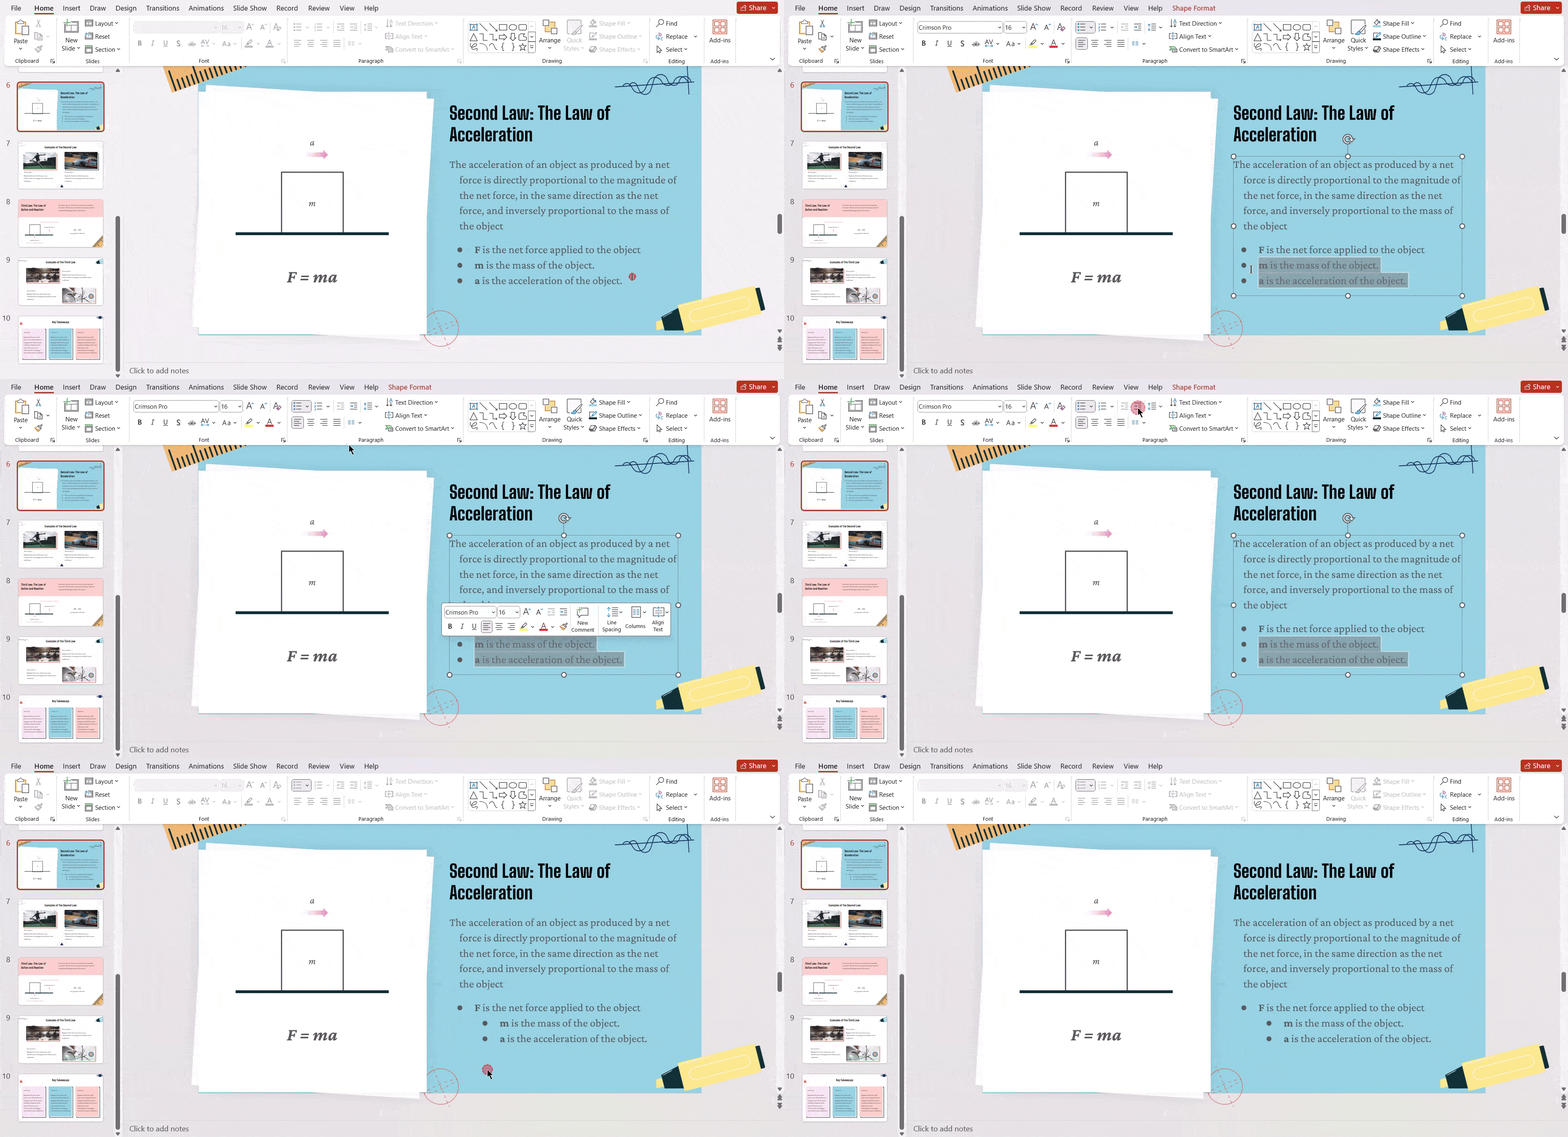
Do you want your PowerPoint to look really professional and catch people’s eyes? One trick to make it stand out is by using something called a hanging indent. This cool feature helps highlight specific points in your presentation, making them easier to read and understand for your audience. In this article, we’ll show you how to add a hanging indent to your PowerPoint slides, so your presentation can really shine.
What is a Hanging Indent?
Hanging Indent is a special way of formatting text in Microsoft PowerPoint. It’s great for making lists, like bullet points or numbered lists that look super clean and organized. Unlike normal indents where all the lines start at the same spot, with a hanging indent, the first line moves a bit to the right, while the rest stay in line with the left side of the page. This makes each item in your list stand out nicely, making it easier for your audience to read and follow along.
Benefits of Using Hanging Indent in PowerPoint
Using a hanging indent can make your presentation look super clean. But why should you bother? Let’s check out the perks!
- Readability: It helps your audience understand things better by neatly separating points. This makes it easier for them to follow along and remember what you’re saying.
- Professional Look: It shows that you pay attention to details and makes your presentation look well-organized. When your slides look polished, people take your presentation more seriously.
- Structure: It’s great for showing complex information in a clear way. Important points stand out, so your audience can focus on what matters most.
- Easy Editing: If you need to change things later on, hanging indents make it a breeze. You can tweak your slides without messing up how they look.
- Neat Lists: It stops your slides from looking too cluttered, especially when you have lots of points to cover.
- Proper References: For academic or professional presentations, hanging indents help you cite your sources correctly. This makes your presentation look more credible and follows formatting rules.
- Visual Consistency: Using hanging indents throughout your presentation gives it a nice, uniform style. It looks tidy and well put together, which makes it easier for your audience to follow along.
Making Text Stand Out with Hanging Indents in PowerPoint
Hanging indents are a formatting technique that makes your text easier to read and visually separates items in a list. Here’s how to create them in PowerPoint:
Step – 1. Highlight Your Text:
First, choose the text you want to format. This could be a bulleted or numbered list, or even a block of text you want to indent.
Step – 2. Find the Paragraph Settings:
On the PowerPoint ribbon, look for the “Home” tab. In the “Paragraph” section, you’ll see options for spacing, alignment, and indentation.
Step – 3. Dive Deeper into Paragraph Formatting (Optional):
If you only see basic options, click the small arrow in the bottom right corner of the “Paragraph” section. This opens a more detailed menu.
Step – 4. Set Up the Indent:
In the Paragraph menu (or the expanded options), find the “Indentation” area. You’ll see two controls:
- Before Text: This moves the entire paragraph to the right or left.
- Special: This lets you choose different indentation styles.
Step – 5. Create the Hanging Effect:
- Set the “Before Text” value to your desired indentation. A common choice is 0.5 inches, but adjust it as needed.
- In the “Special” dropdown menu, select “Hanging.” This indents all lines except the first one.
Step – 6. See the Change:
Click “OK” to apply the formatting. Now, the first line of your text should stay put, while the following lines will be indented by the amount you chose.

Bonus Tip:
For quick adjustments, you can use the ruler at the top of your slide (if it’s visible). Drag the indent markers to visually set the spacing.
Create presentation slides with AI in Seconds in Google Slides
10M+Installs
Works with Google Slides

How to Indent Bullet Points in PowerPoint?
There are 2 ways to Indent Bullet Points in PowerPoint:
Method 1: Using the Ribbon:
- Select the bullet points you want to indent.
- Go to the “Home” tab.
- In the “Paragraph” section, click the “Increase Indent” button (looks like an arrow pointing right) to indent, or “Decrease Indent” (left arrow) to unindent.

Method 2: Using Keyboard Shortcuts:
- Select the bullet points.
- Press “Tab” to indent or “Shift+Tab” to unindent.
Want to to know How To Do Hanging Indent On Google Slides?
Checkout 3 Easy Ways
Troubleshooting Common Issues with Hanging Indents in PowerPoint
When you are getting started with hanging indents in PowerPoint, there are high chances that you may run into some issues. Take a look at the steps below to see how you can troubleshoot them:
1. Uneven Indentation:
Cause: This could be due to inconsistent paragraph settings within your list of items.
Fix:
- Select all list items with the hanging indent issue.
- Go to the Home tab and expand the Paragraph menu (arrow in the bottom corner).
- Under Indentation, ensure Special is set to Hanging.
- If the indent amount is incorrect, adjust the Before text value to achieve a uniform indent.
2. Missing Hanging Indent:
Cause: The text might not be formatted with a hanging indent, even though it’s selected.
Fix:
- Double-check the Paragraph menu under Home and ensure Special is set to Hanging.
3. Conflicting Formatting:
Cause: Existing bullet points or other formatting might interfere with the hanging indent.
Fix:
- Remove any existing bullet points or unwanted formatting from the text before applying the hanging indent.
- To remove bullets, highlight the list and press Ctrl+Shift+S (Windows) or Command+Shift+S (Mac) to open the Style pane. Choose Clear under Bullet Points.
4. Indent Too Large or Small:
Cause: The default indent value might be better for your needs.
Fix:
- In the Paragraph menu under Indentation, adjust the Before text value to achieve the desired indent size. A higher value creates a larger indent for the subsequent lines.
5. Hanging Indent Not Applied to All Lines:
Cause: This might be due to a combination of hanging indent and other formatting applied within the text.
Fix:
- Consider using the Find and Replace function to locate and remove any unwanted formatting within the list items.
- Alternatively, retype the entire list with the hanging indent applied from the beginning.
Create presentation slides with AI in Seconds in Google Slides
- No design skills required
- 3 presentations/month free
- Don’t need to learn a new software
Works with Google Slides

Closing Thoughts
Incorporating hanging indents into your PowerPoint presentations offers a powerful way to enhance both readability and professionalism. By following the steps outlined in this guide, you can effortlessly create clear and well-organized slides that will grab your audience’s attention and leave a lasting impression. So, next time you’re crafting a presentation, don’t underestimate the impact of a well-placed hanging indent!
Frequently Asked Questions
Are there other ways to create a hanging indent in PowerPoint?
Yes, there are other ways! Just right-click on the text you want to change and pick ‘Paragraph’. Then, a box will pop up. Click on the dropdown menu called ‘Special’ and choose ‘Hanging’.
Can I remove a hanging indent from PowerPoint?
Absolutely! Just select the text, go to the ‘Home’ tab at the top, and find the ‘Paragraph’ group. Click on it and choose ‘None’. That’ll take away the hanging indent from your text.
What are the limitations of using a hanging indent?
Using a hanging indent a lot can make the text look messy, especially if it’s a long paragraph. Sometimes, the indent might not even show up well if the paragraph is too long. So, it’s best to use the indent sparingly and make sure the text is easy to read.
What other formatting options are available in PowerPoint?
PowerPoint has more than just hanging indents! You can change the line spacing, font size, and color. Plus, you can adjust how the text lines up, add bullets or numbers, and even put borders or shading around it. Lots of cool stuff to make your slides look just right!
Why Is My Hanging Indent in Powerpoint Not Working?
Sometimes, copied text might have formatting that interferes with the hanging indent. Try creating a new slide, pasting your text, and clearing any formatting before applying the hanging indent.
How to Add Hanging Indent in PowerPoint Mac?
PowerPoint Mac lacks a dedicated hanging indent feature. Here’s a workaround:
- Select text.
- Go to the “Home” tab > Paragraph (expand options).
- Set the “Before text” indent (e.g., 0.5″) and choose the “Left” text body.
- (Optional) Adjust the “Before paragraph” line spacing for better separation.
- Click “OK” to apply.
How to do Hanging Indent in PowerPoint Table?
PowerPoint doesn’t directly support applying hanging indents within table cells. However, you can achieve a similar effect using a workaround:
- Type your text outside the table: Create a text box with your content and apply the hanging indent there.
- Resize and position the text box: Resize the text box to fit within the table cell and position it accurately.
Can I Use a Keyboard Shortcut for a Hanging Indent?
Yes! Press Ctrl+Shift+T to open the Paragraph dialog box with the “Indentation” tab selected. Choose “Hanging” from the “Special” menu and adjust values as needed.

